Sweet and Smokey Chipotle Roasted Chicken 

Comment

Sweet and Smokey Chipotle Roasted Chicken 

IMG_2037.JPG

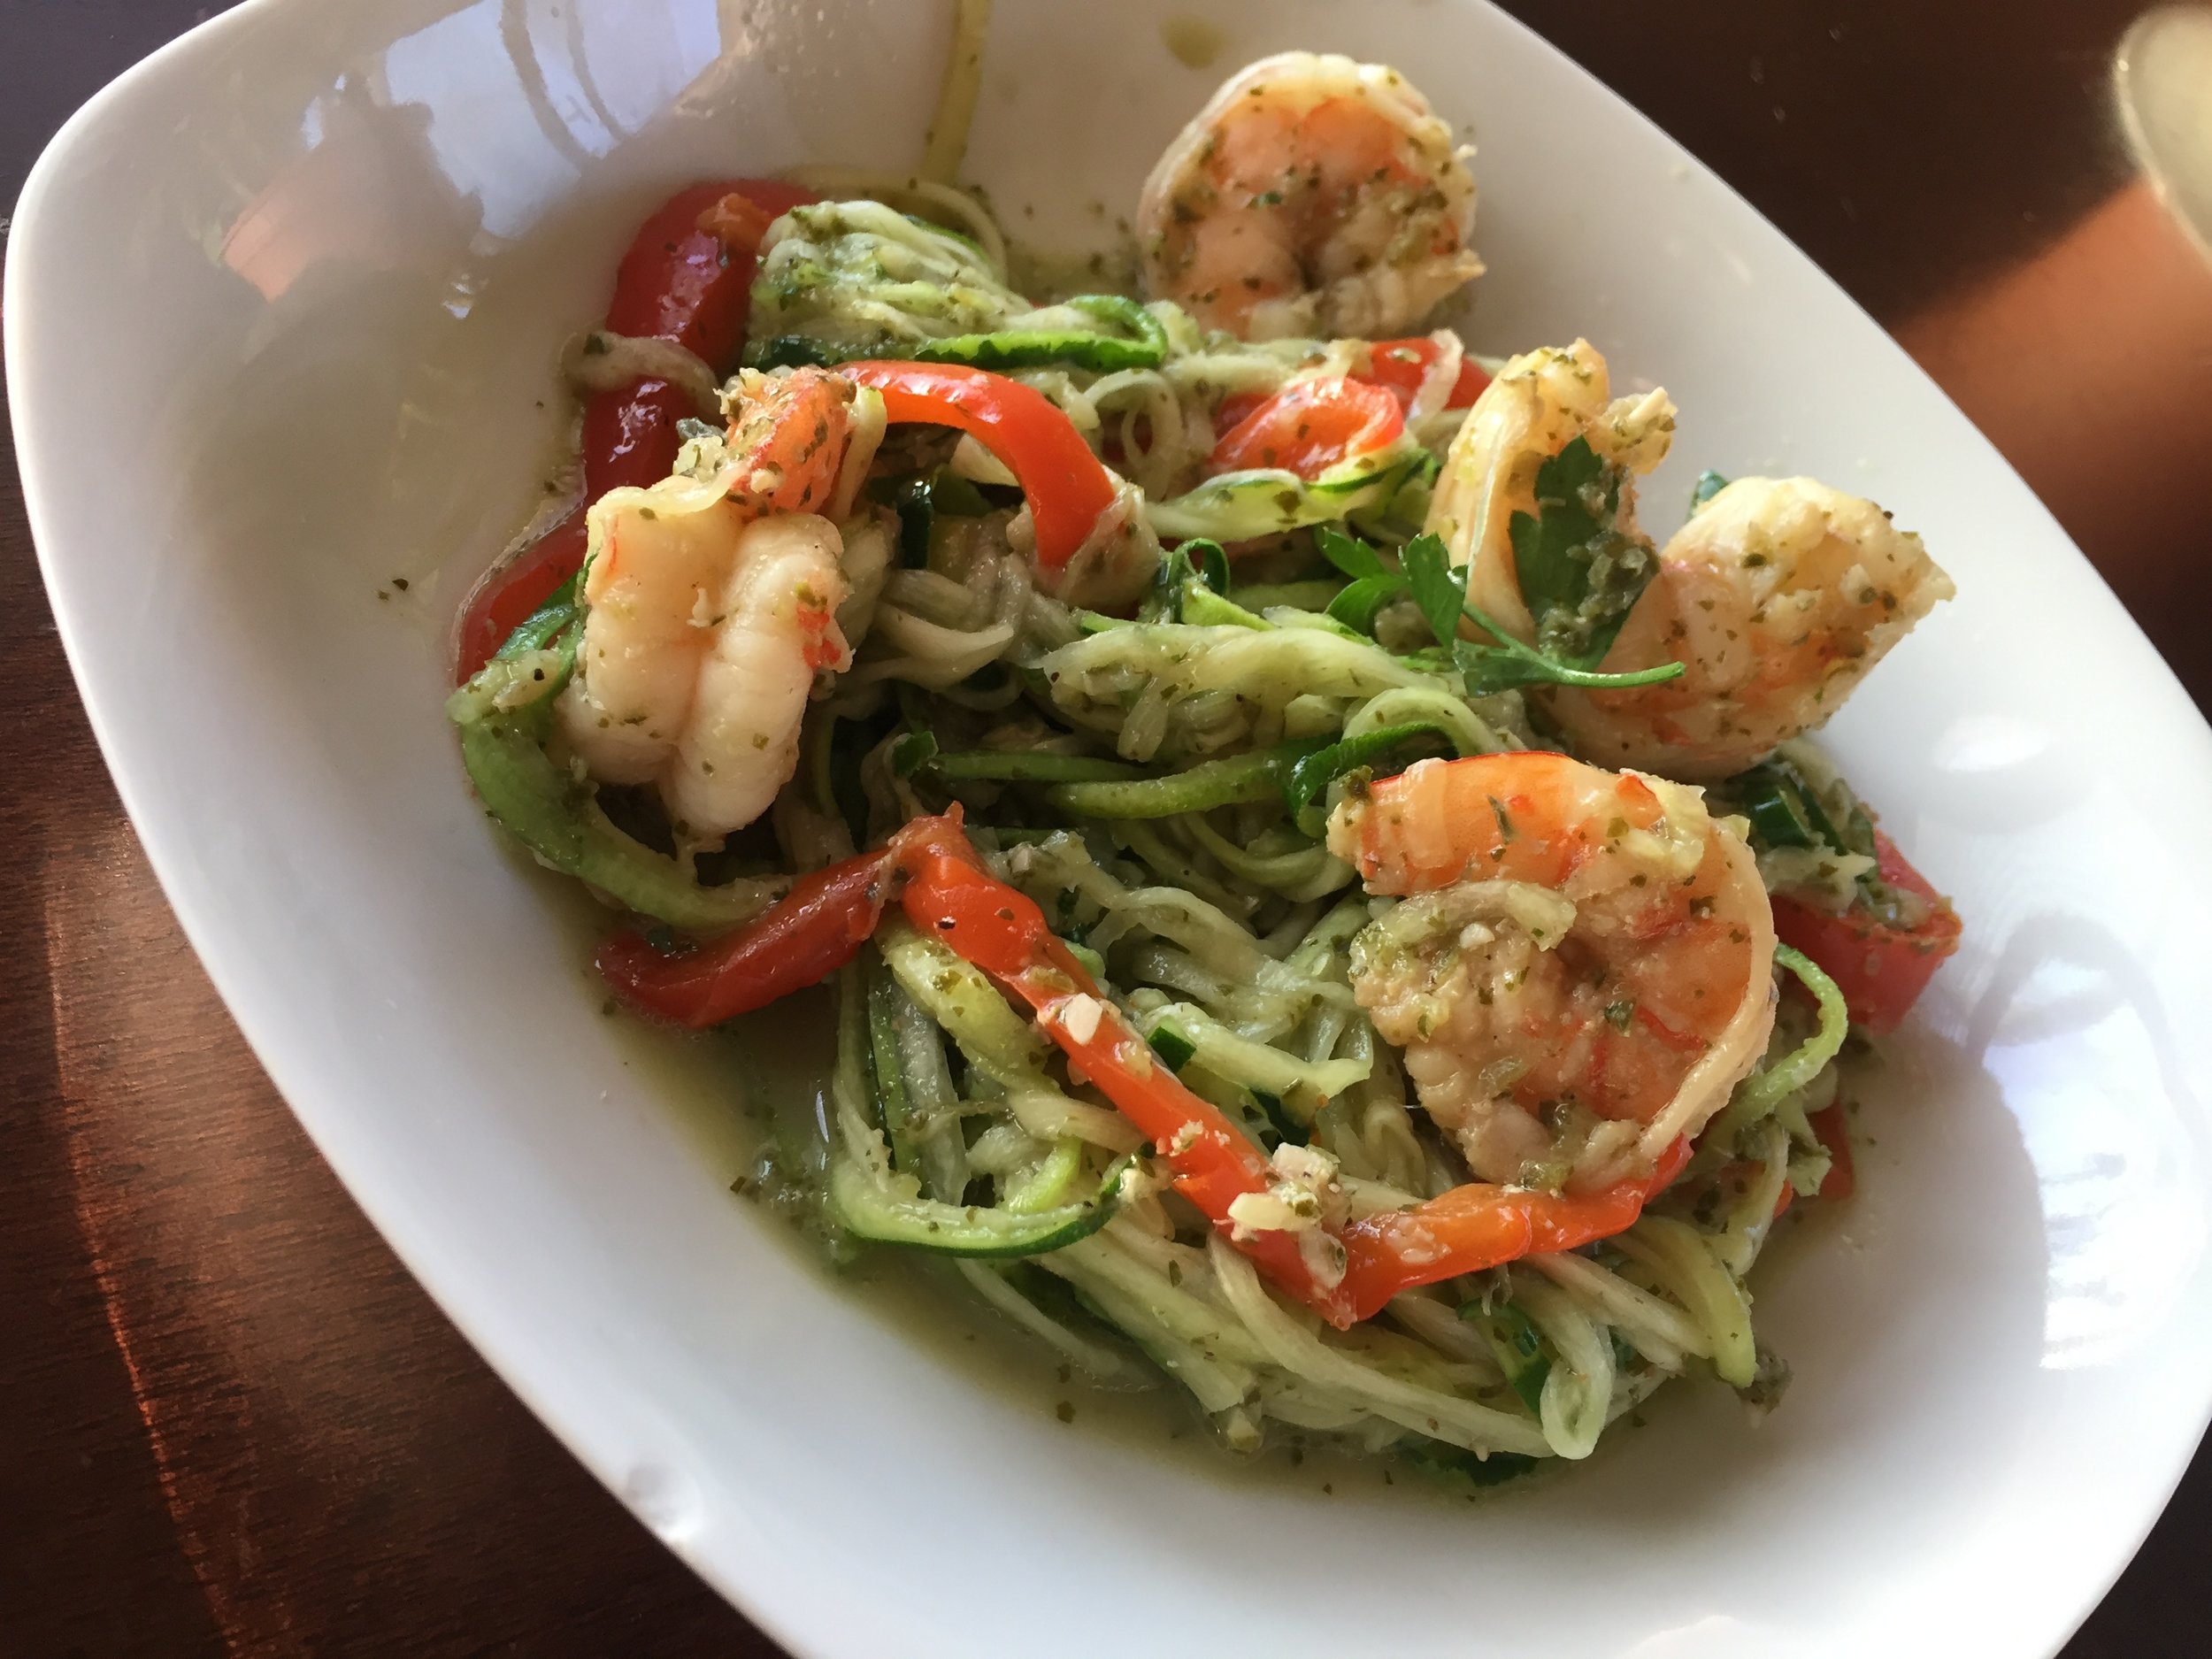
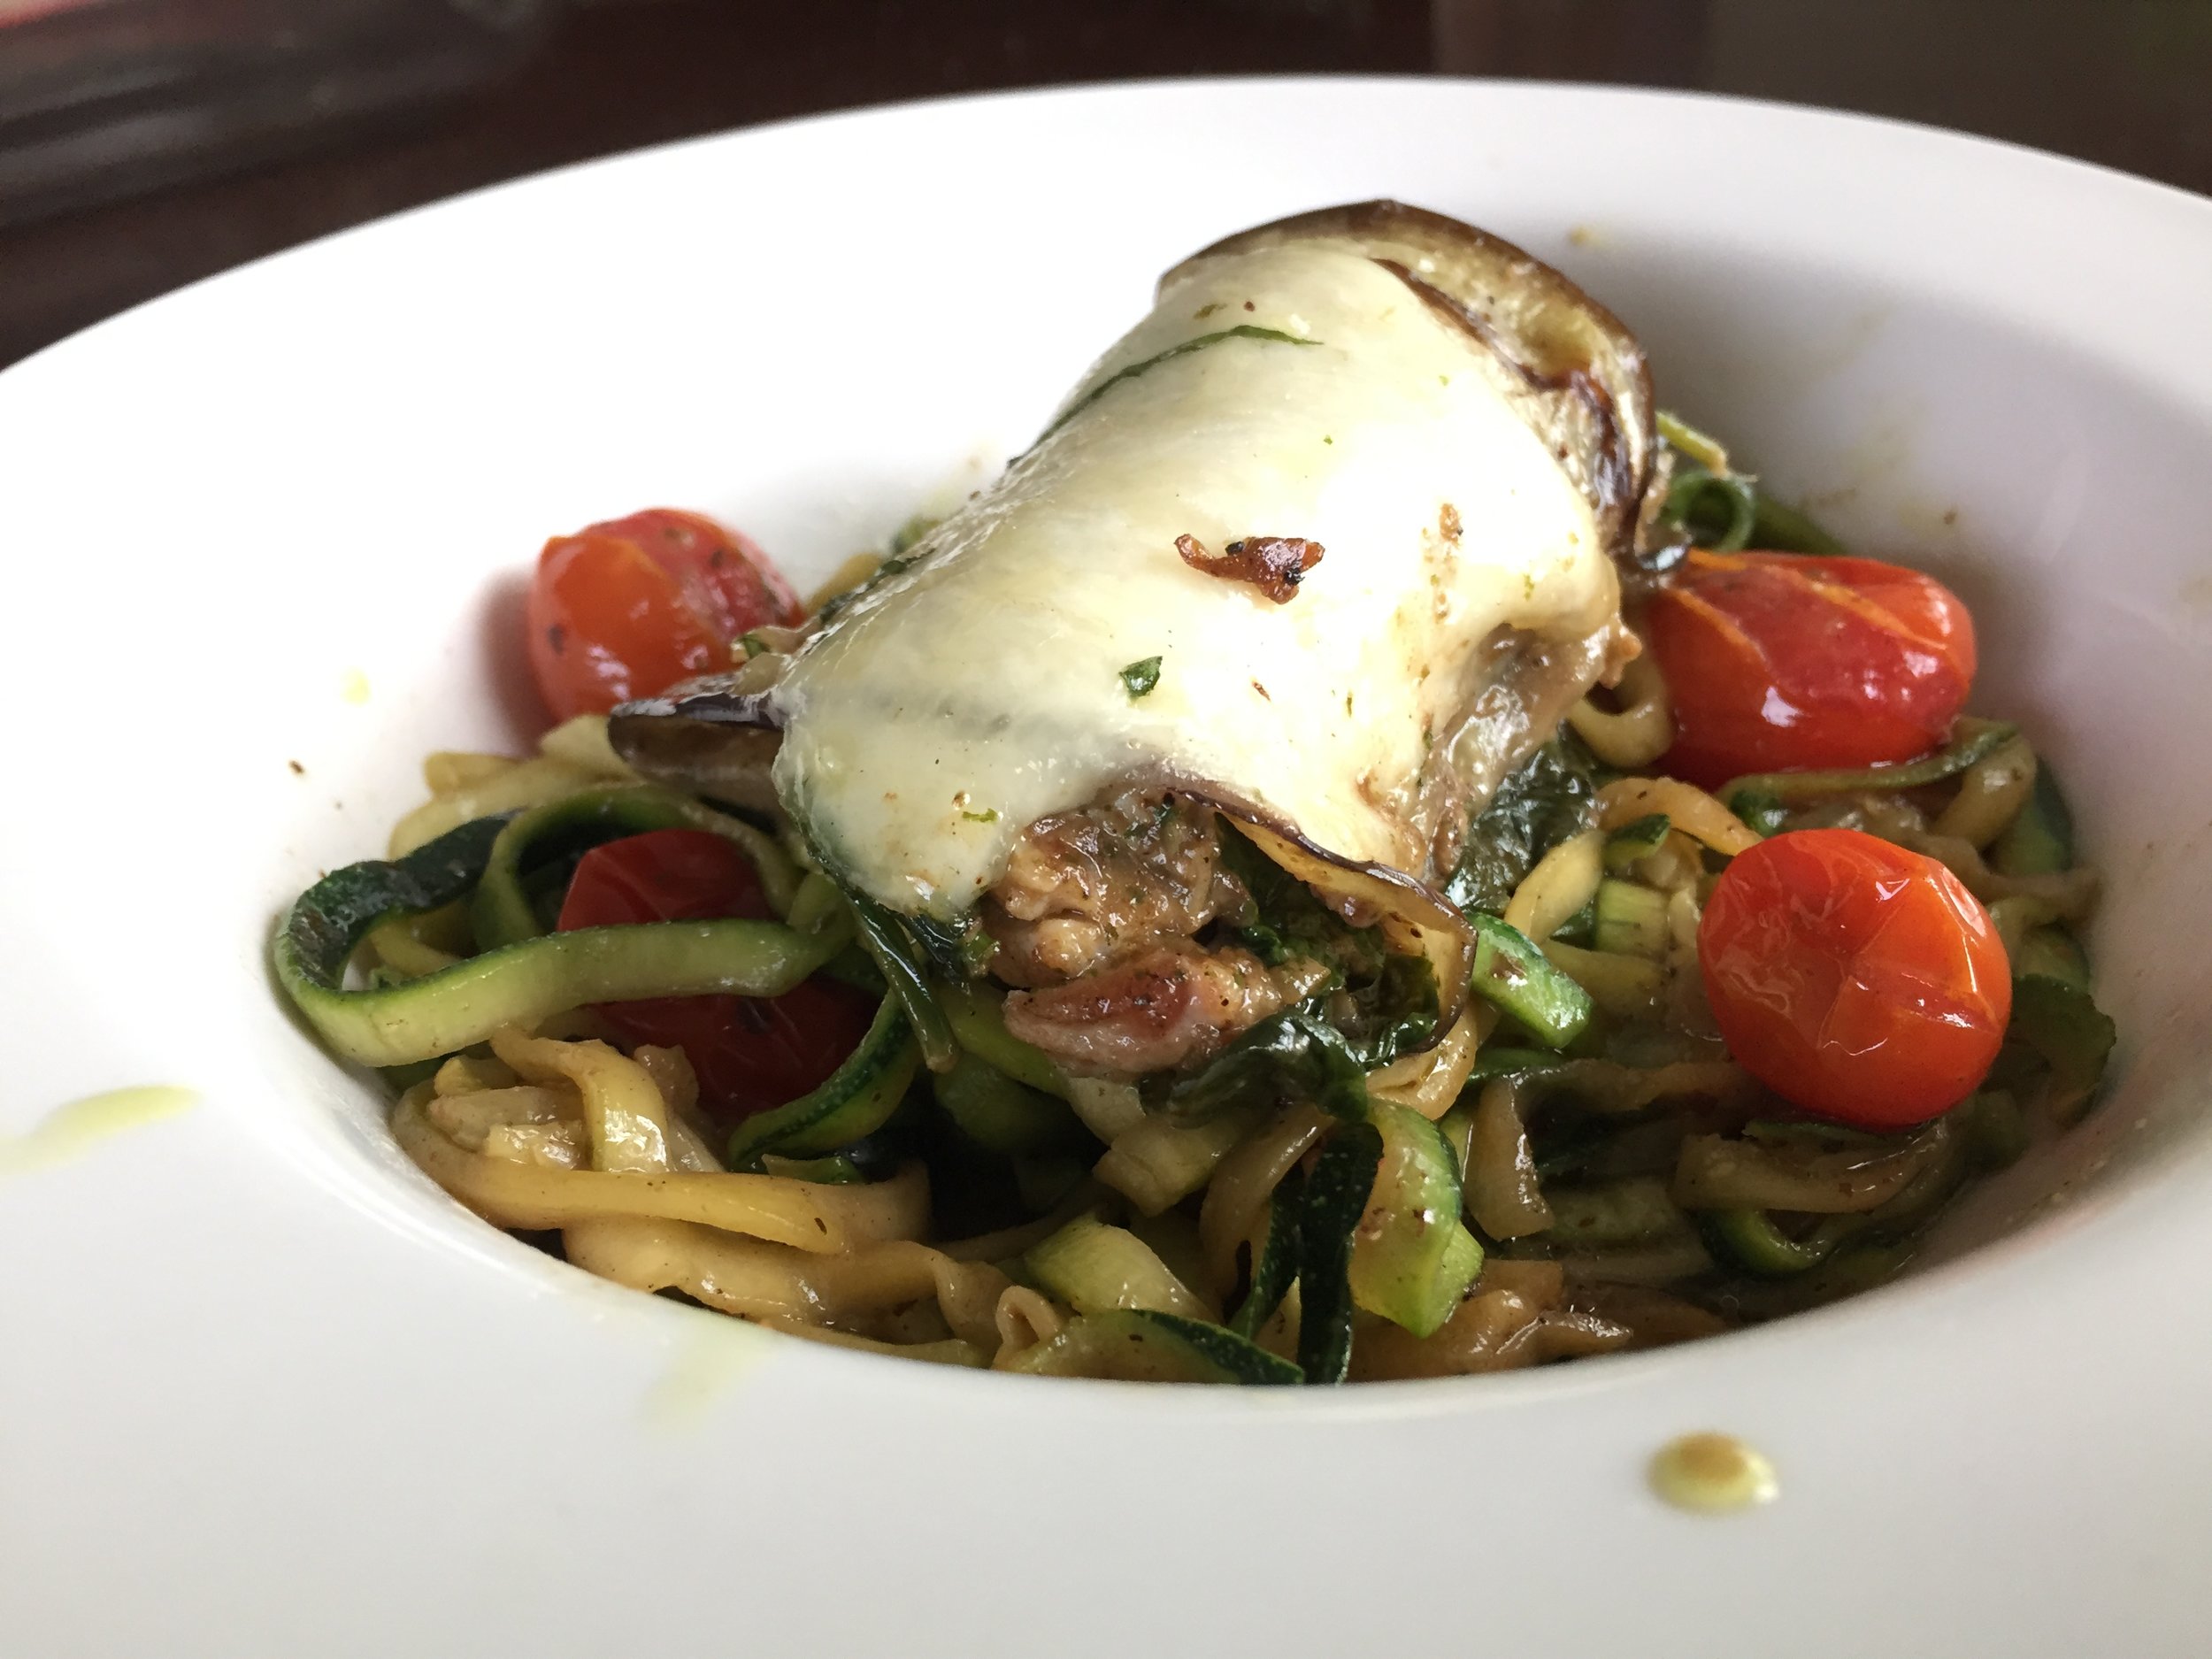
The last 2 months have been quite busy for me... I turned 30, partied like I was 21, climbed a mountain, got a new roommate and started an amazing new job. A lot has changed, but the focus on my health has not and I've got quite a few new recipes to catch you guys up on... 

So, what is the first thing I cooked after returning back from my backpacking trip? A big old chicken of course!

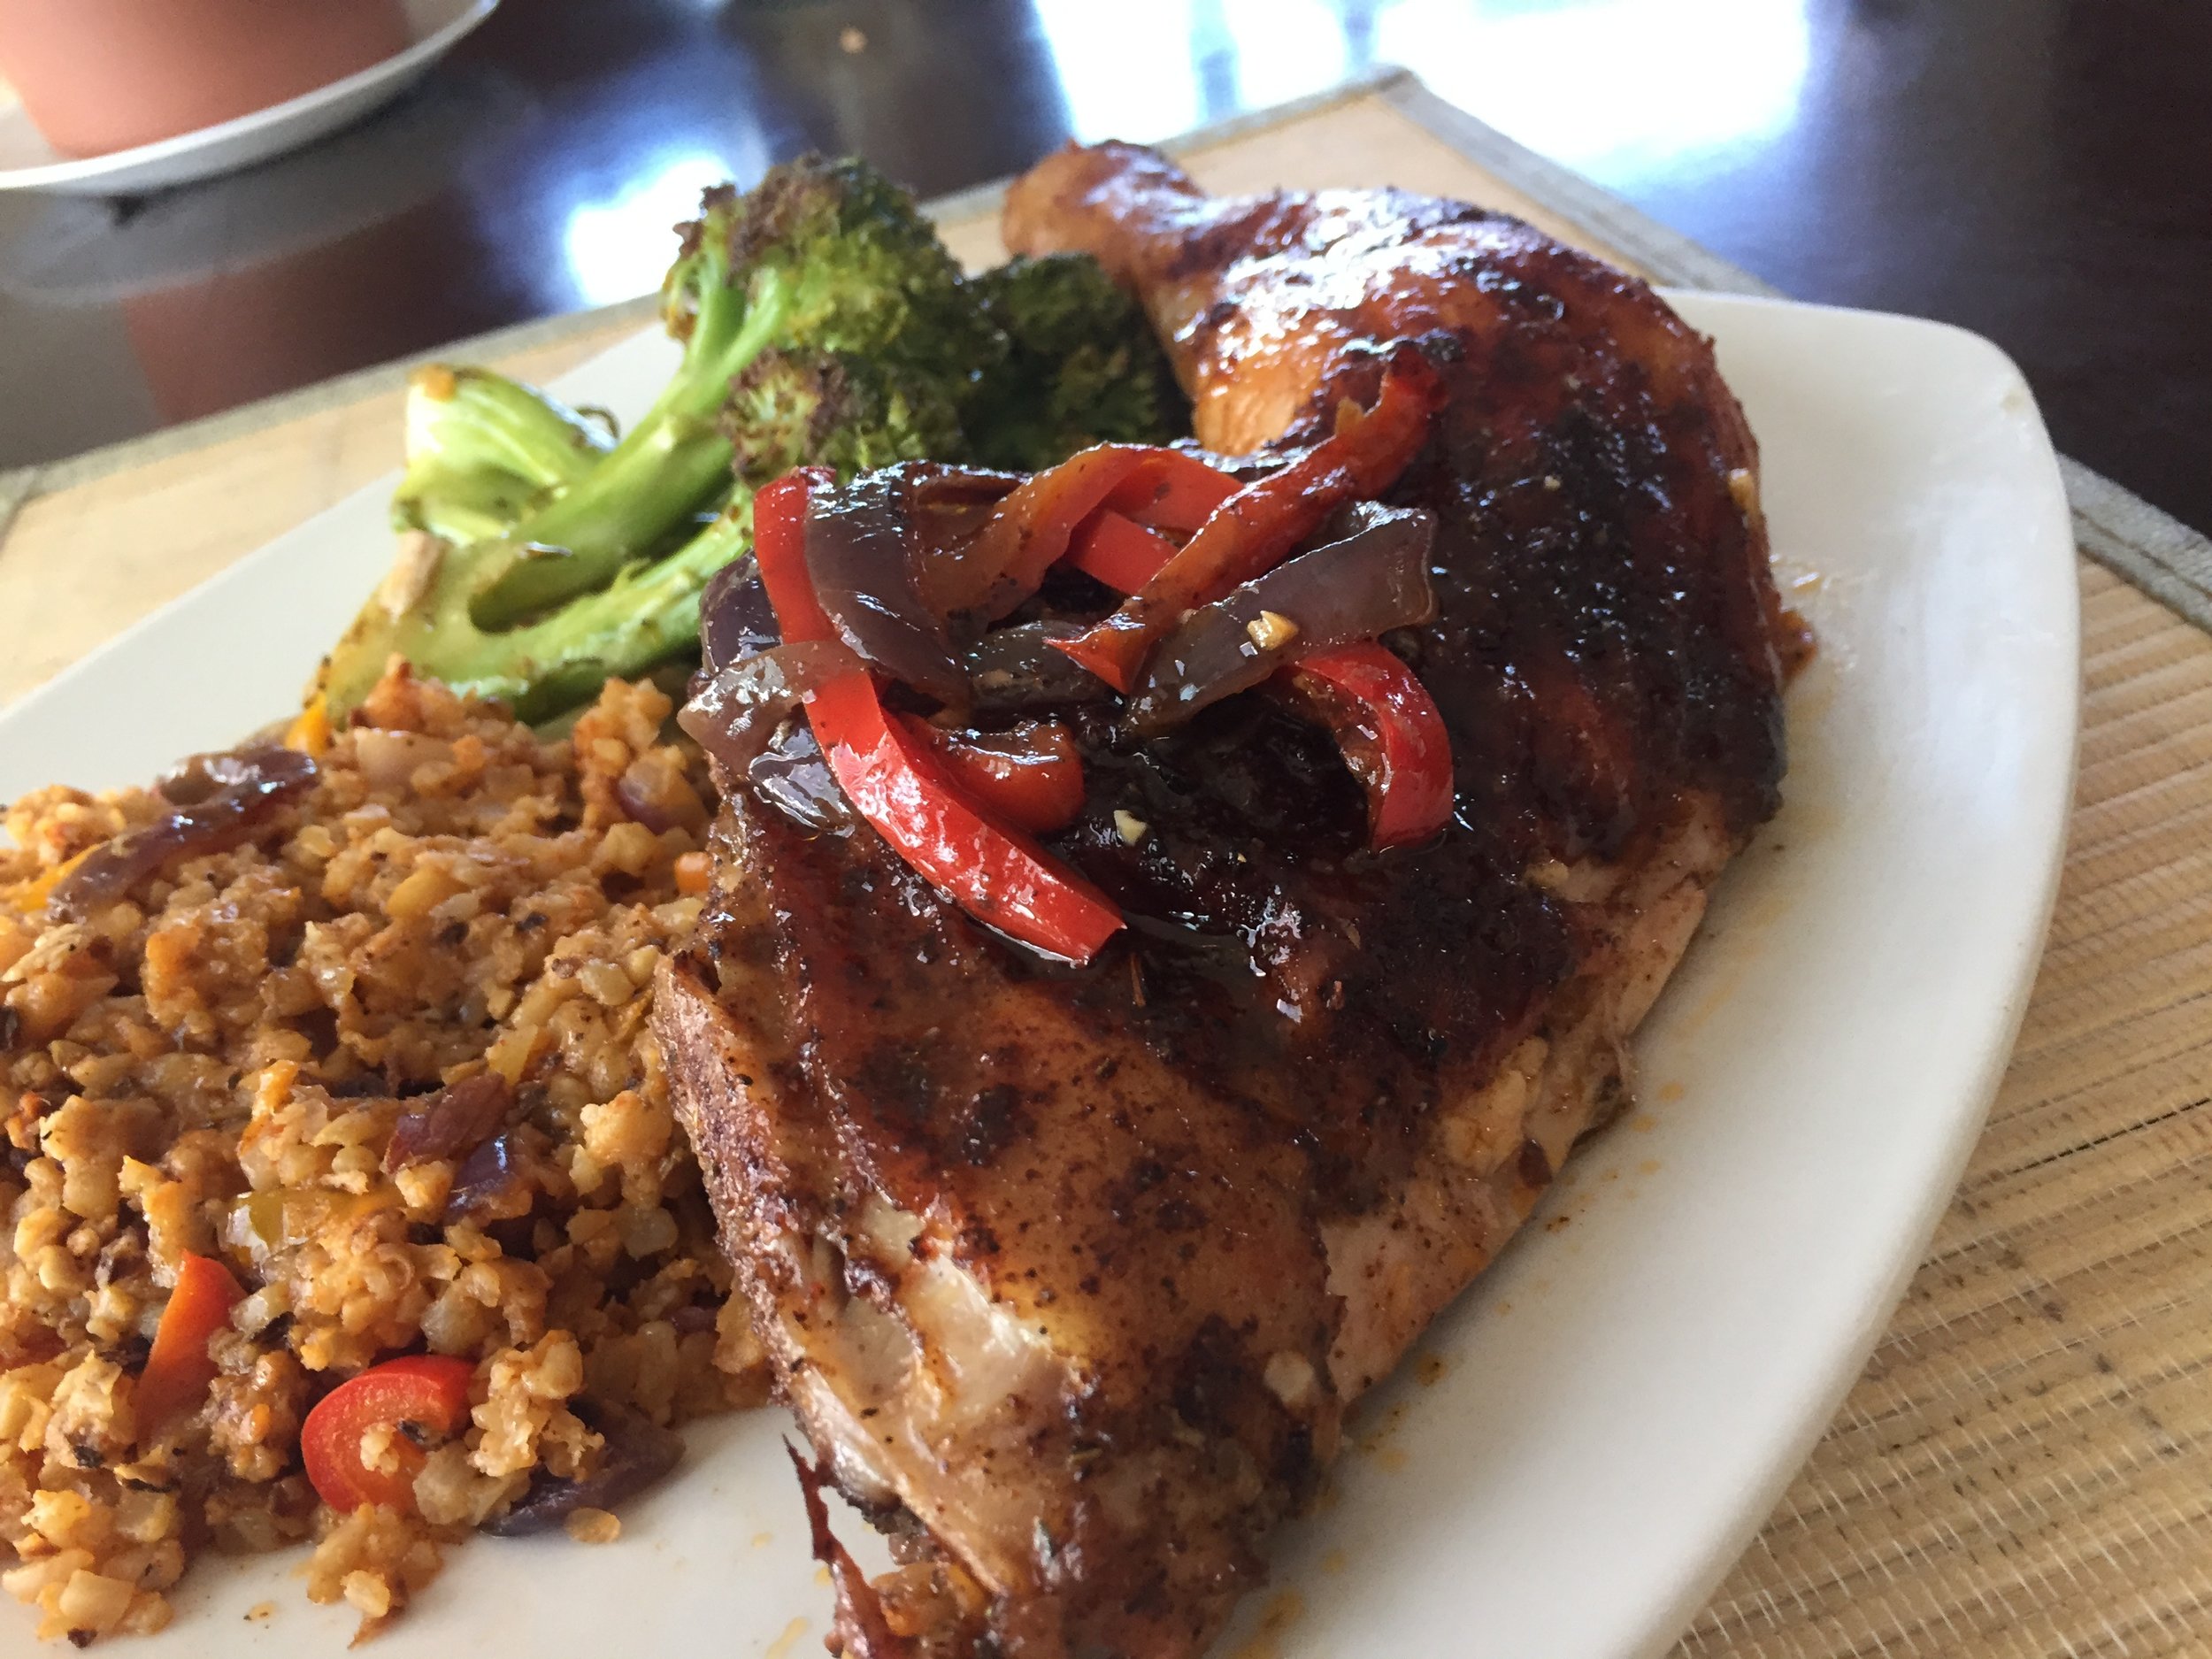
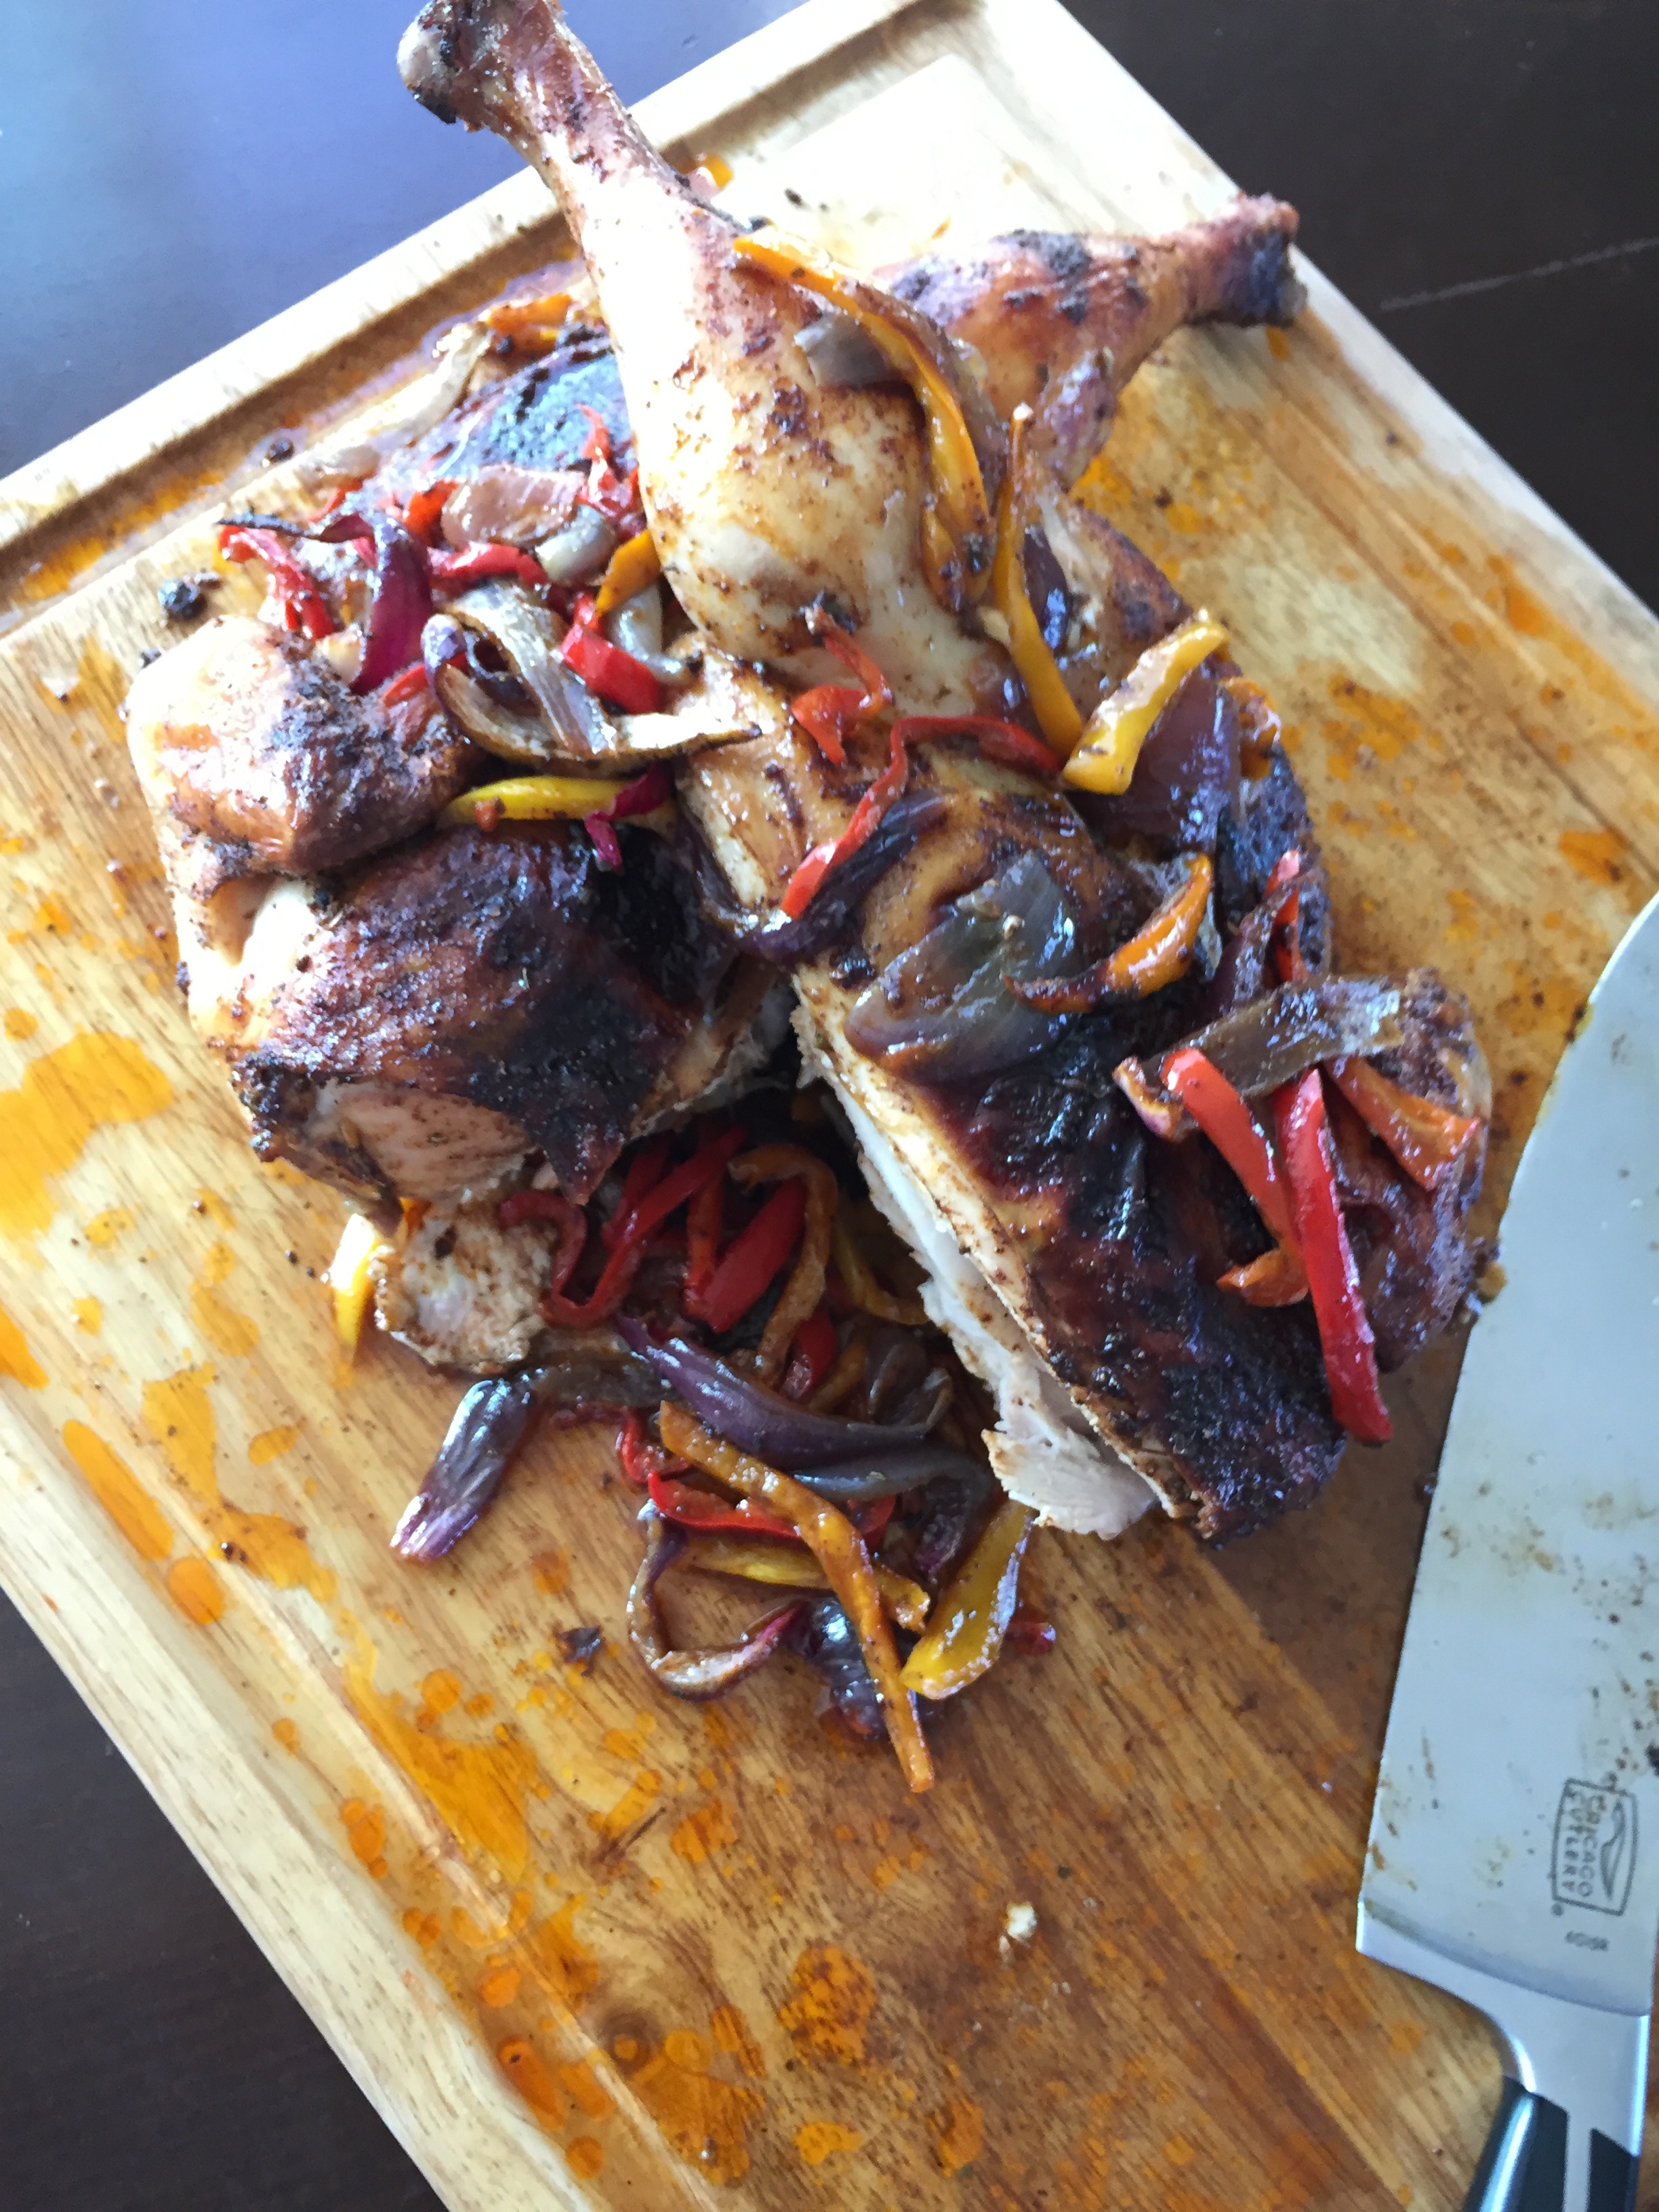
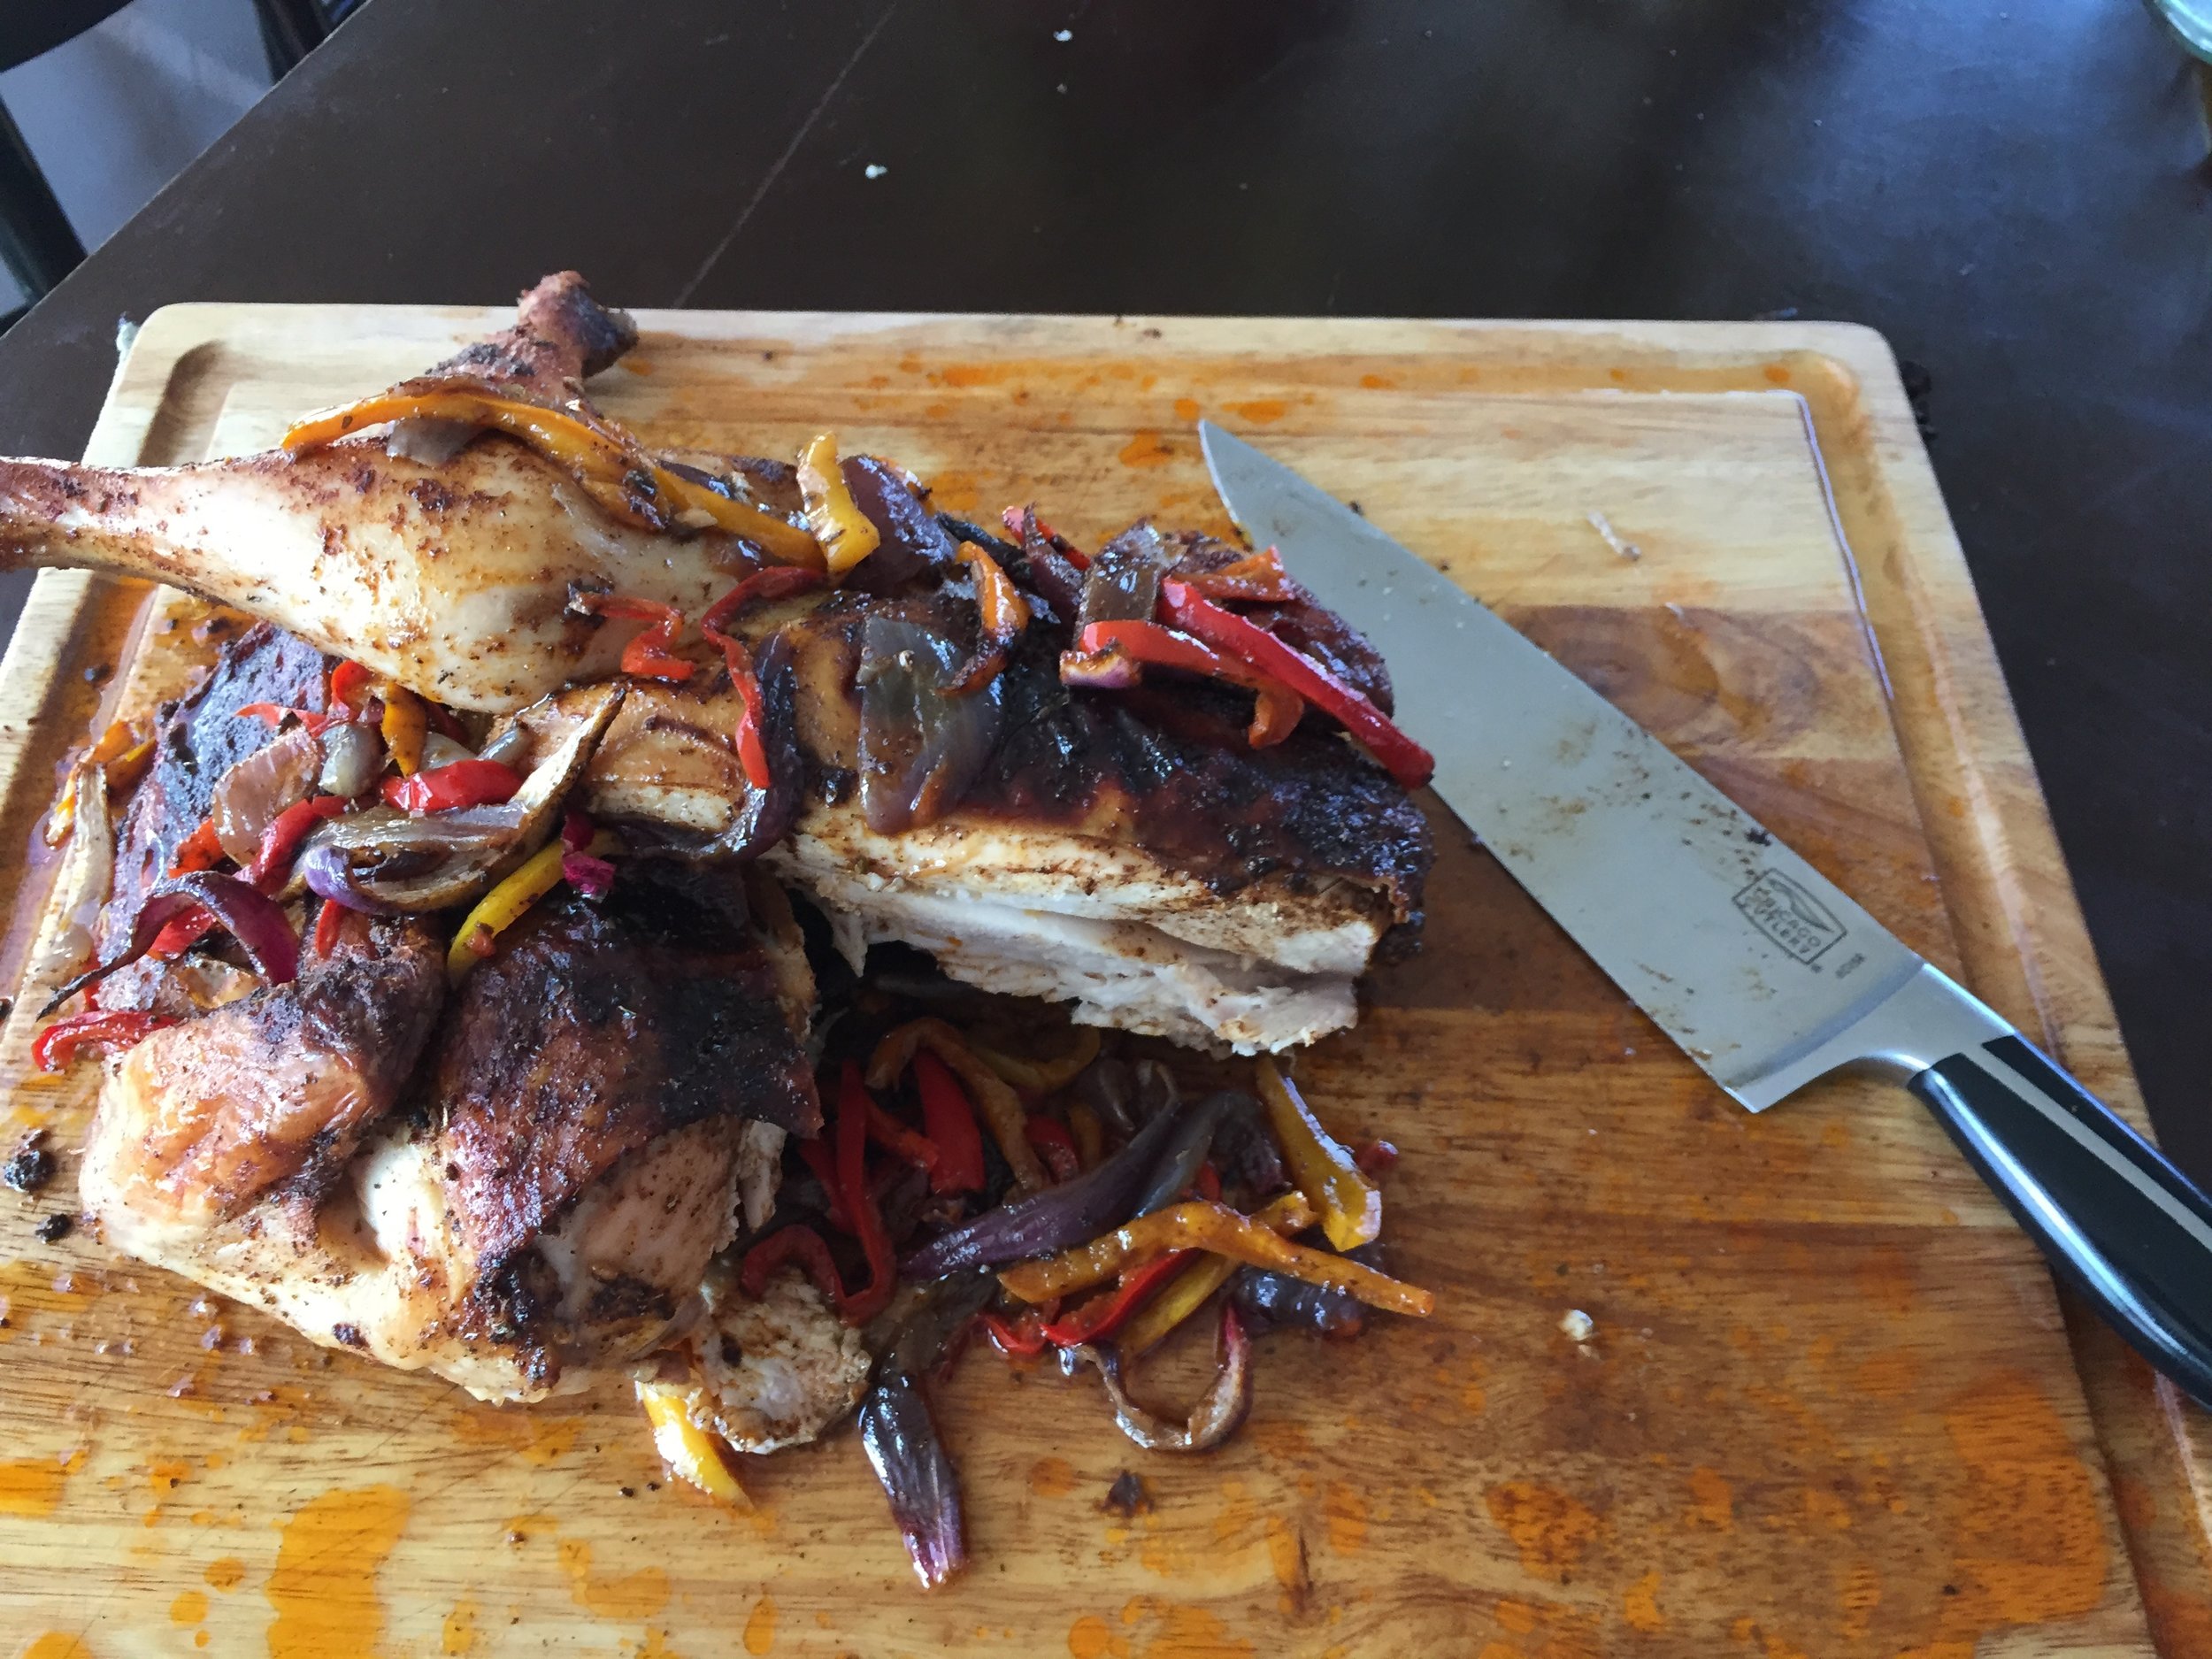
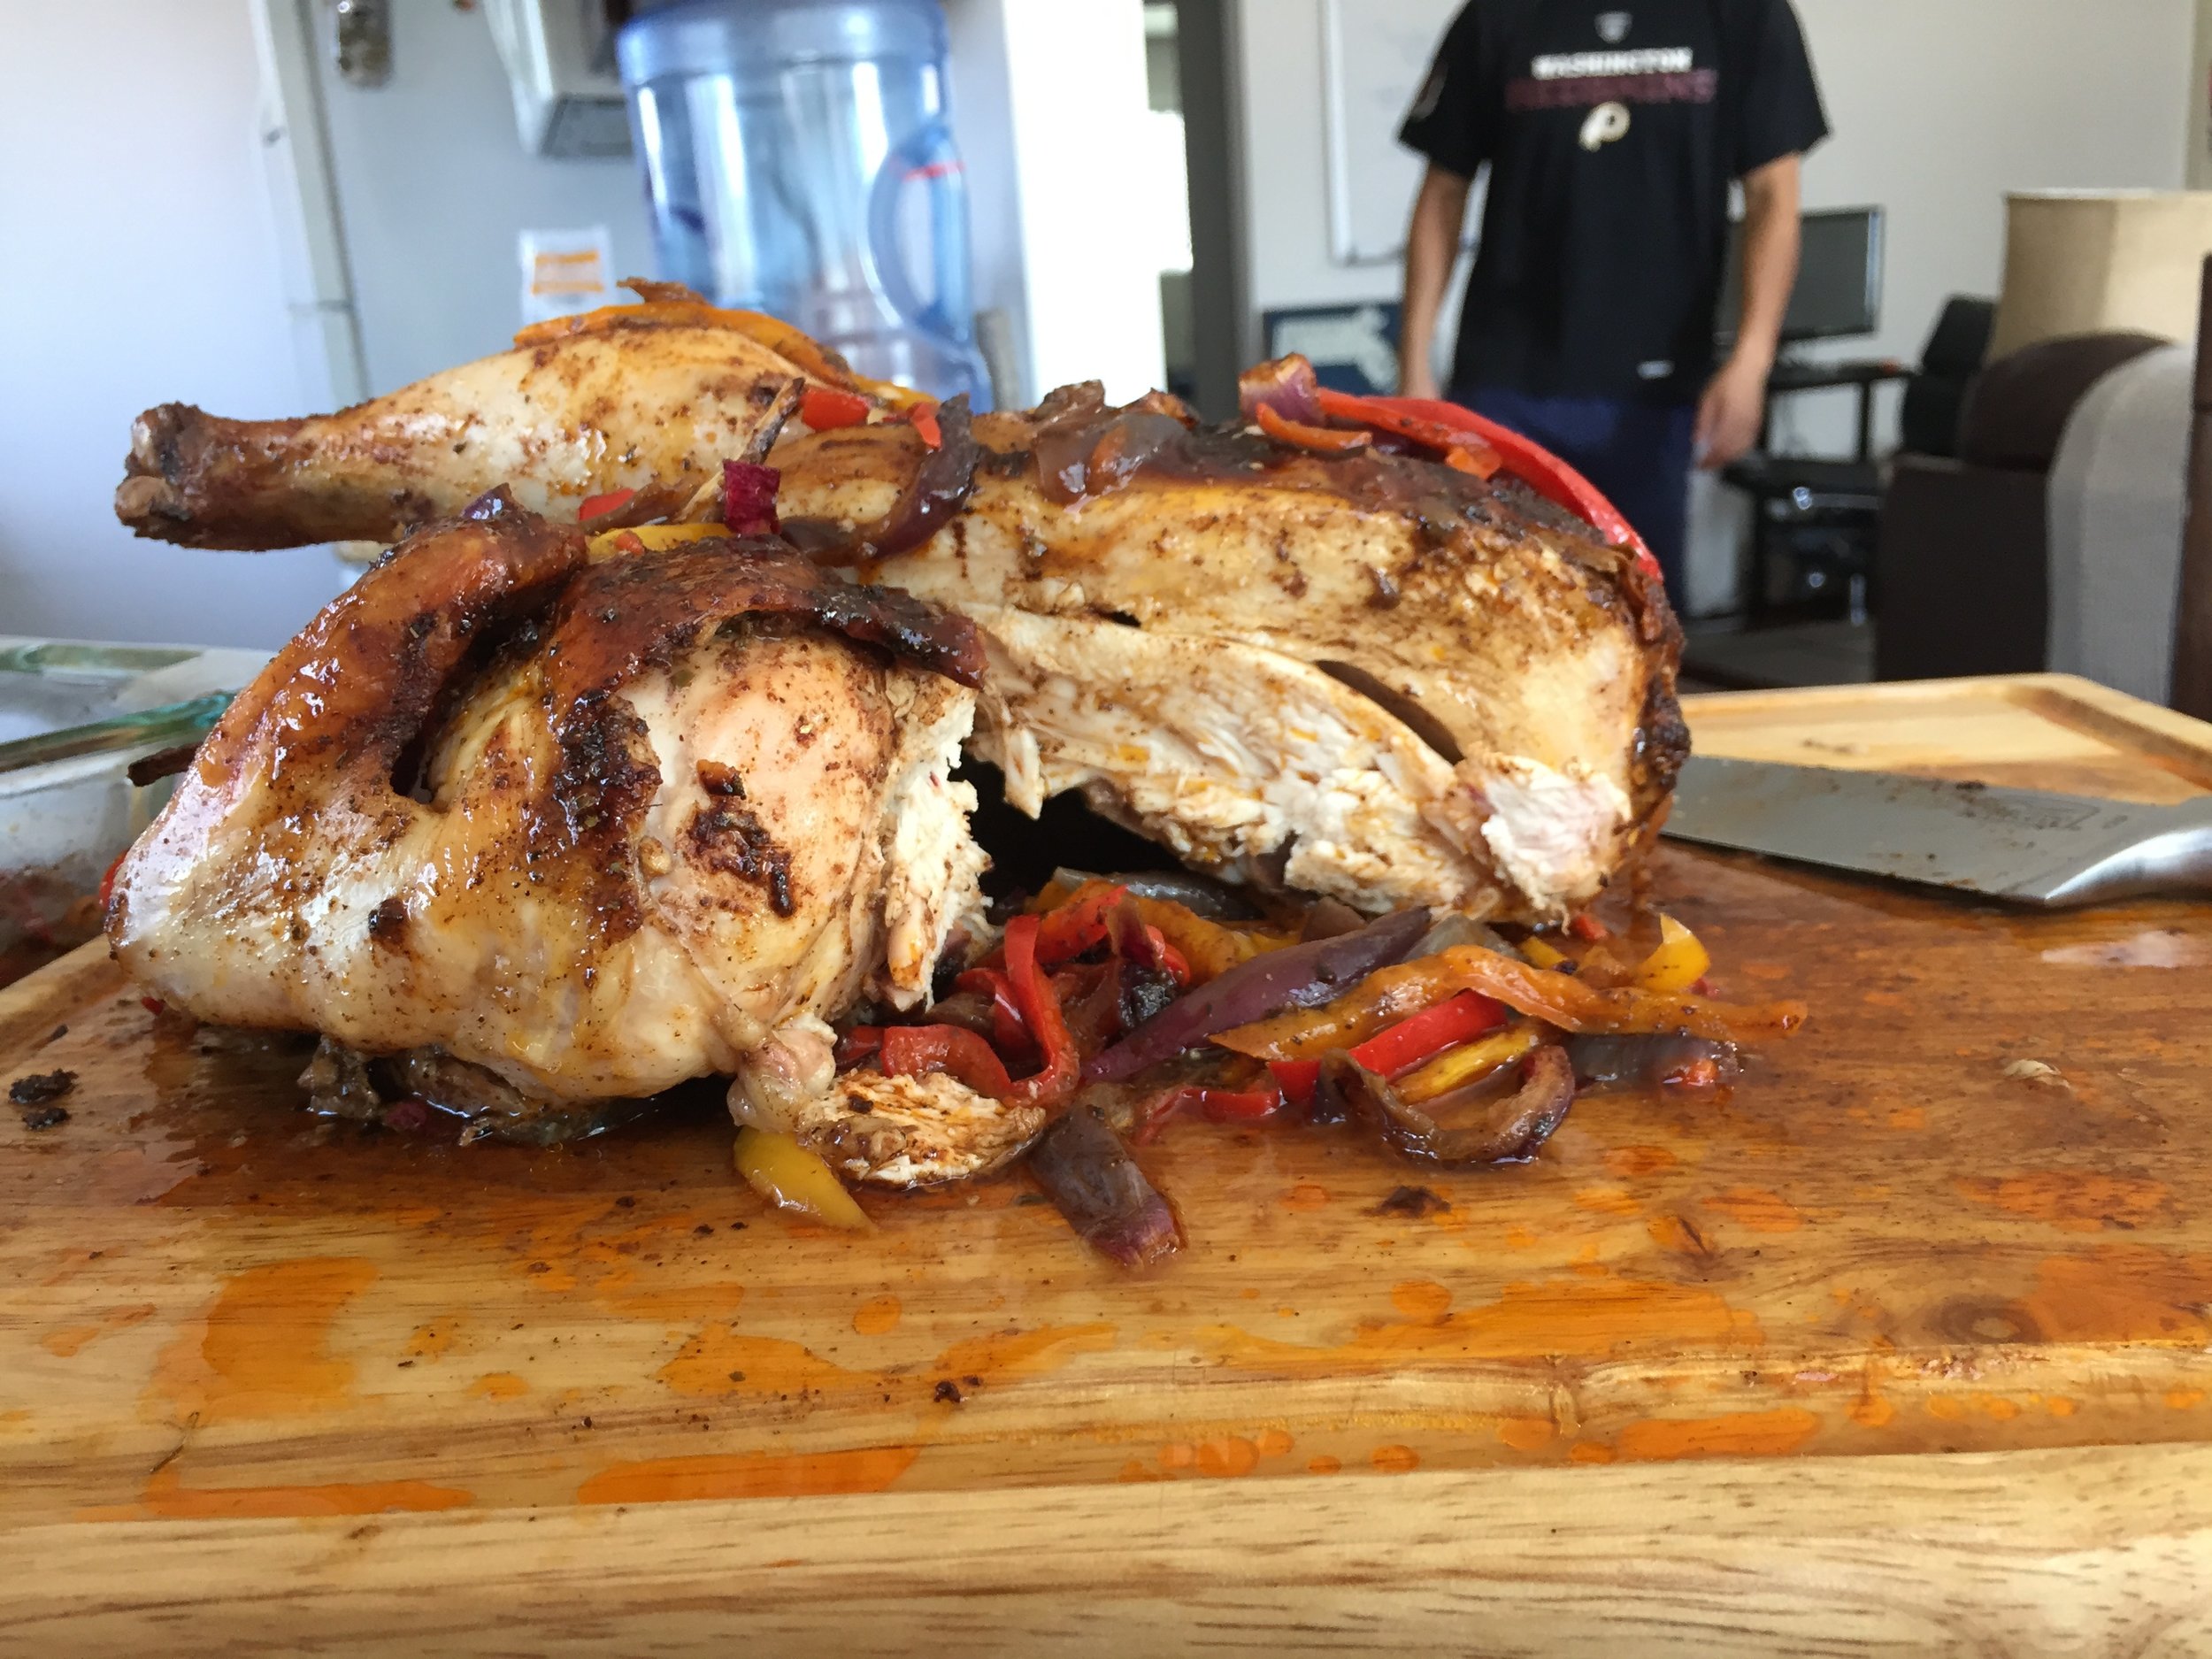
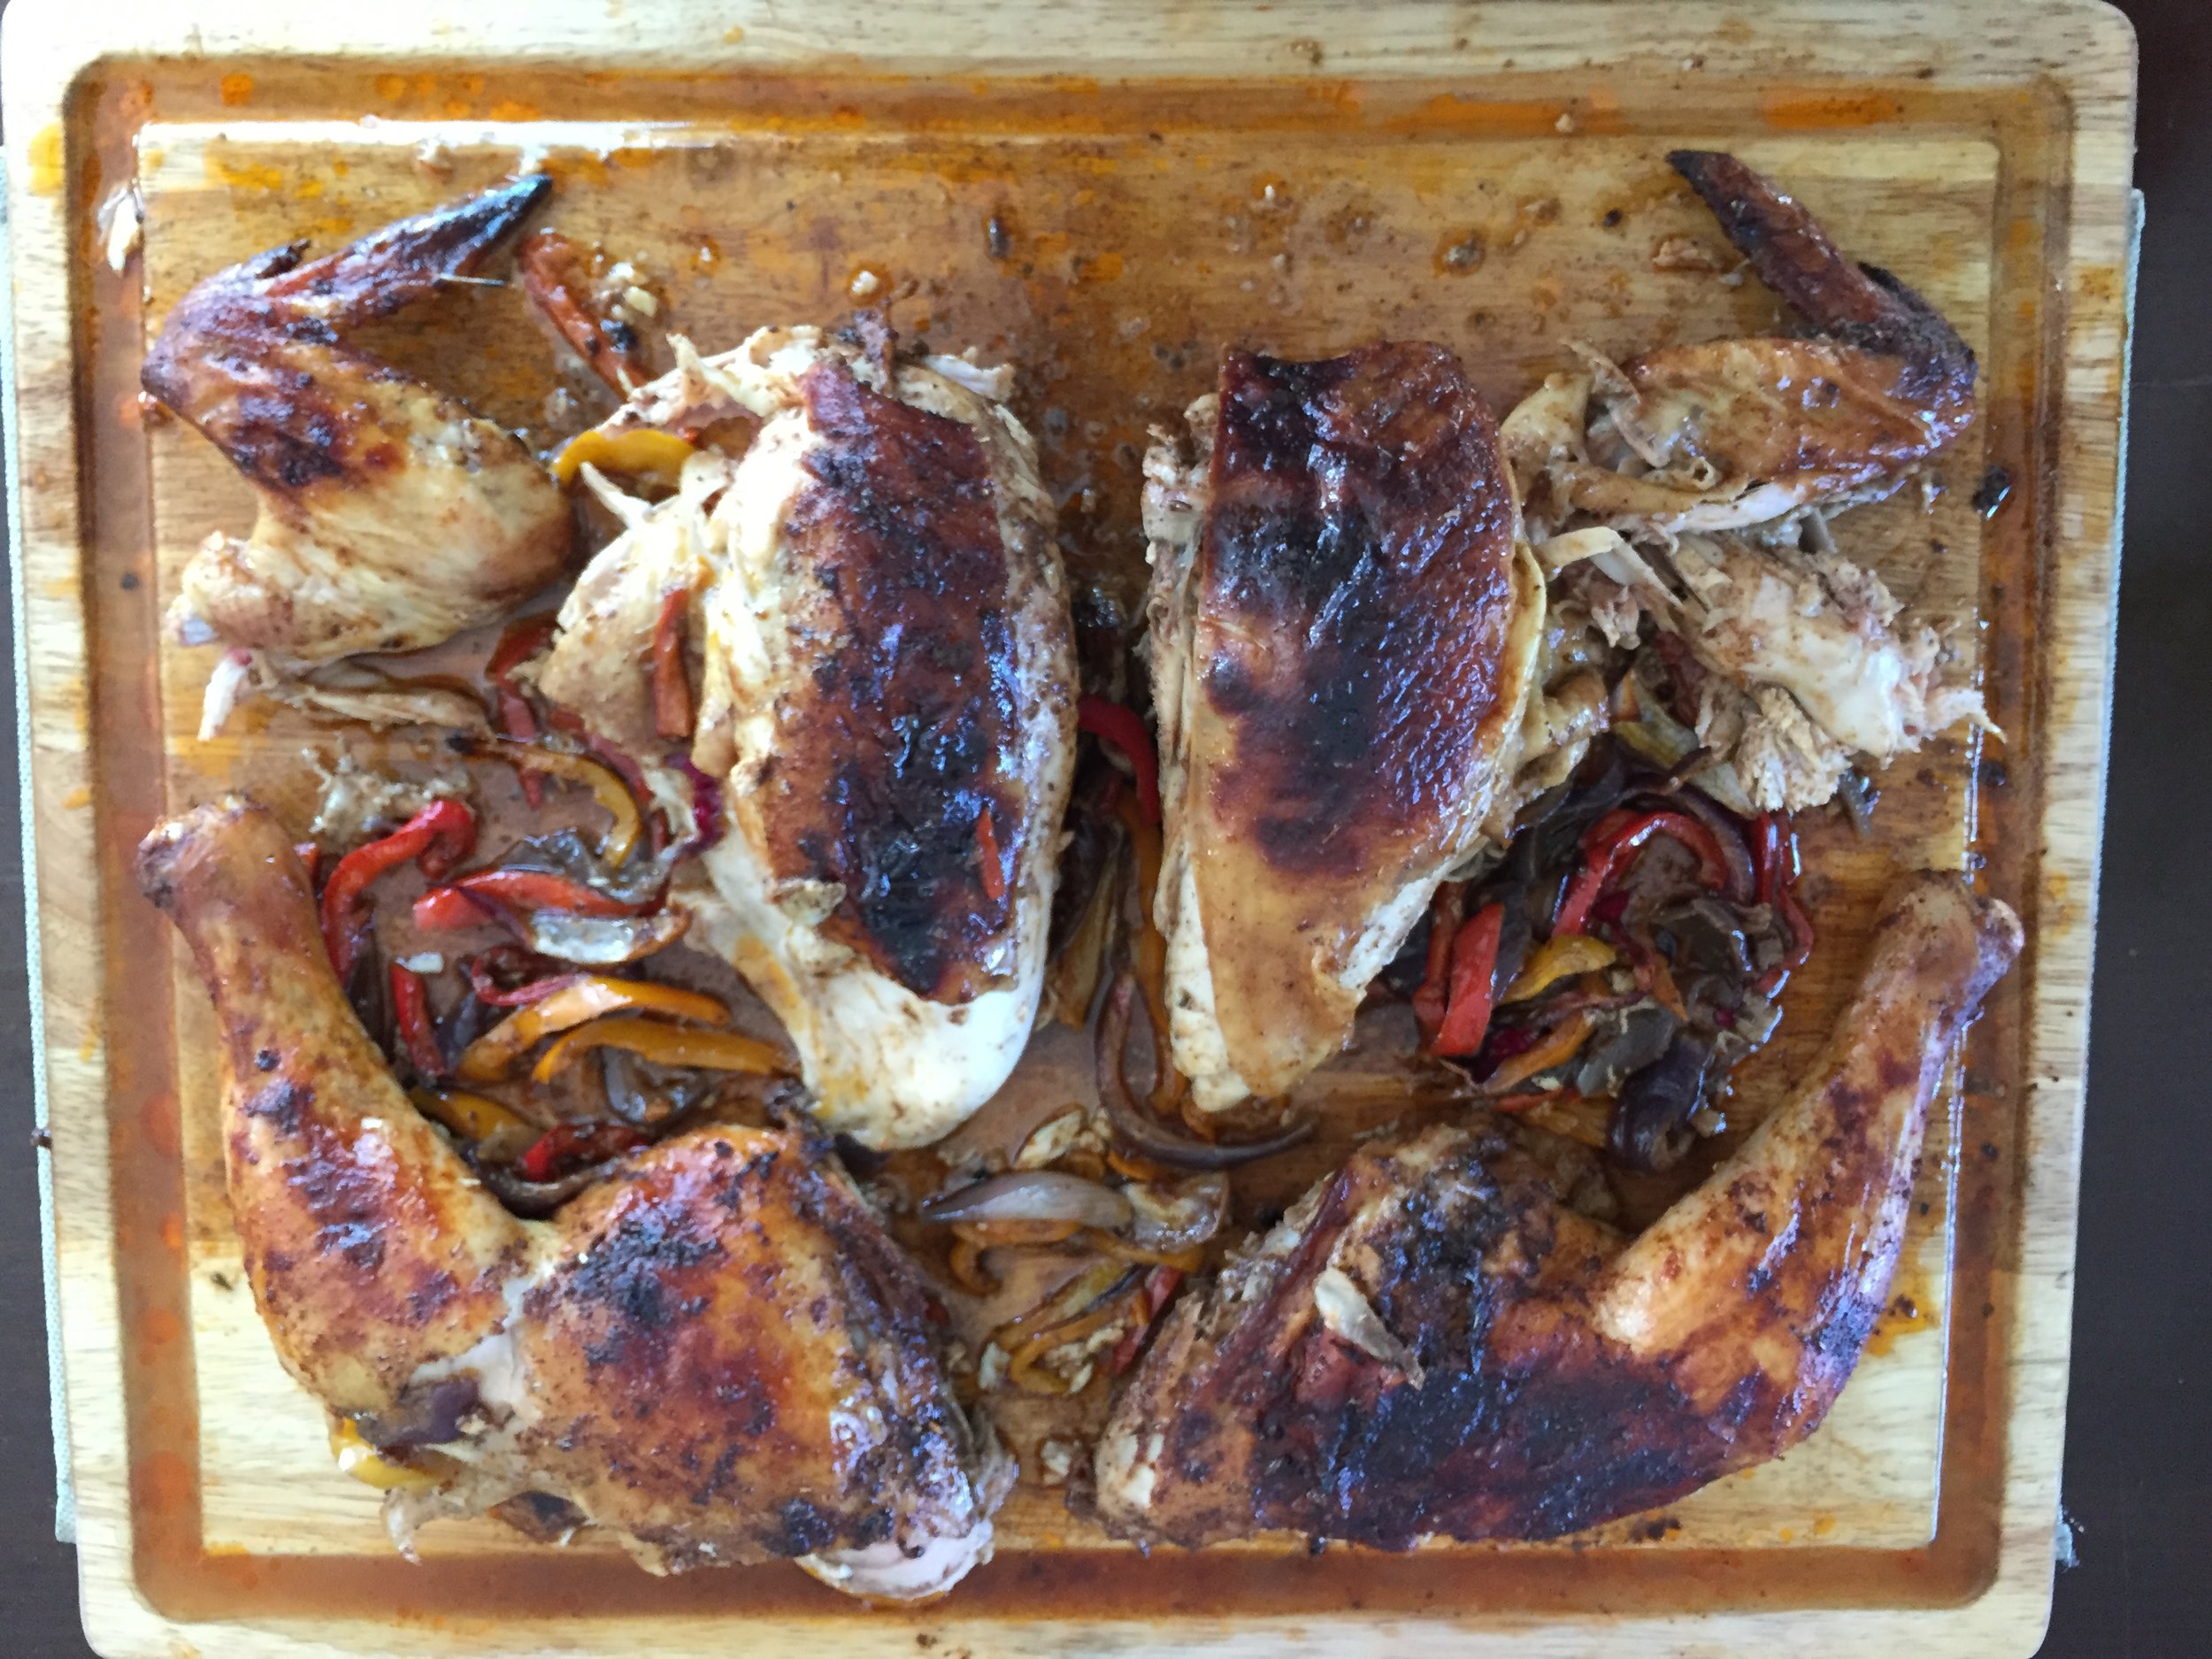
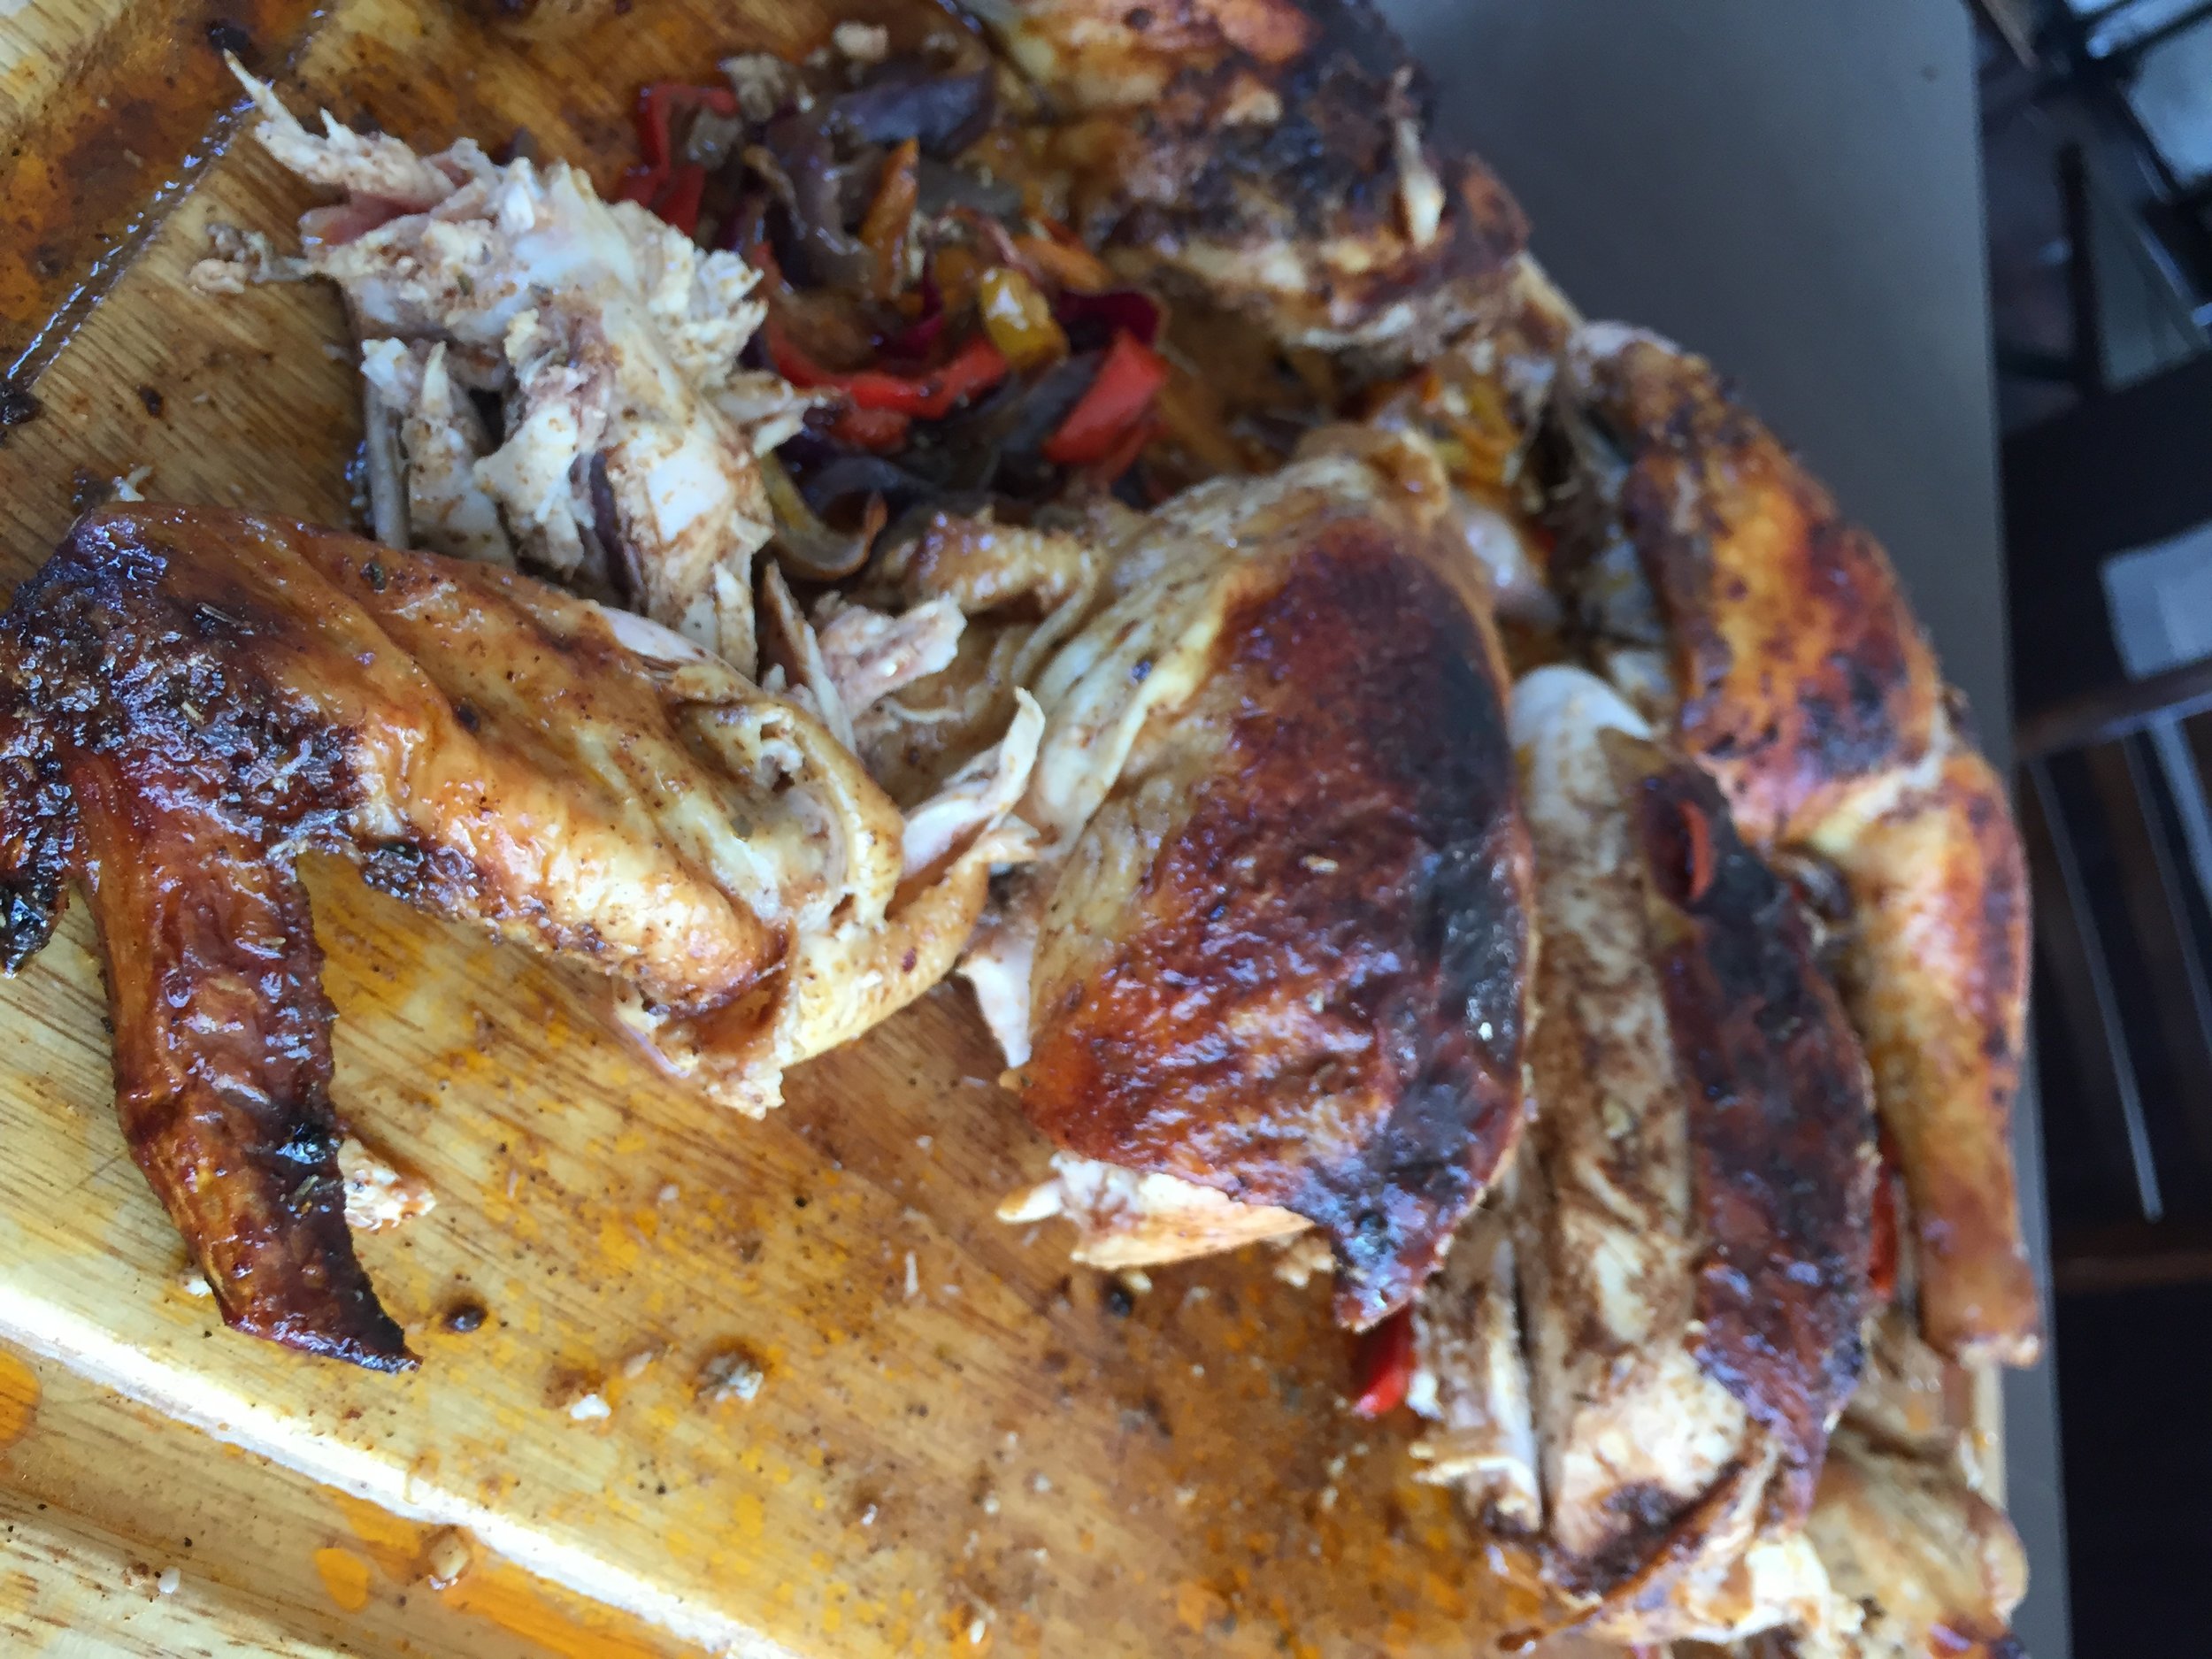
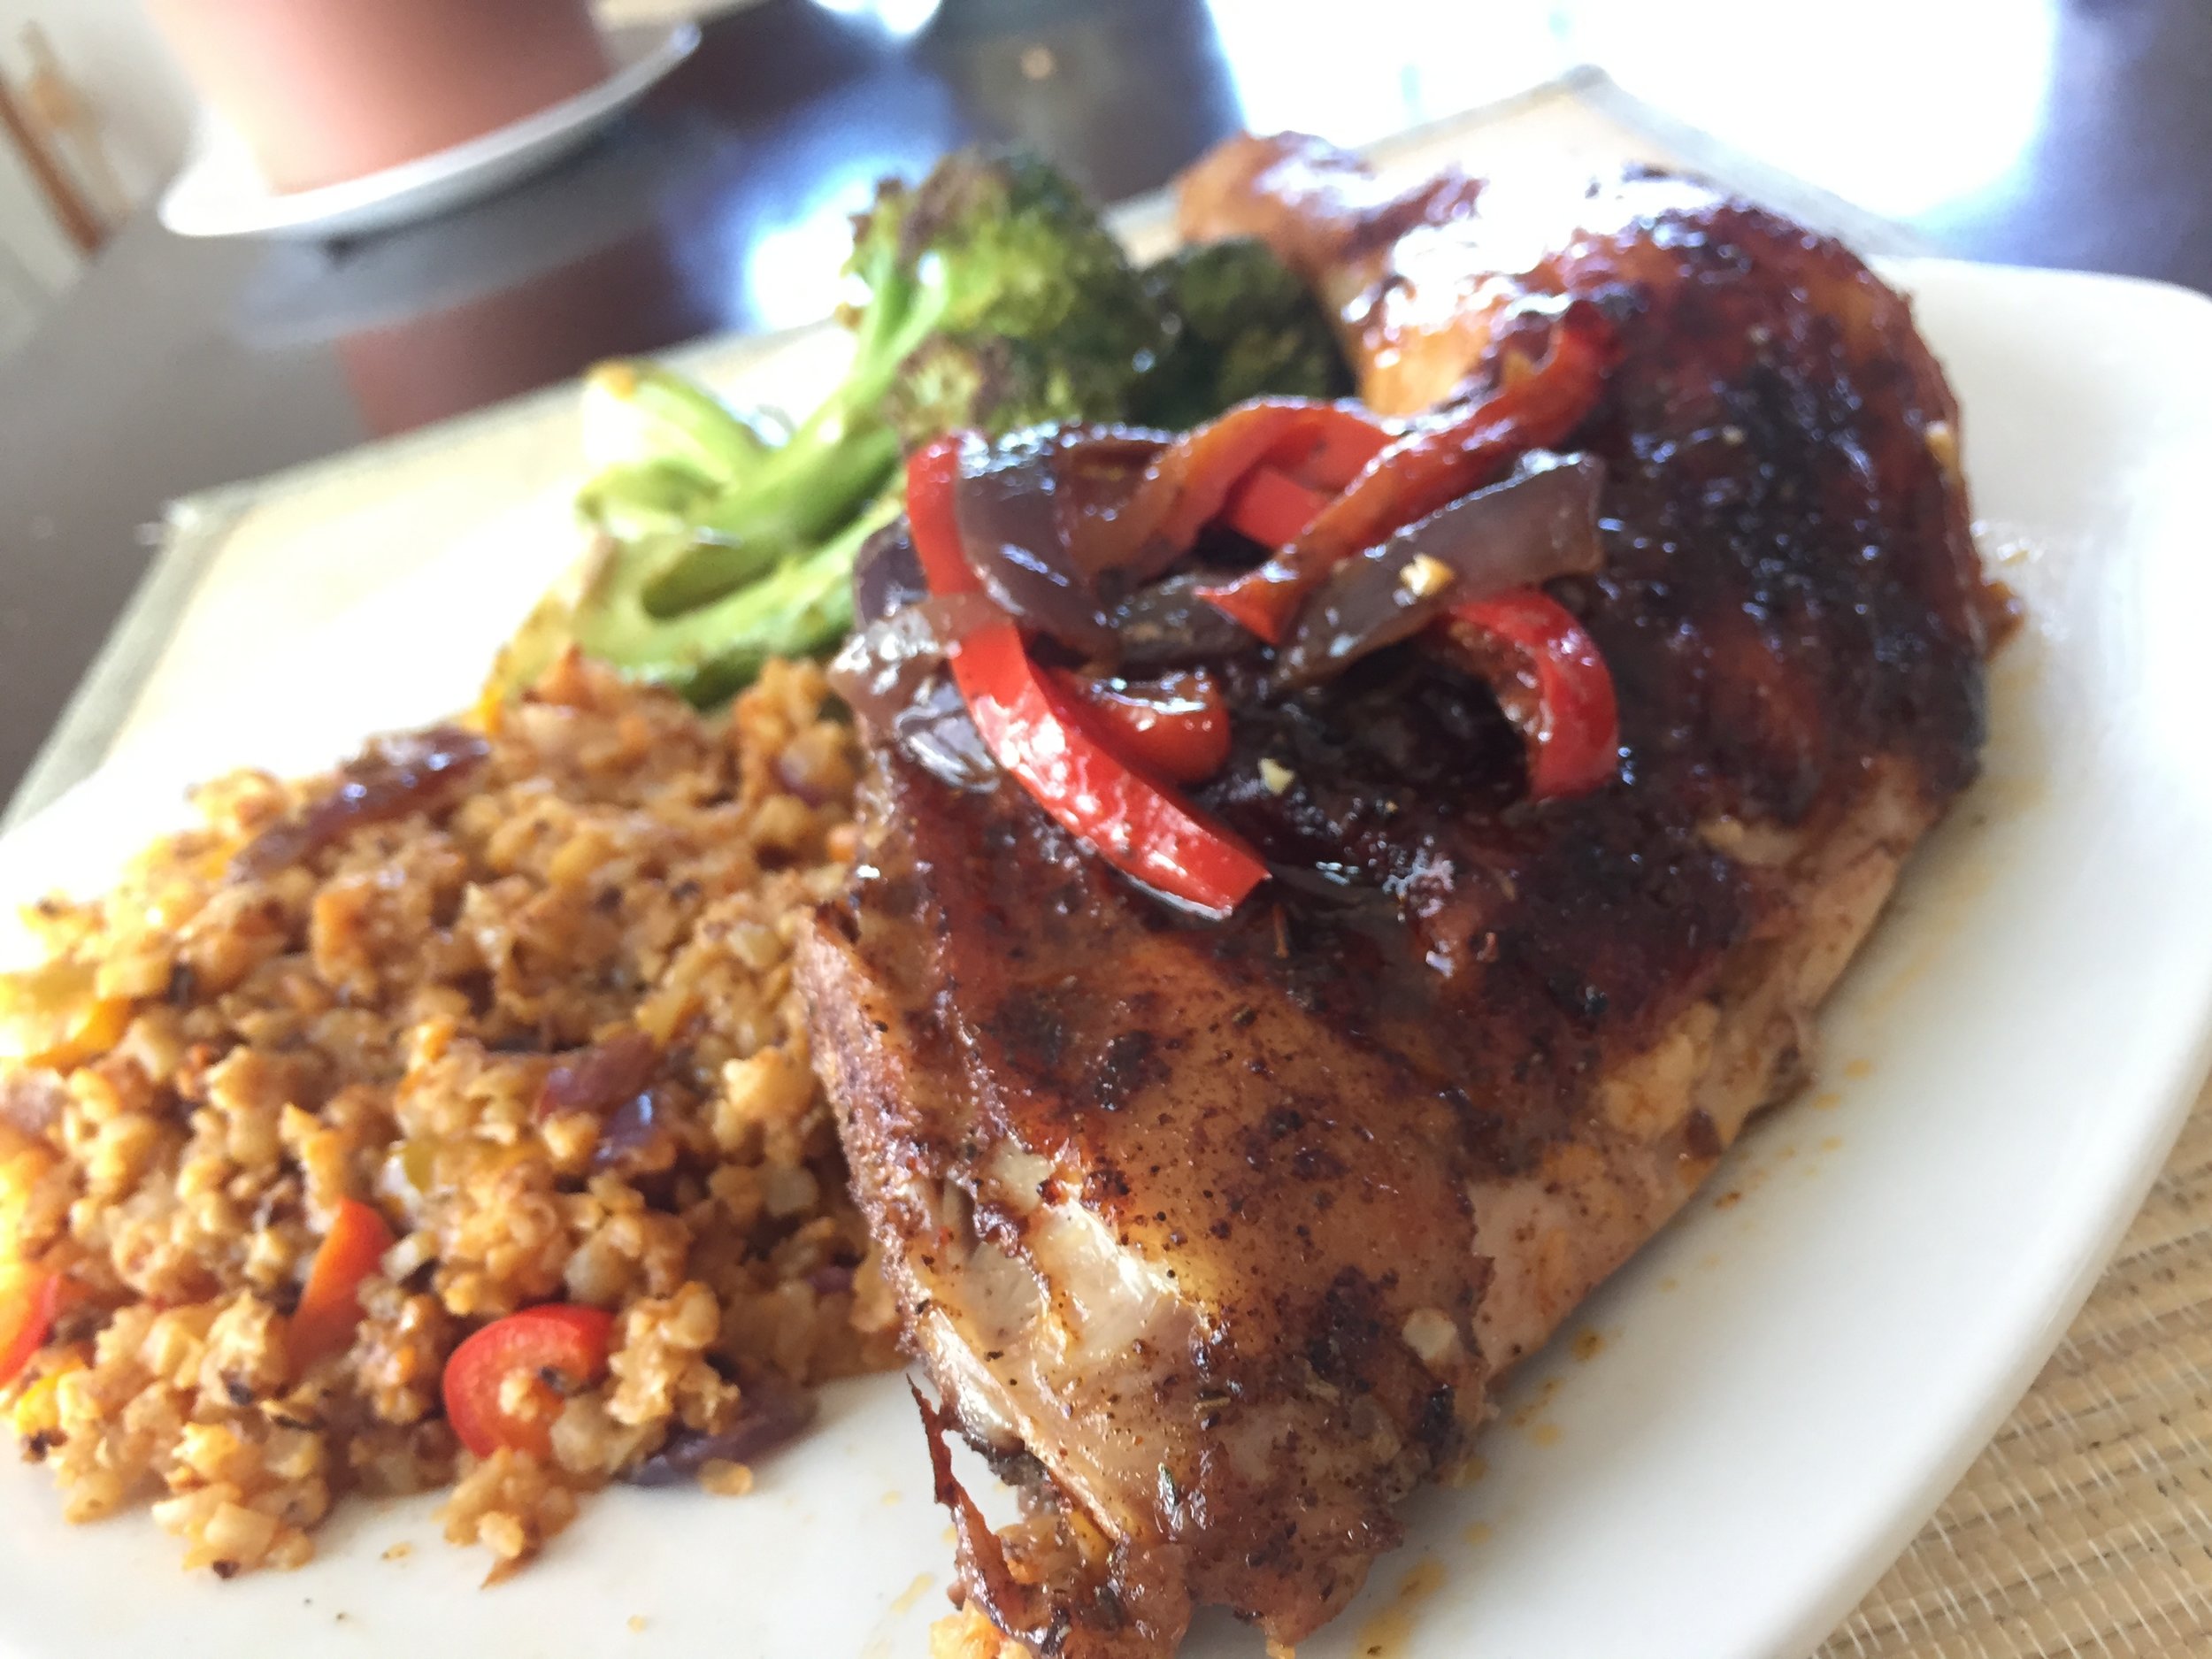
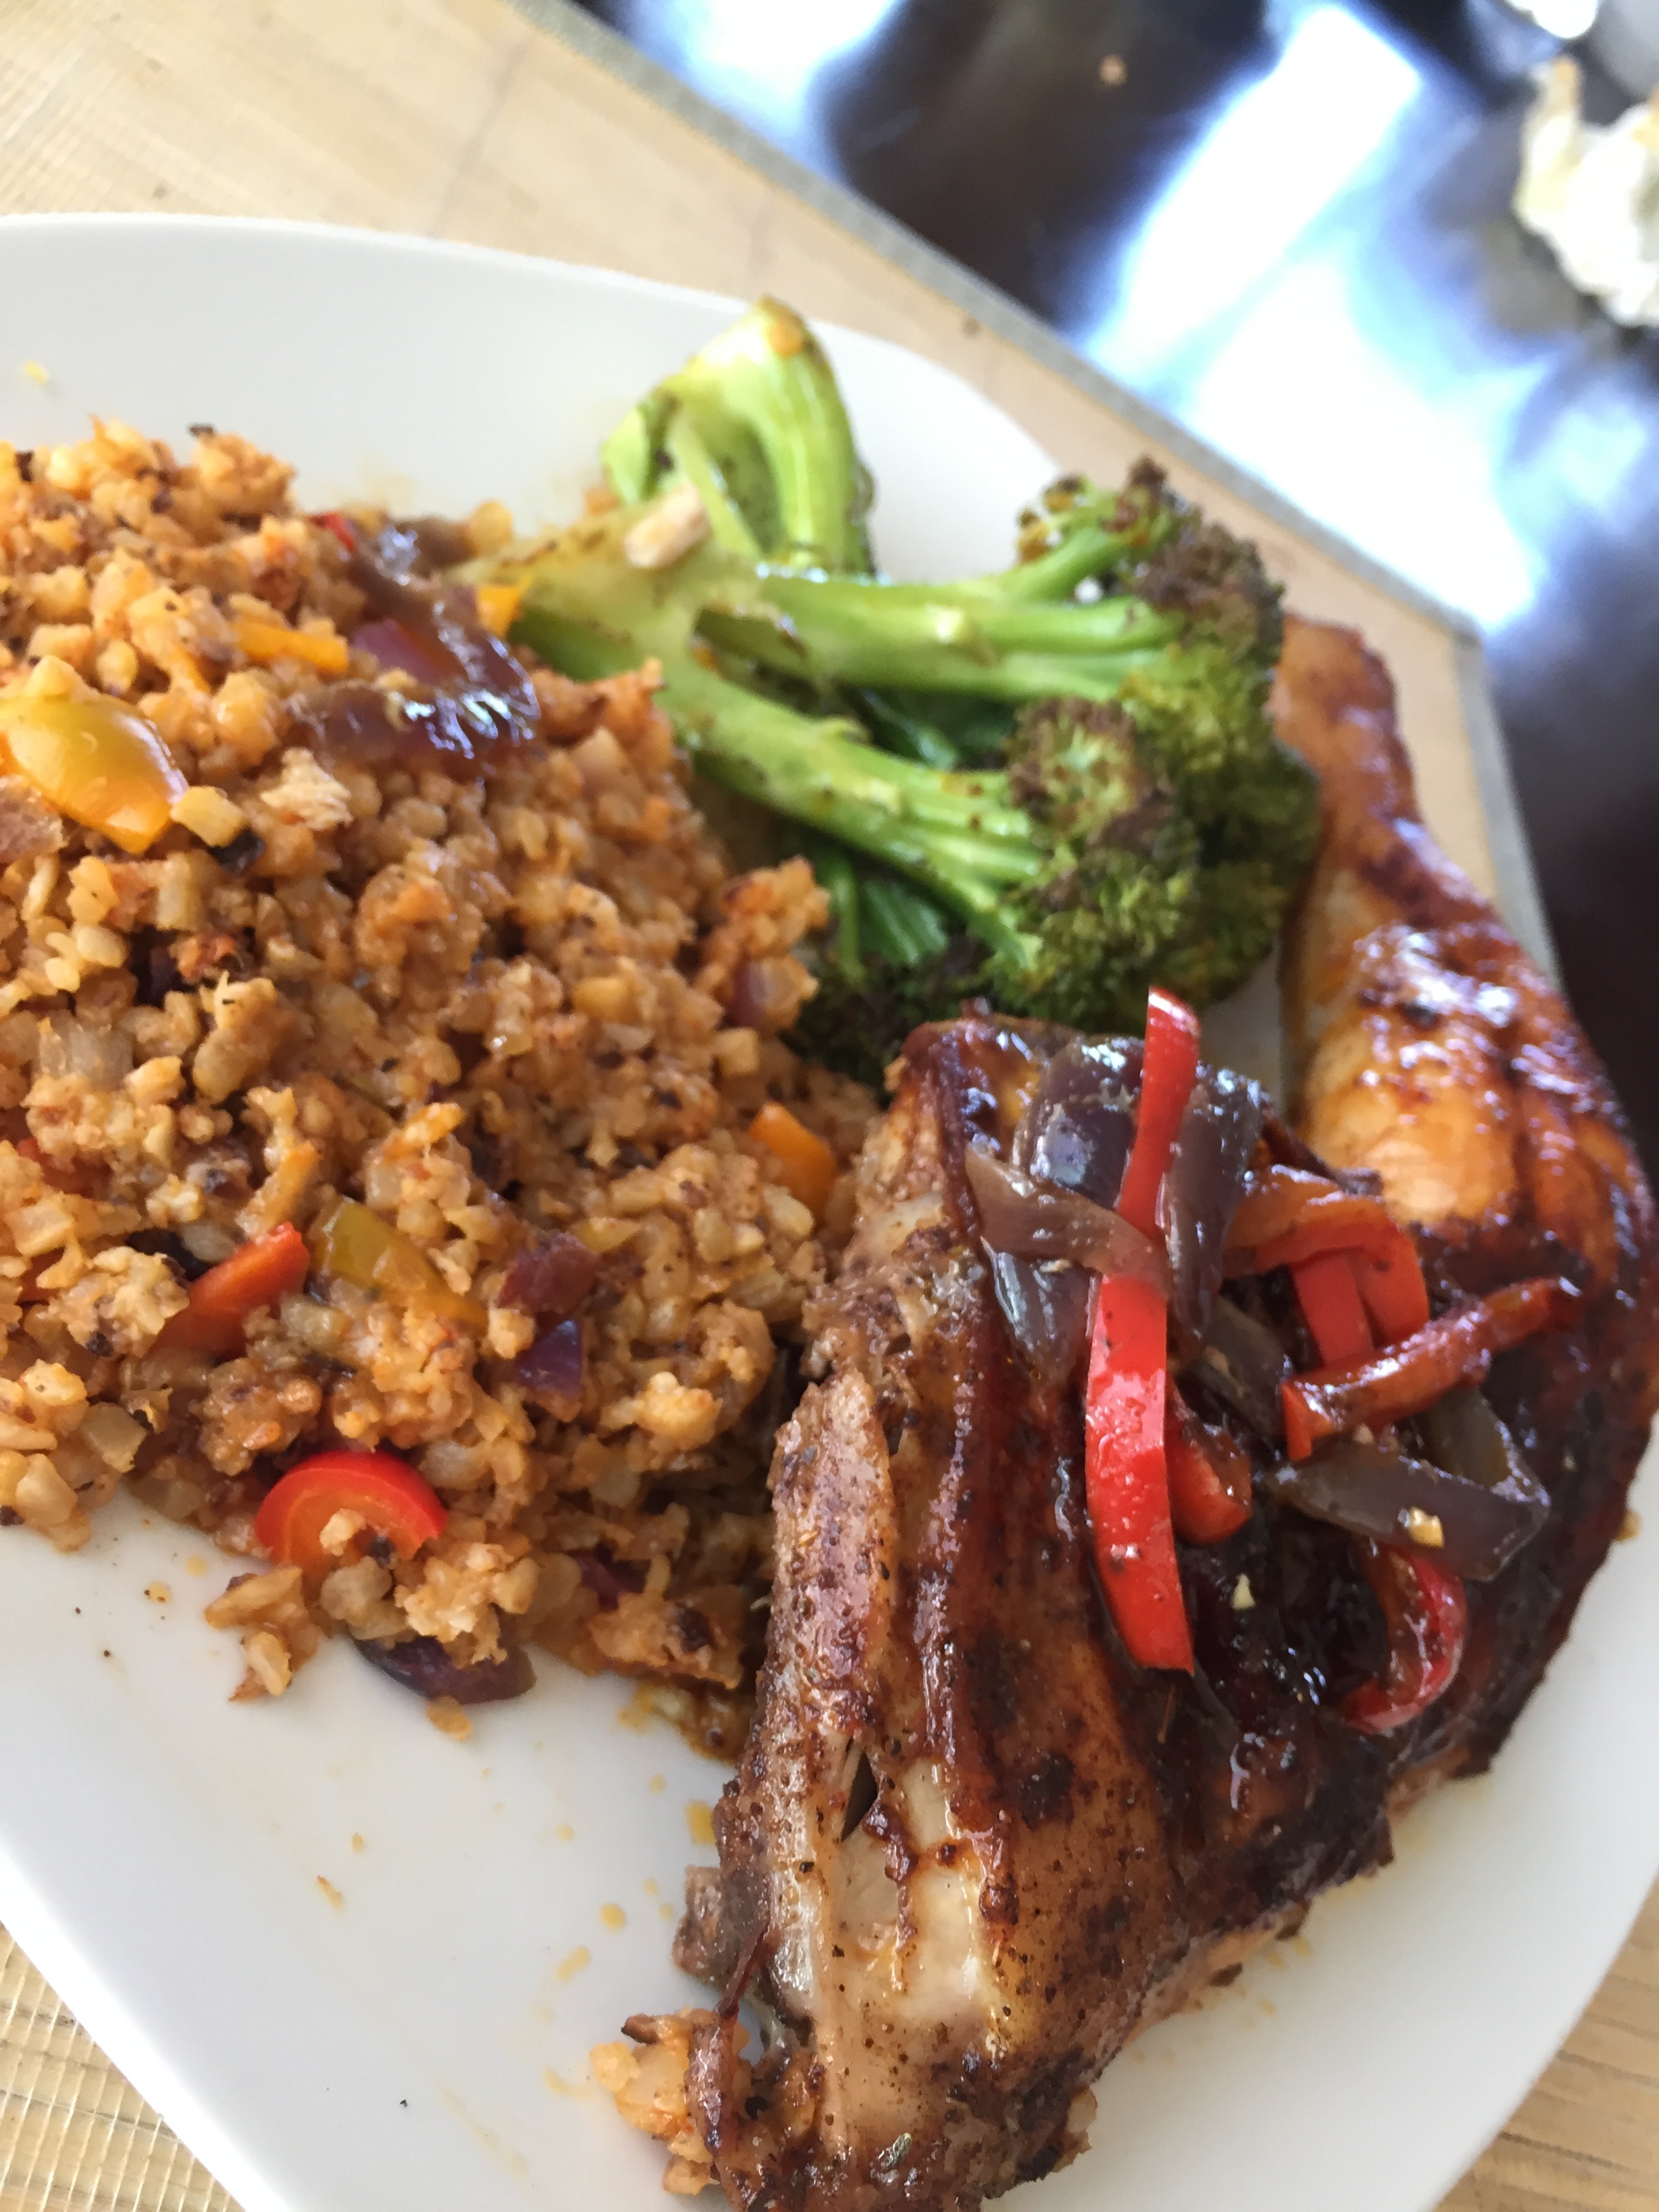
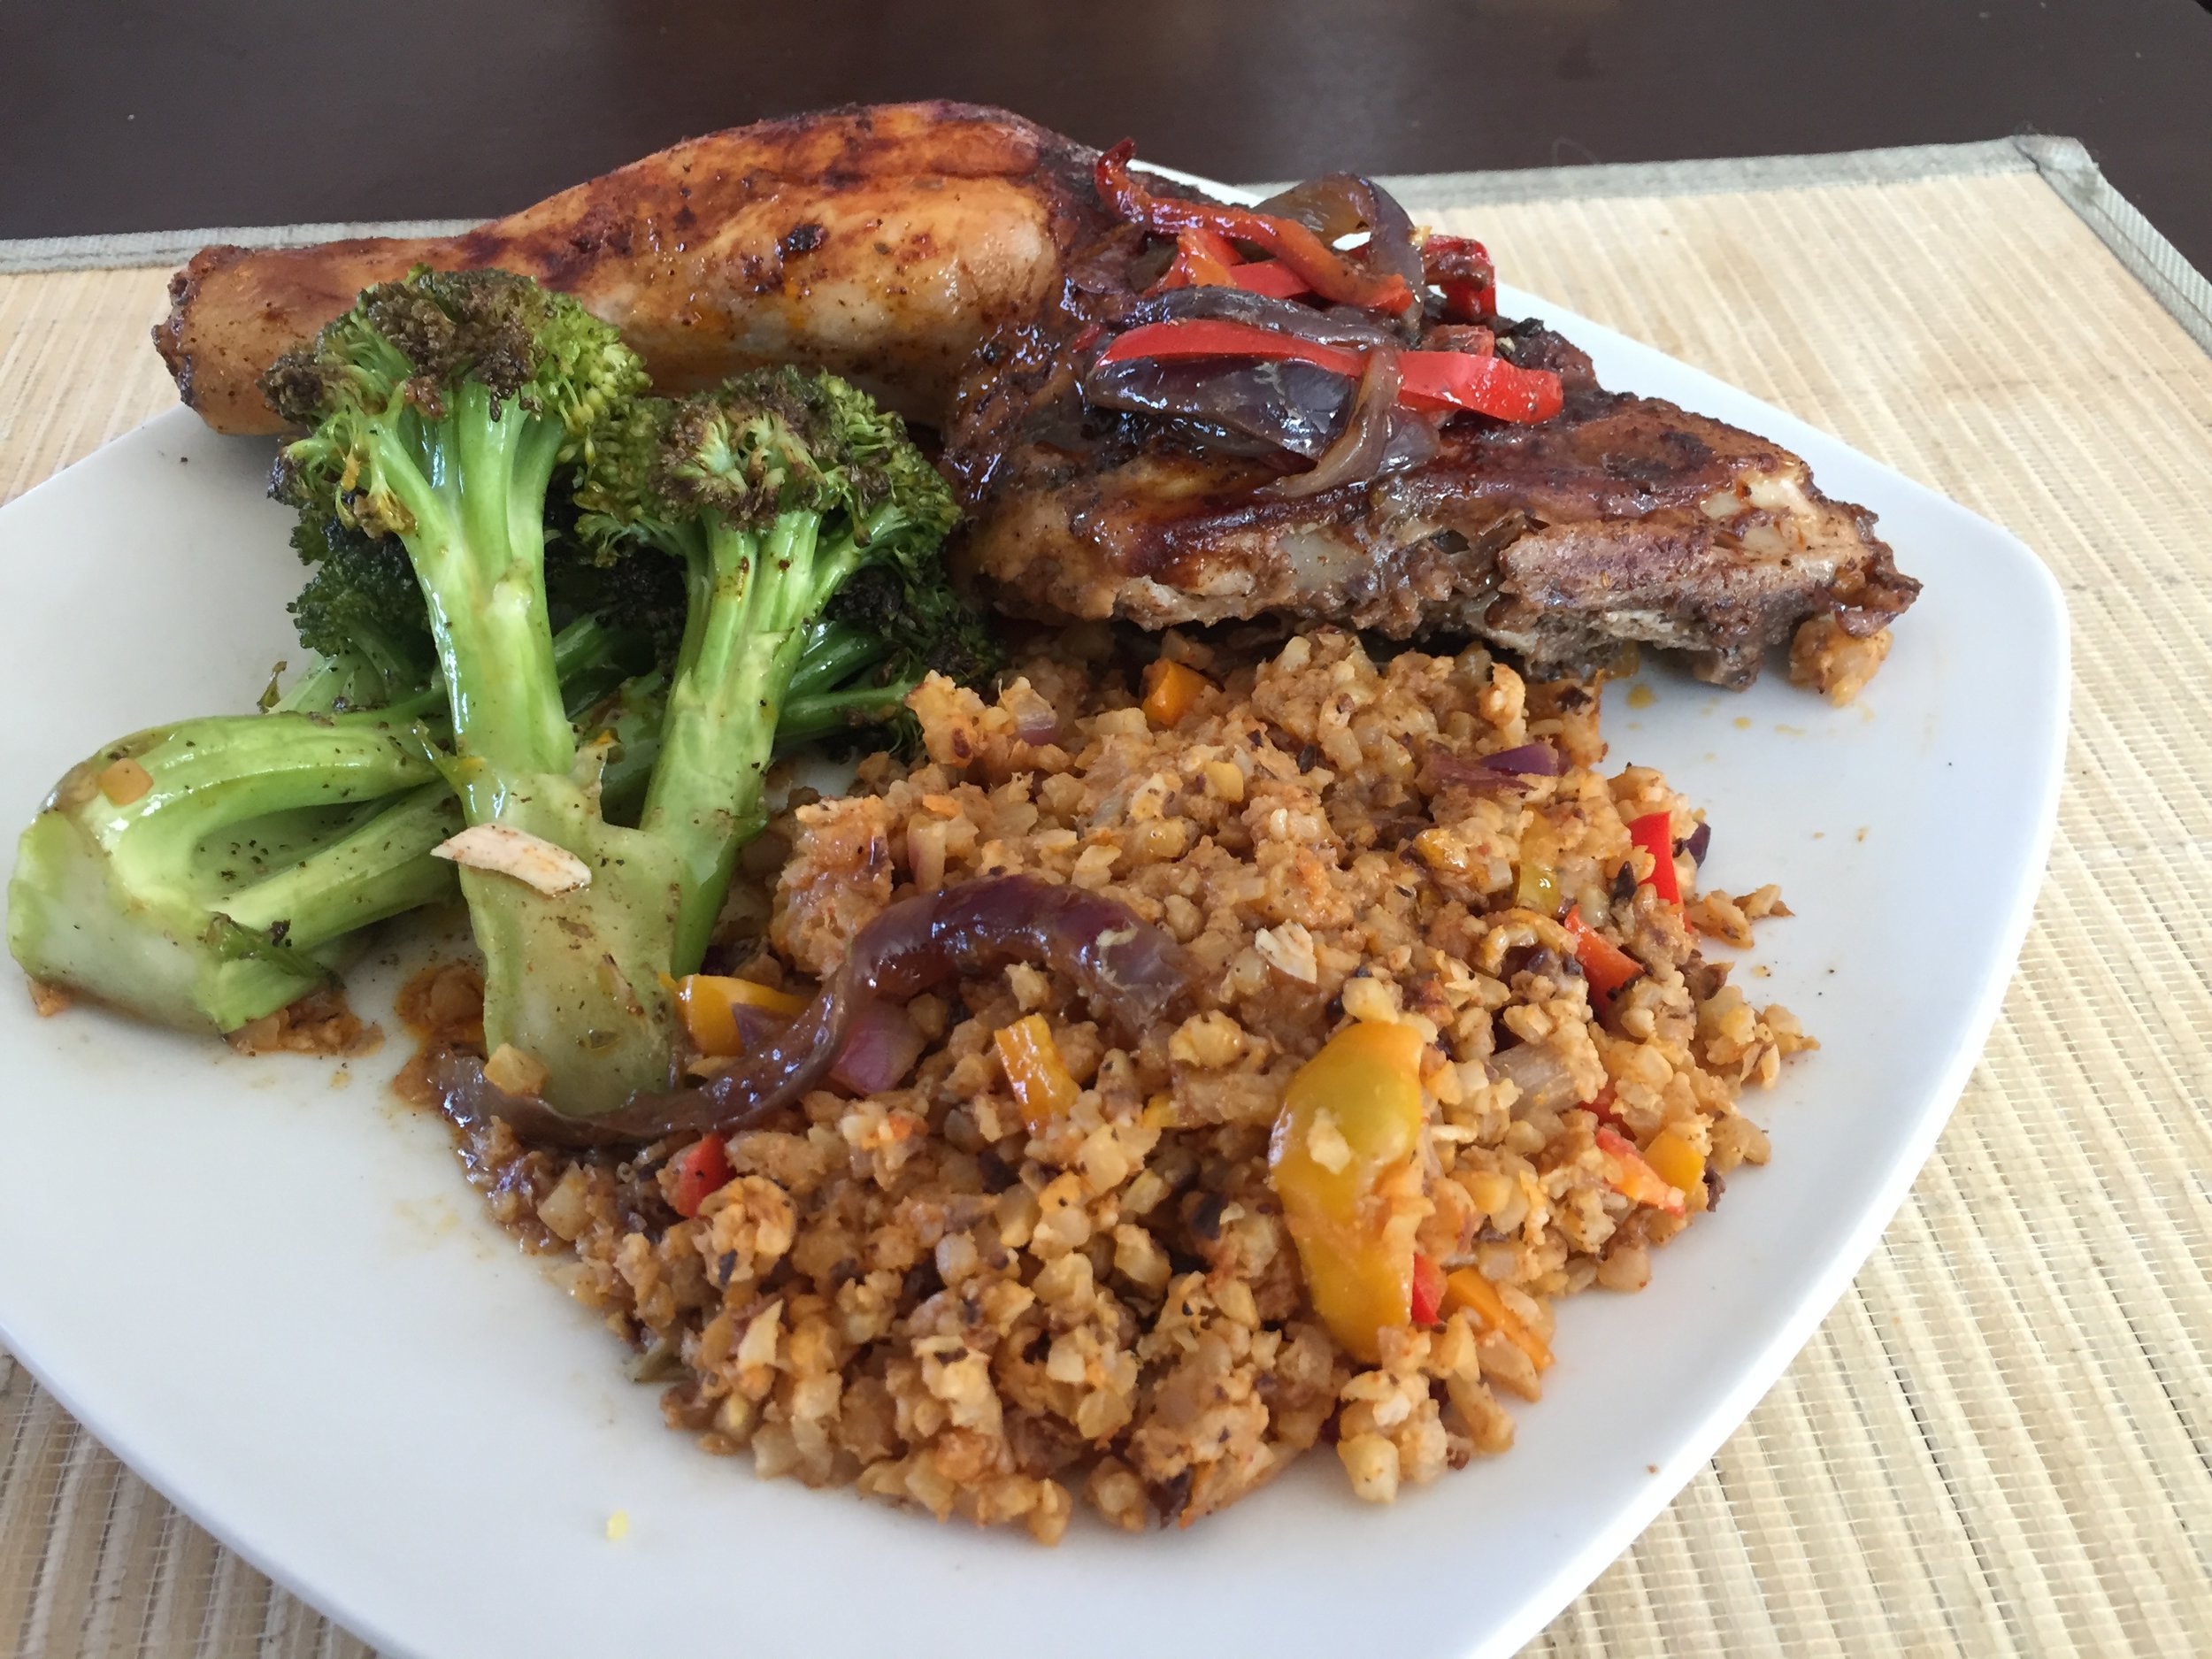
Roasting a whole chicken can be intimidating, but it really is quite easy. The hardest part is dressing it but I've got a killer rub for you guys today! This chicken was so flavorful with just a little spicy kick and none of the unwanted sugar! If you are on a budget this is a great option too. Granted, it does require a little more work, but it's so worth it and much less expensive than buying thighs and breasts. To put it into perspective a whole (free range) chicken costs a little bit more than a pound of free range chicken breast, but with the whole chicken you get the legs, thighs and wings to go along with it! And best of all you get the bones, which I always boil down and make a nice chicken stock for soup!  

IMG_2082.JPG

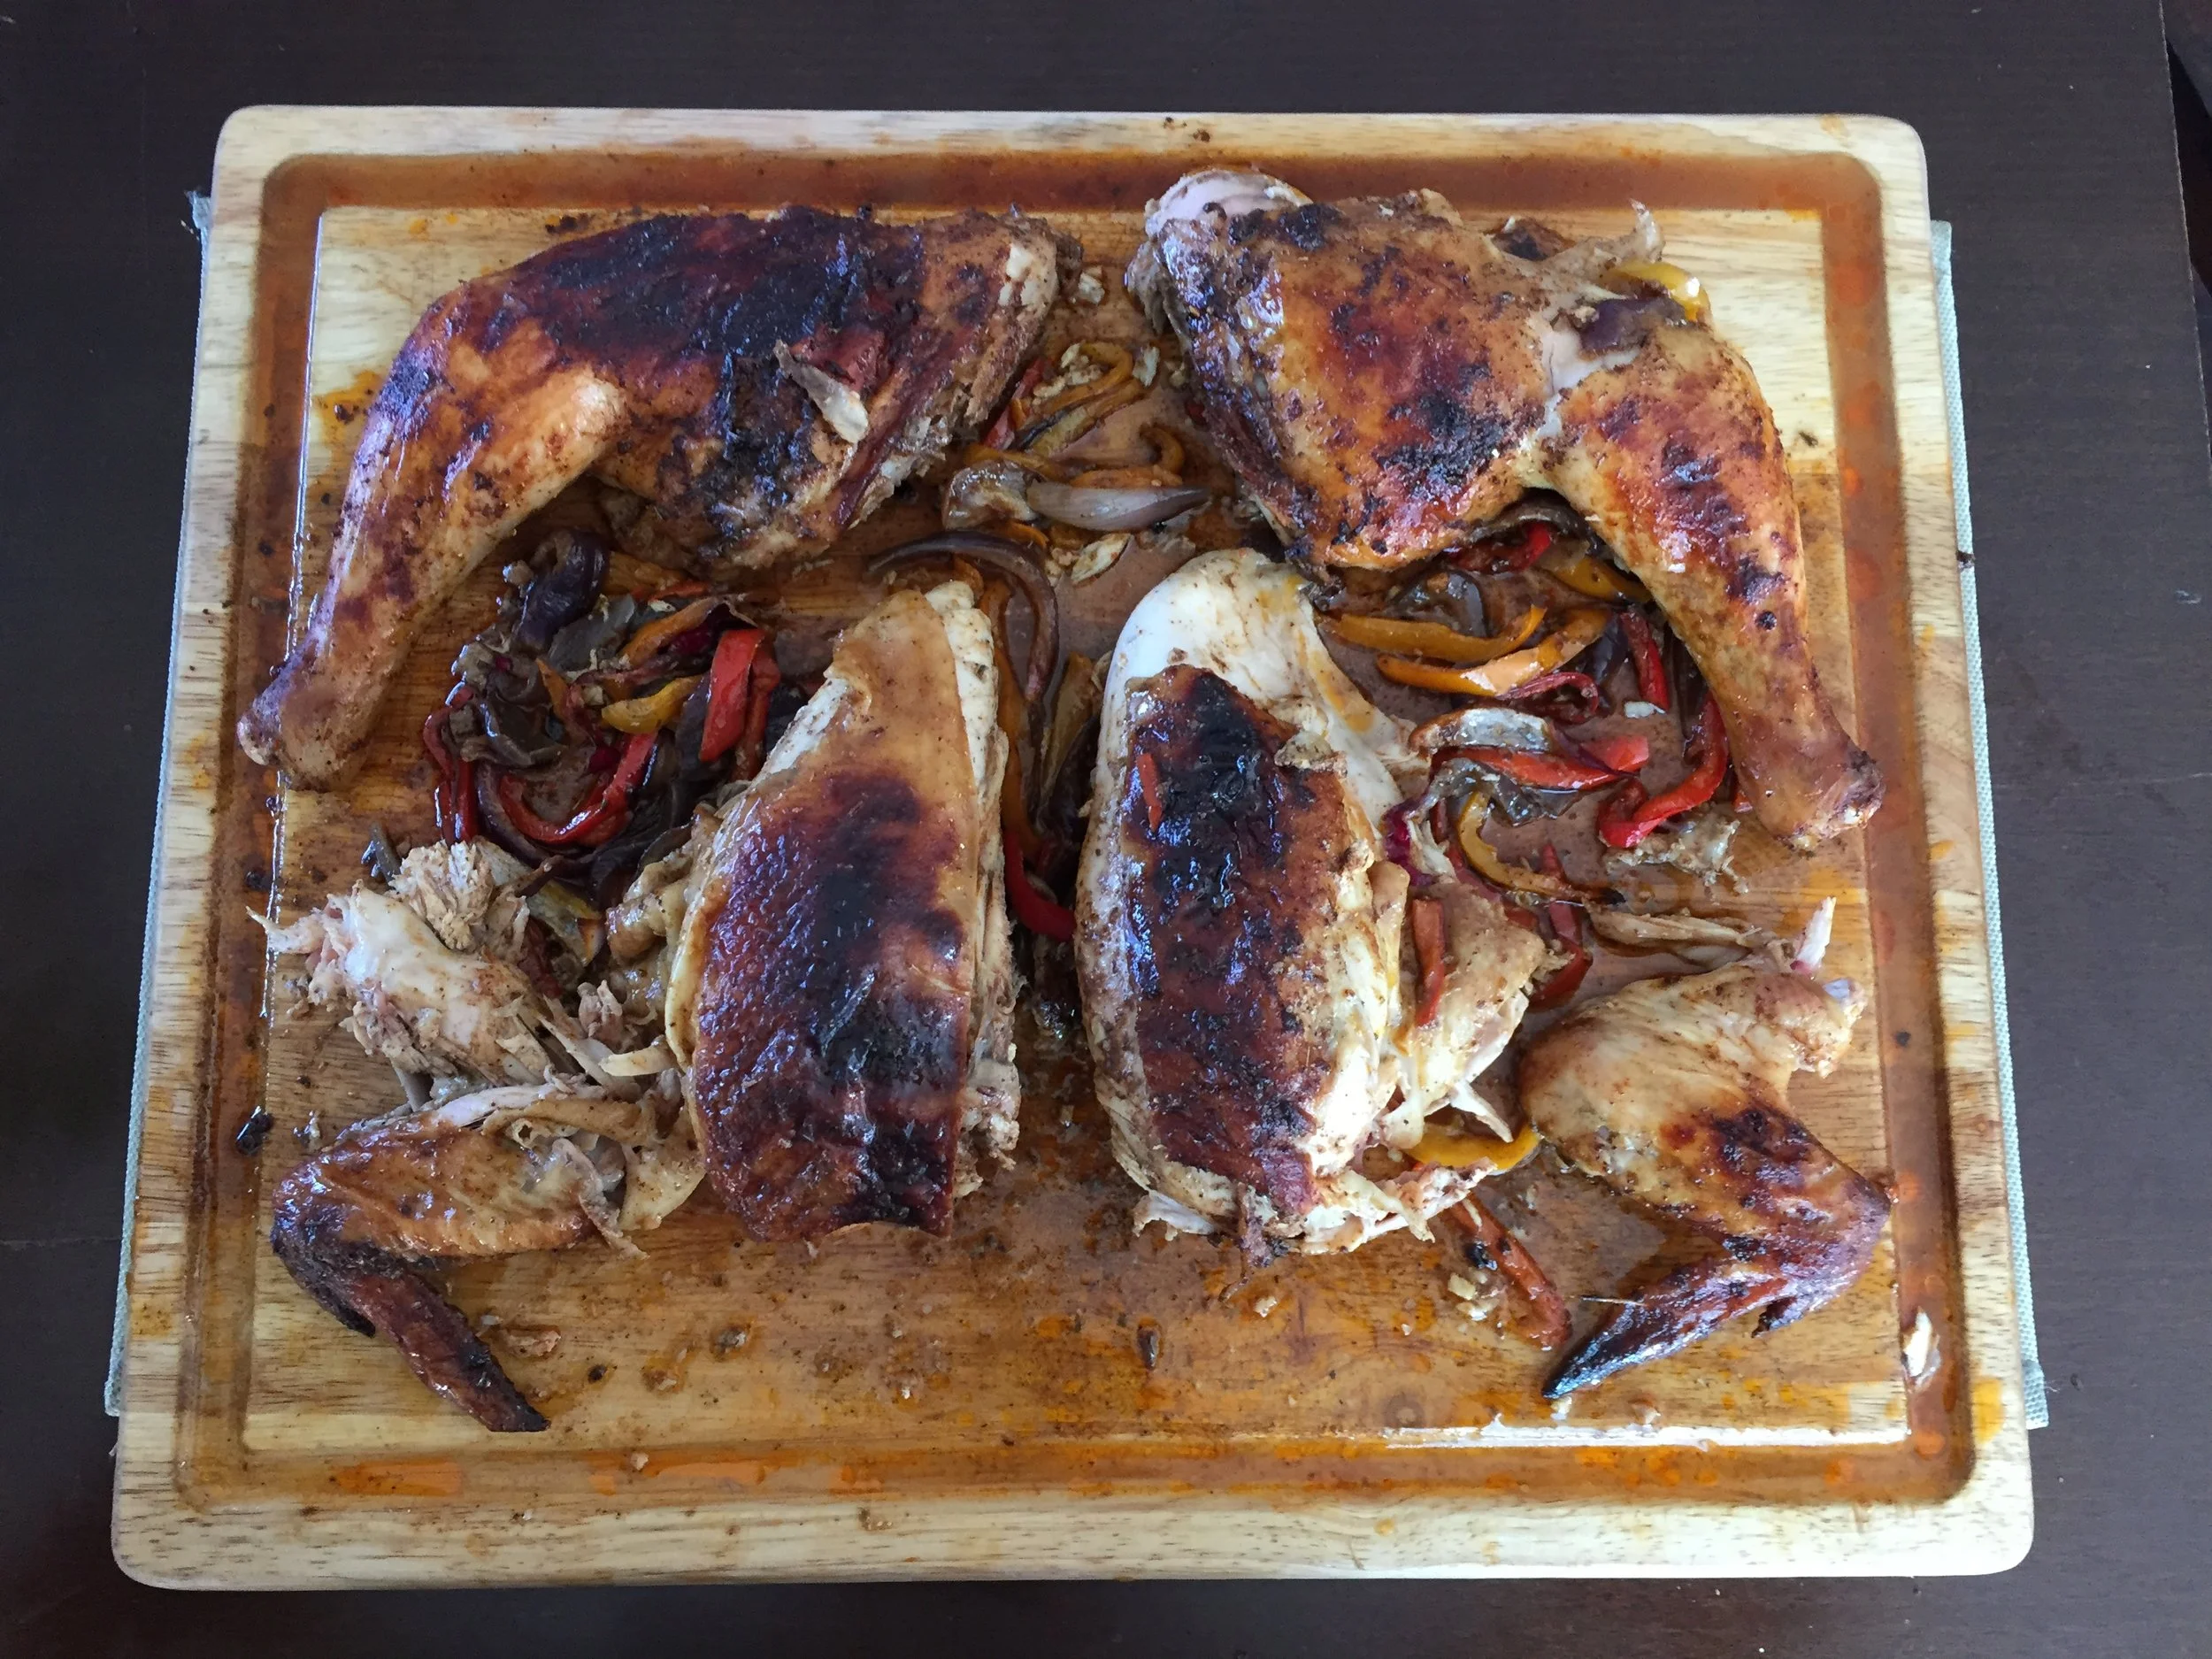
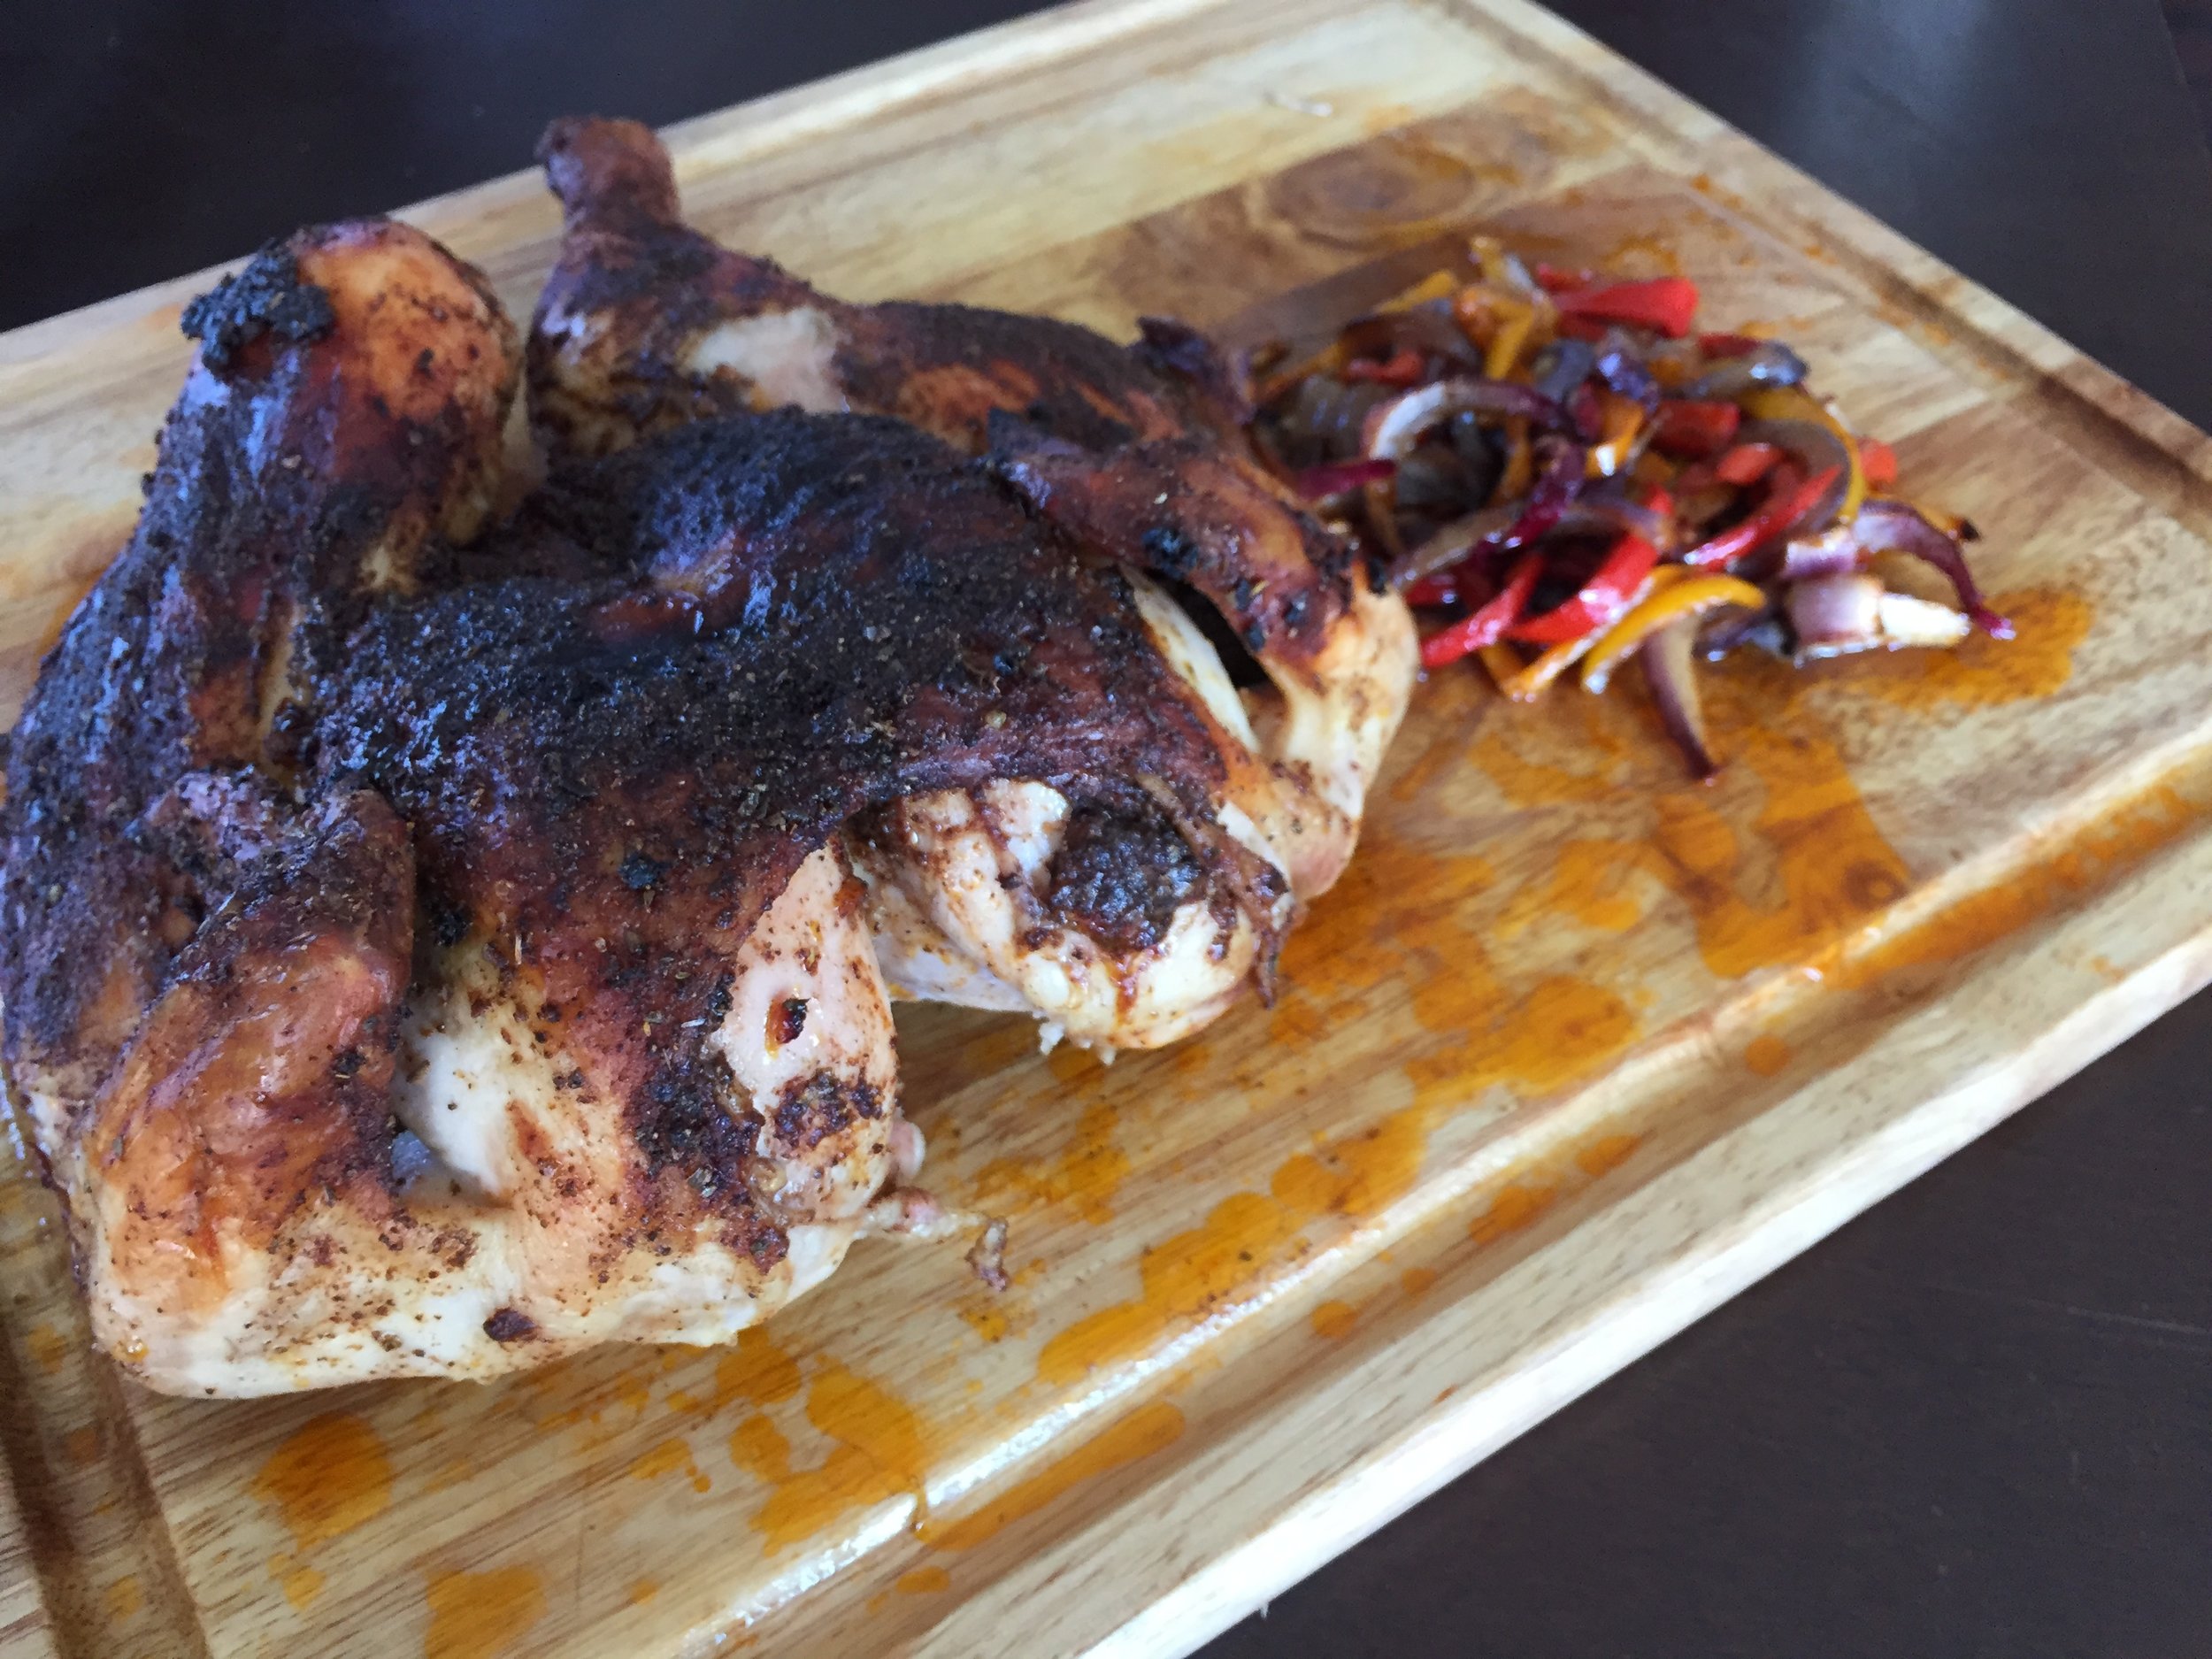
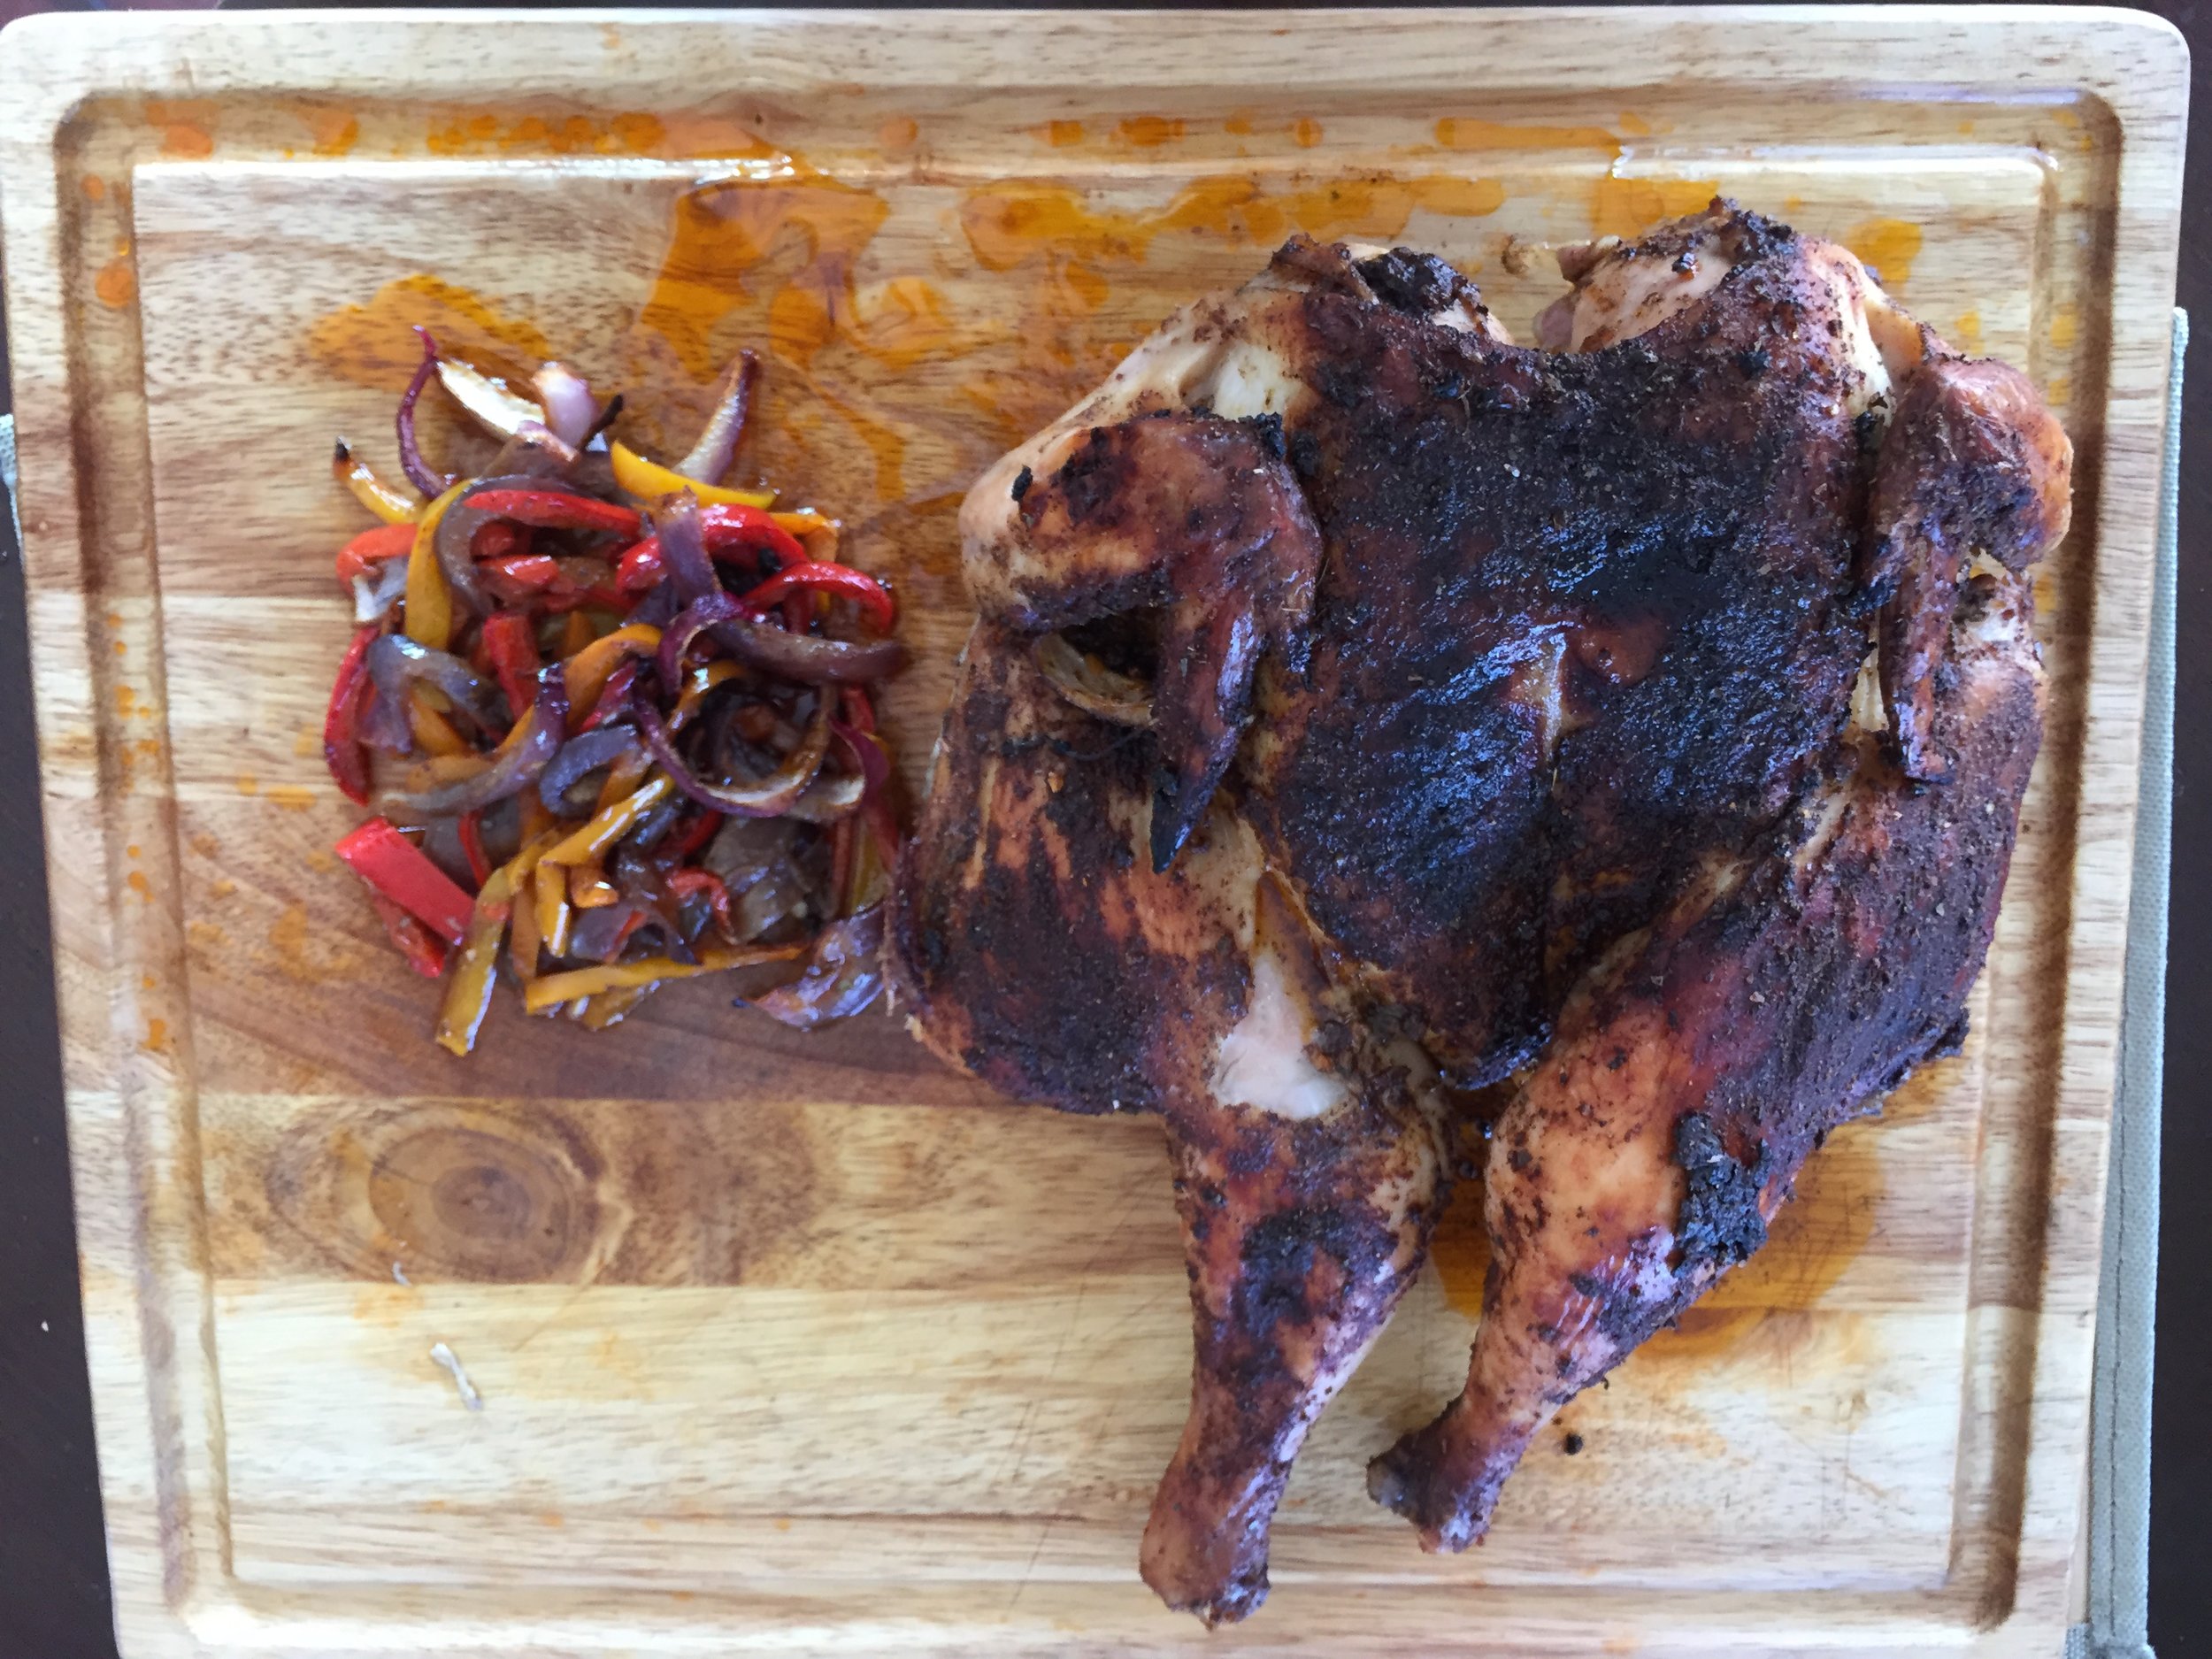
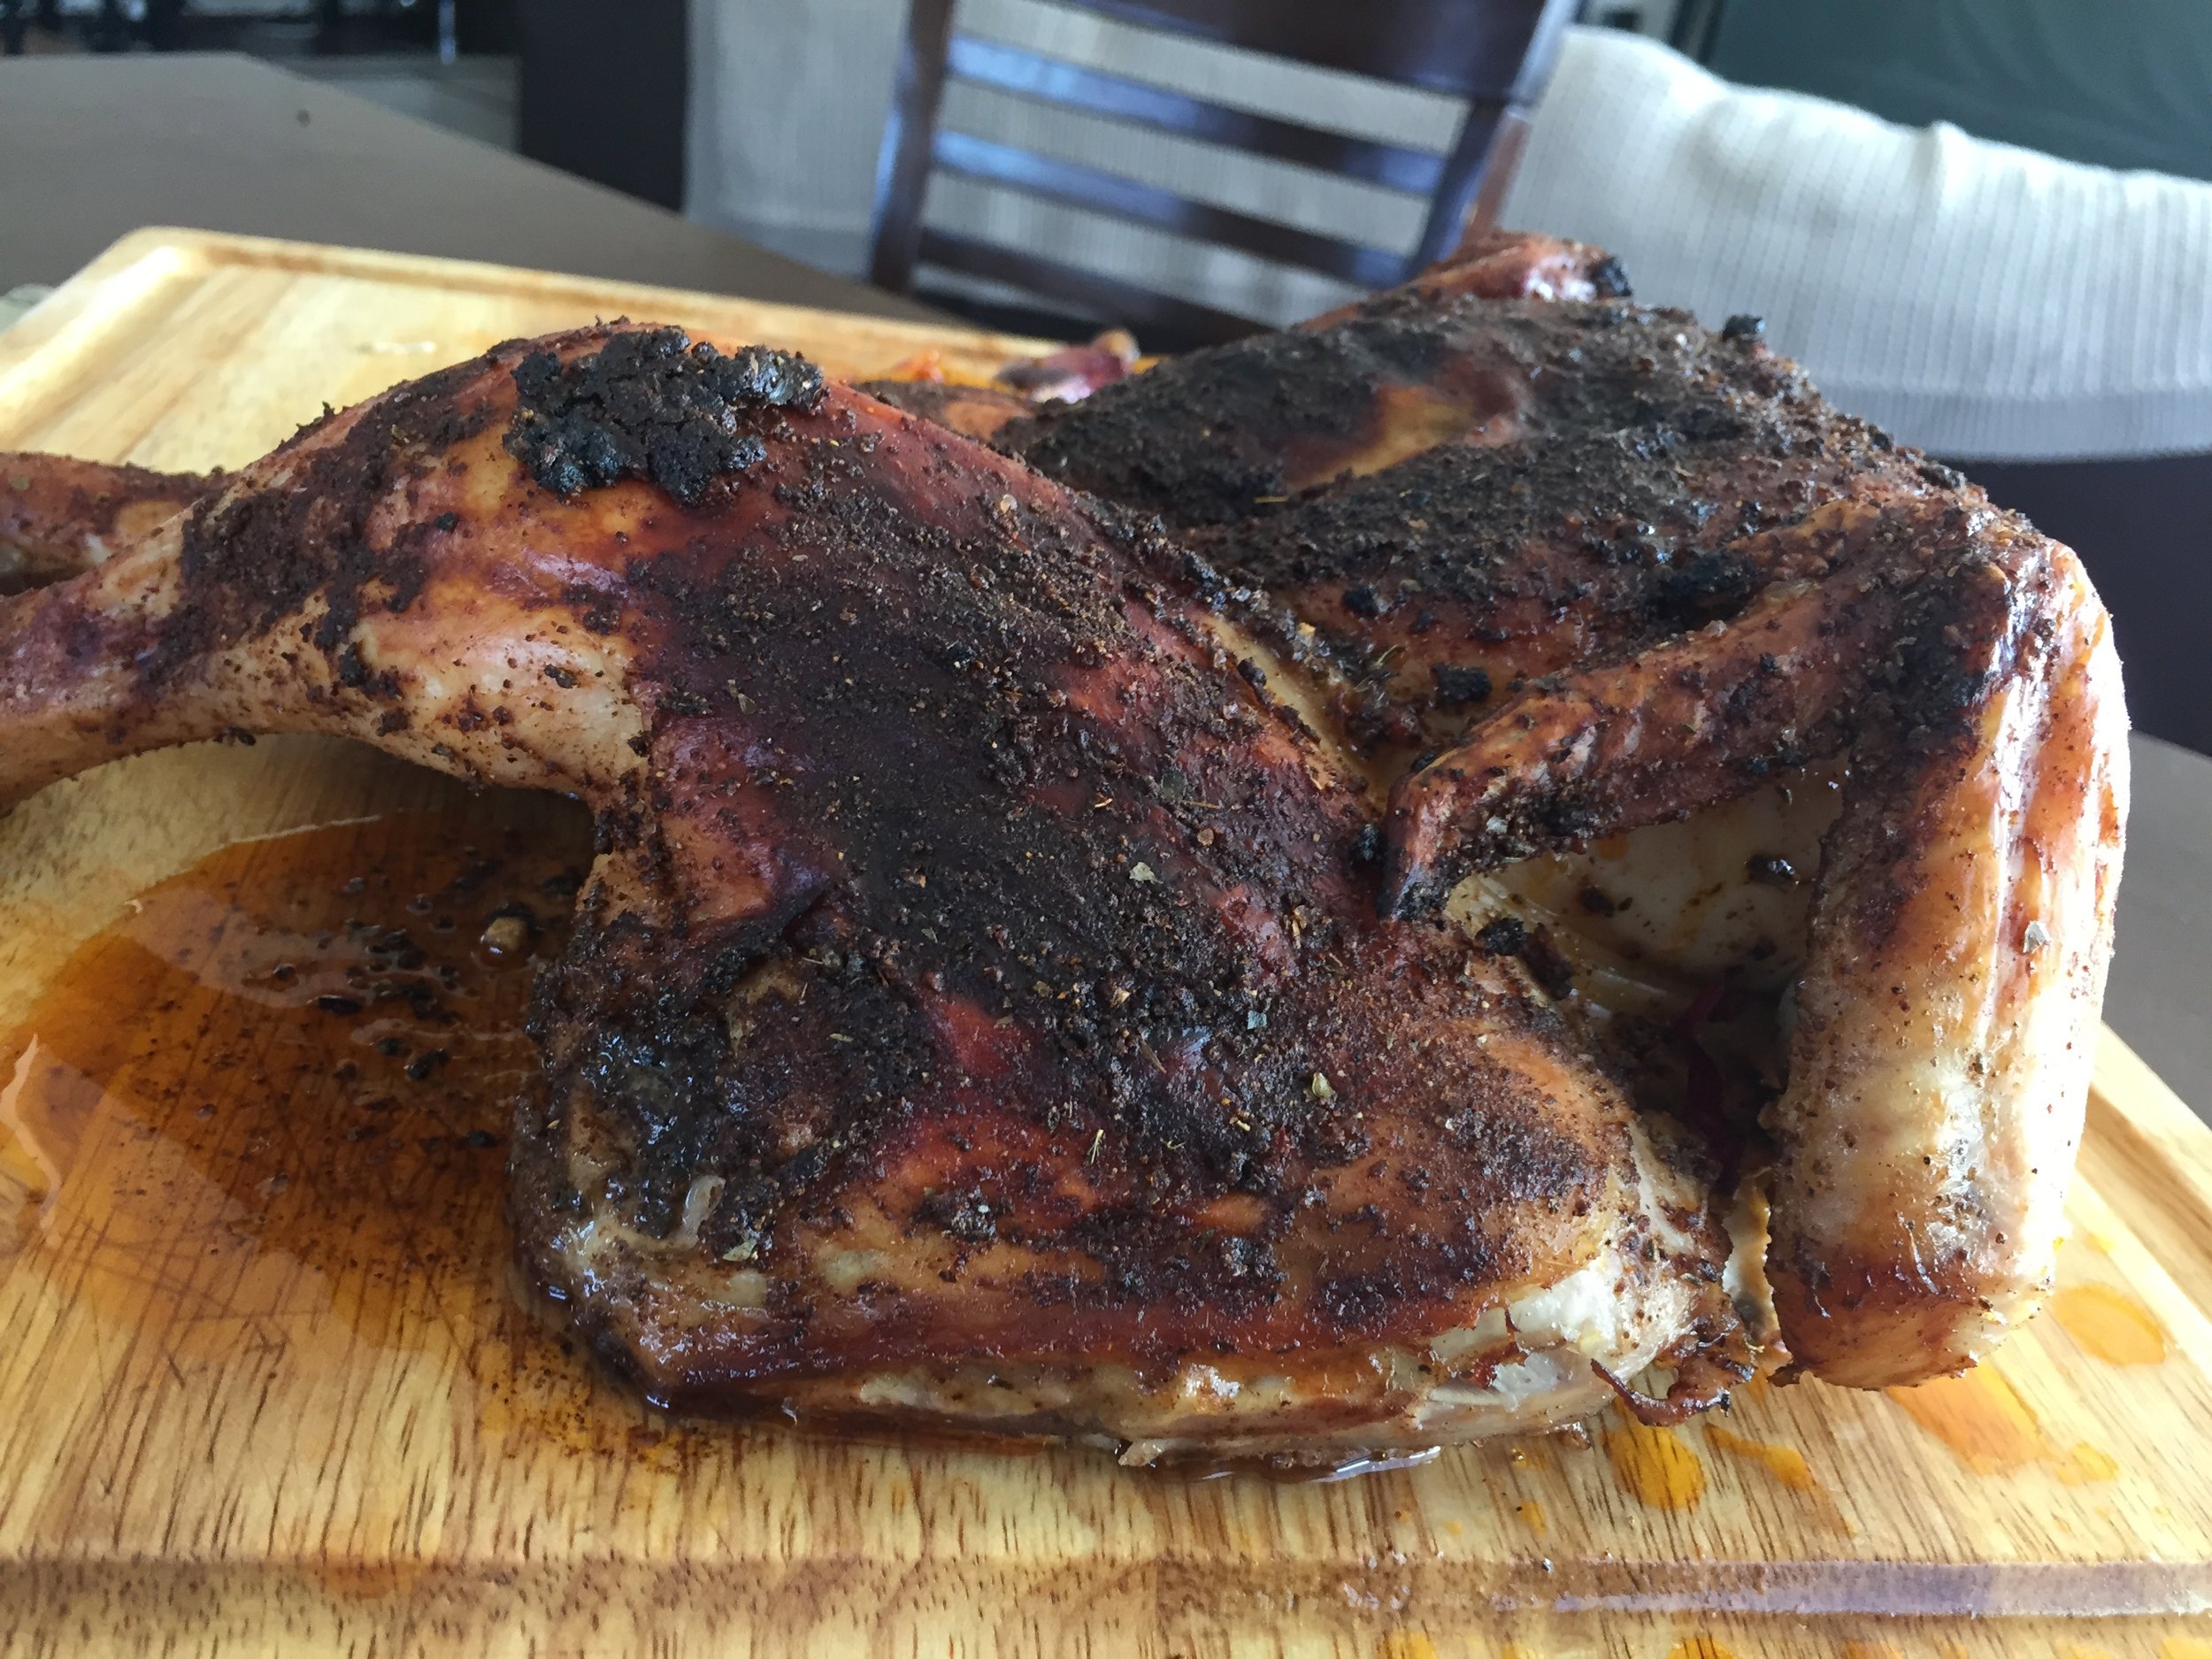
I prefer my skin to be a little crispy because when the butter and spices are baked into crispy skin... there's just nothing better. In order to do this without drying out the chicken you're going to want to cook the first 20 minutes or so (depending on size) on high heat (450F) and then lower it to 350 for the remainder of time. 

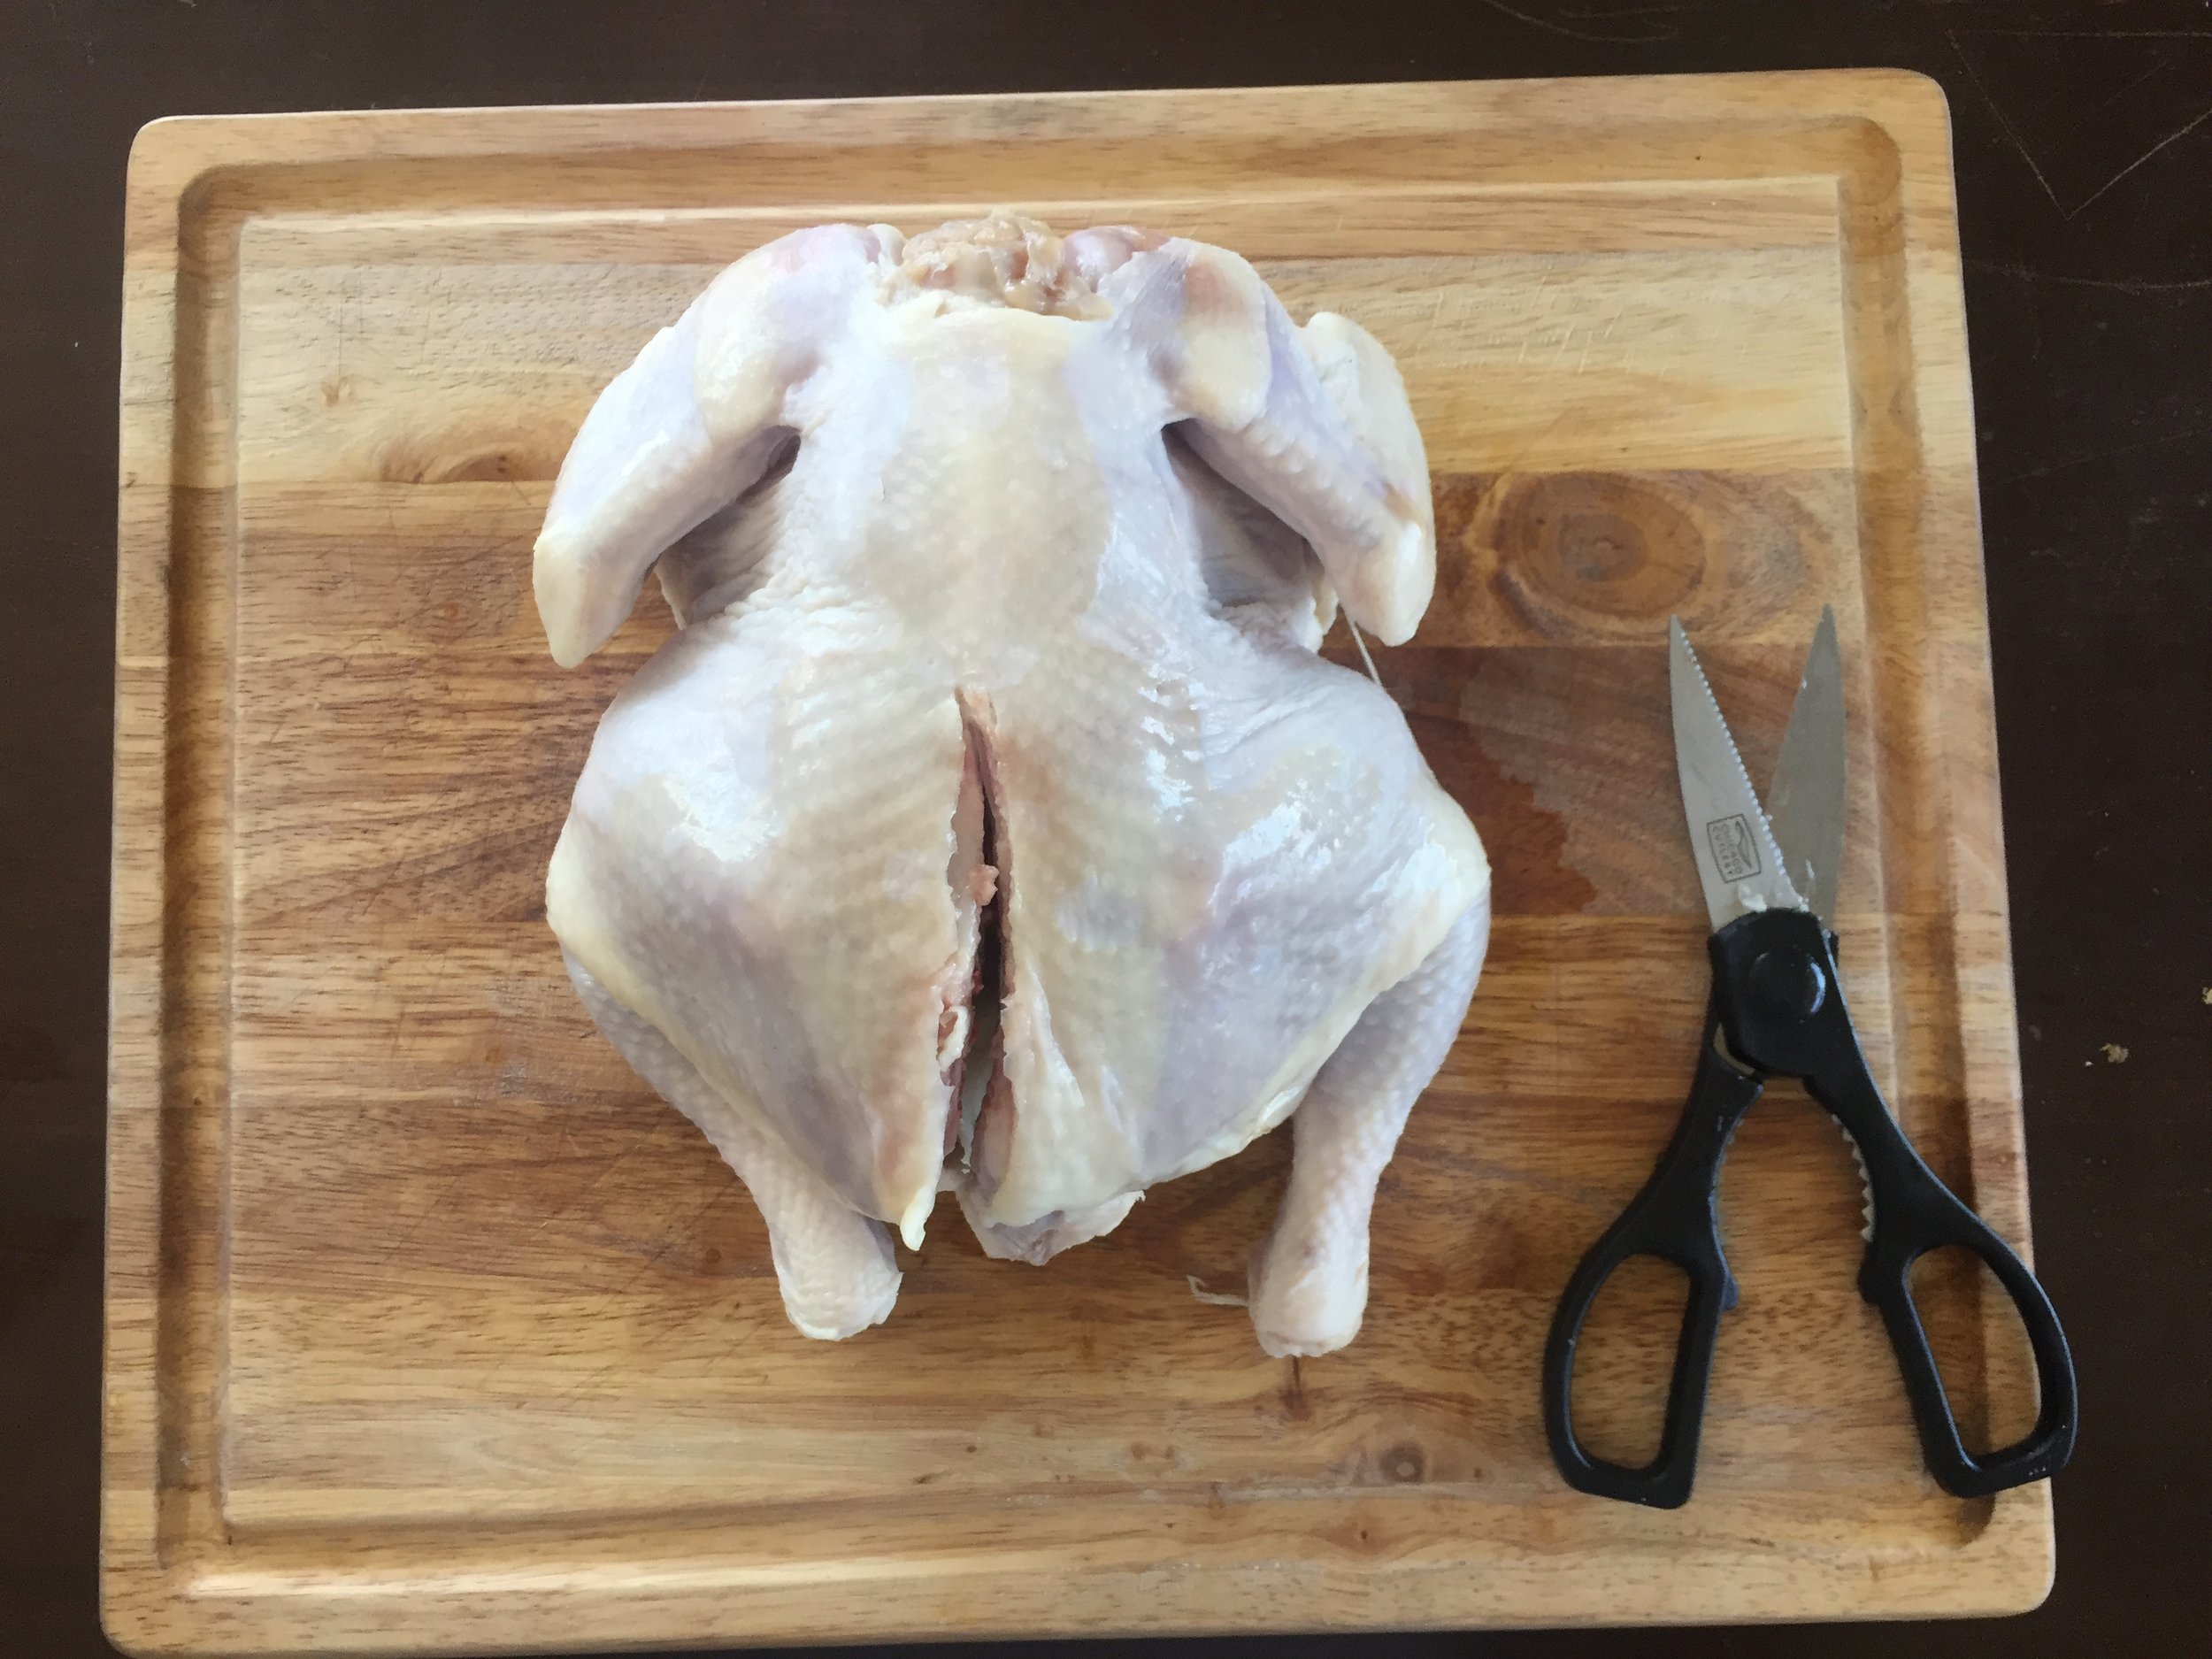
We're also going to butterfly the chicken. This is not required, but it is great for shaving a few minutes off the cooking time and I think it makes for a great presentation. Youtube can show you better than I can explain it so here is a quite video on how to butterfly: 

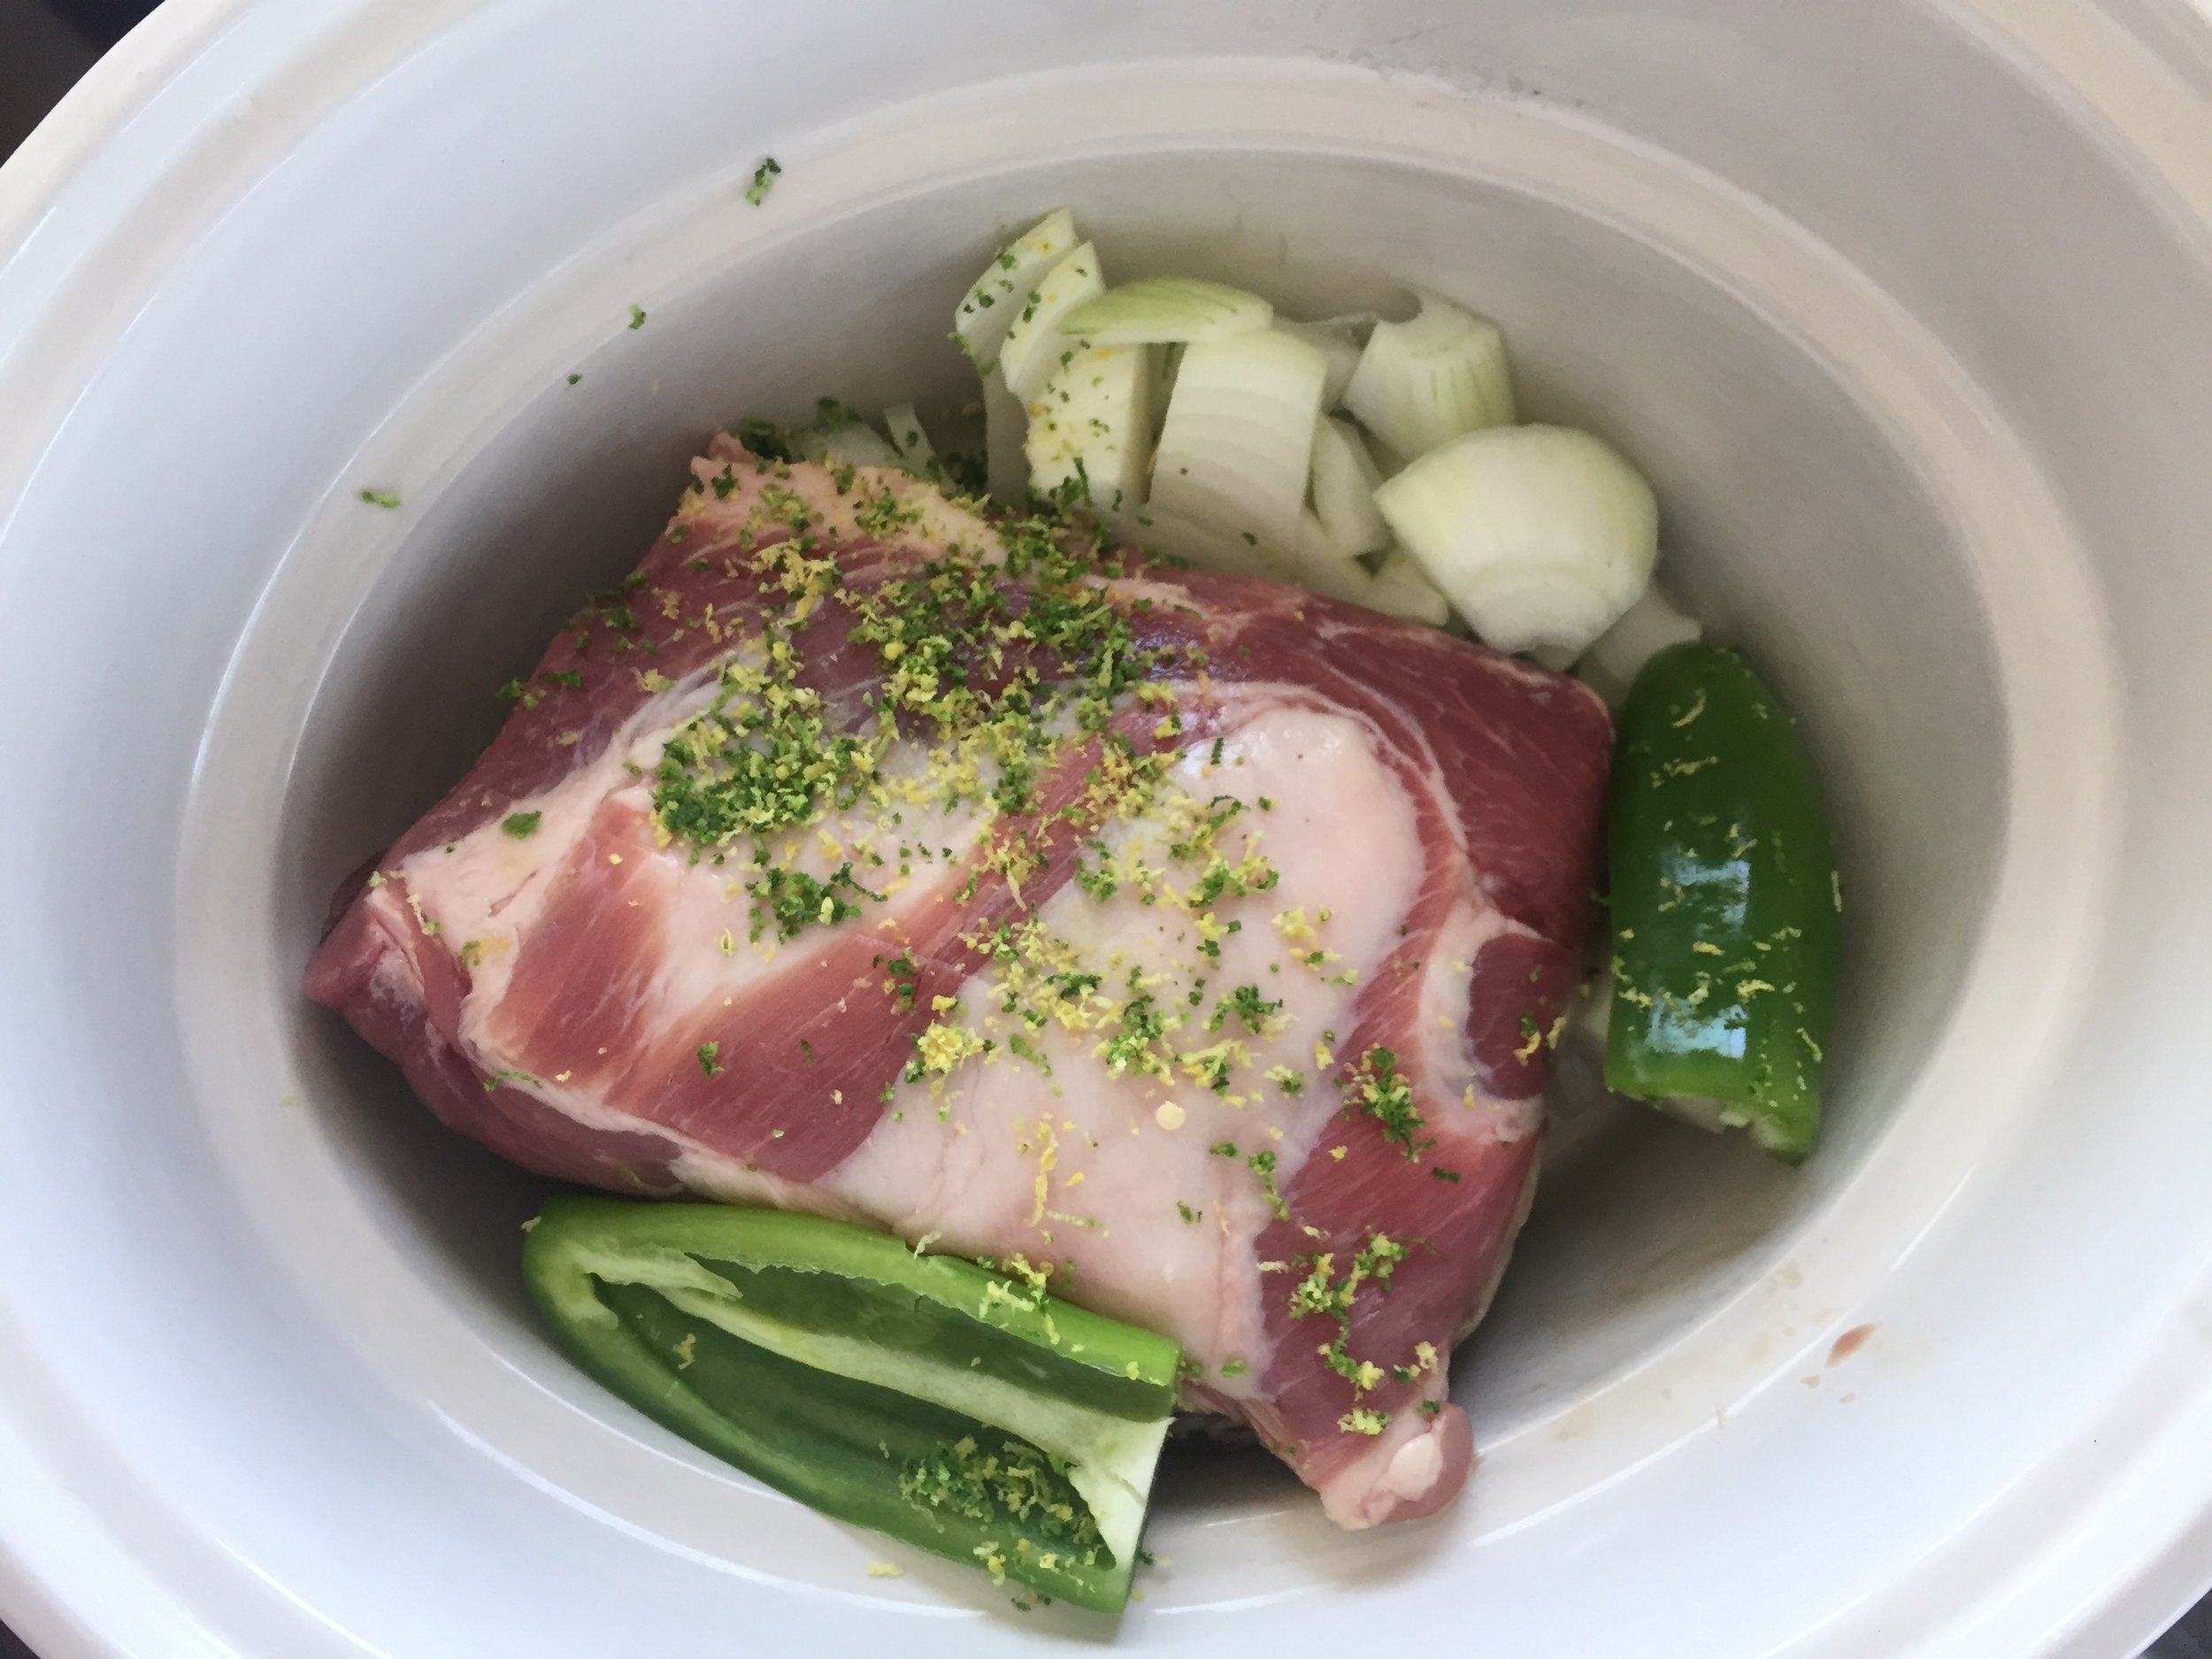
Ok now that you're a butterflying expert, let talk dressing the chicken. Once you have the chicken laid out (as seen in the video) carefully separate the skin from the breast and now you're ready to load in the ingredients. Here we go... 
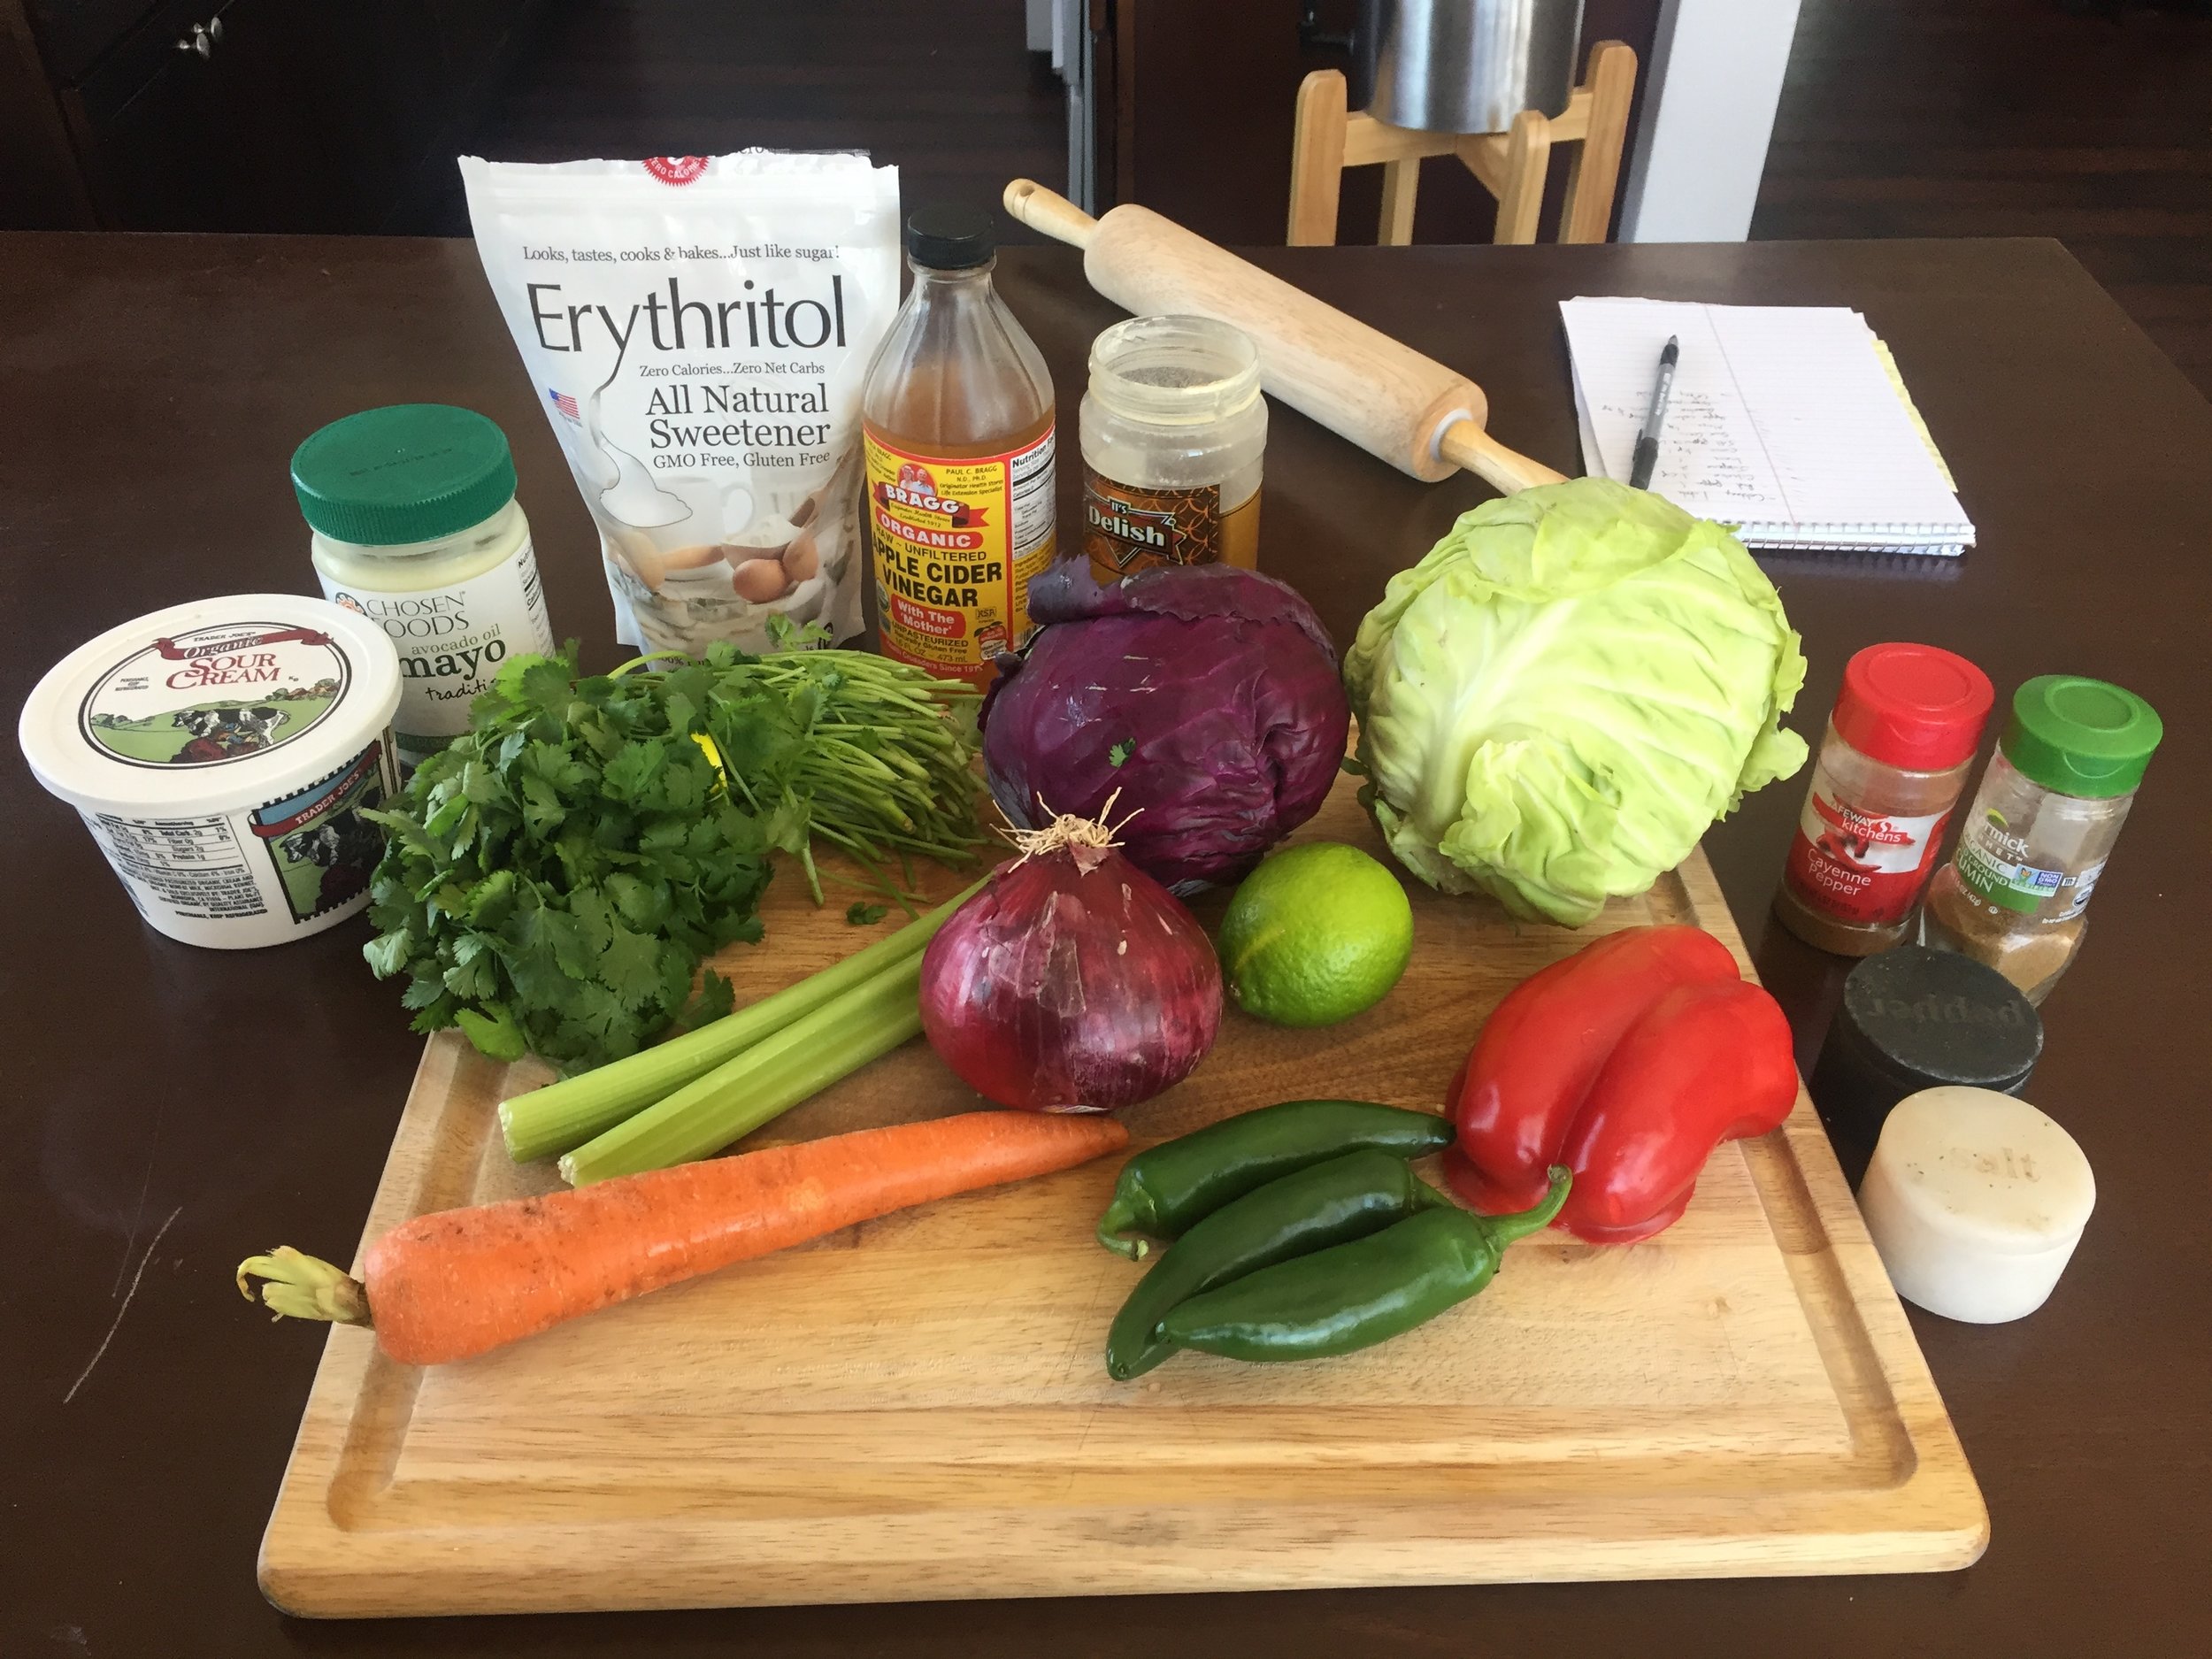
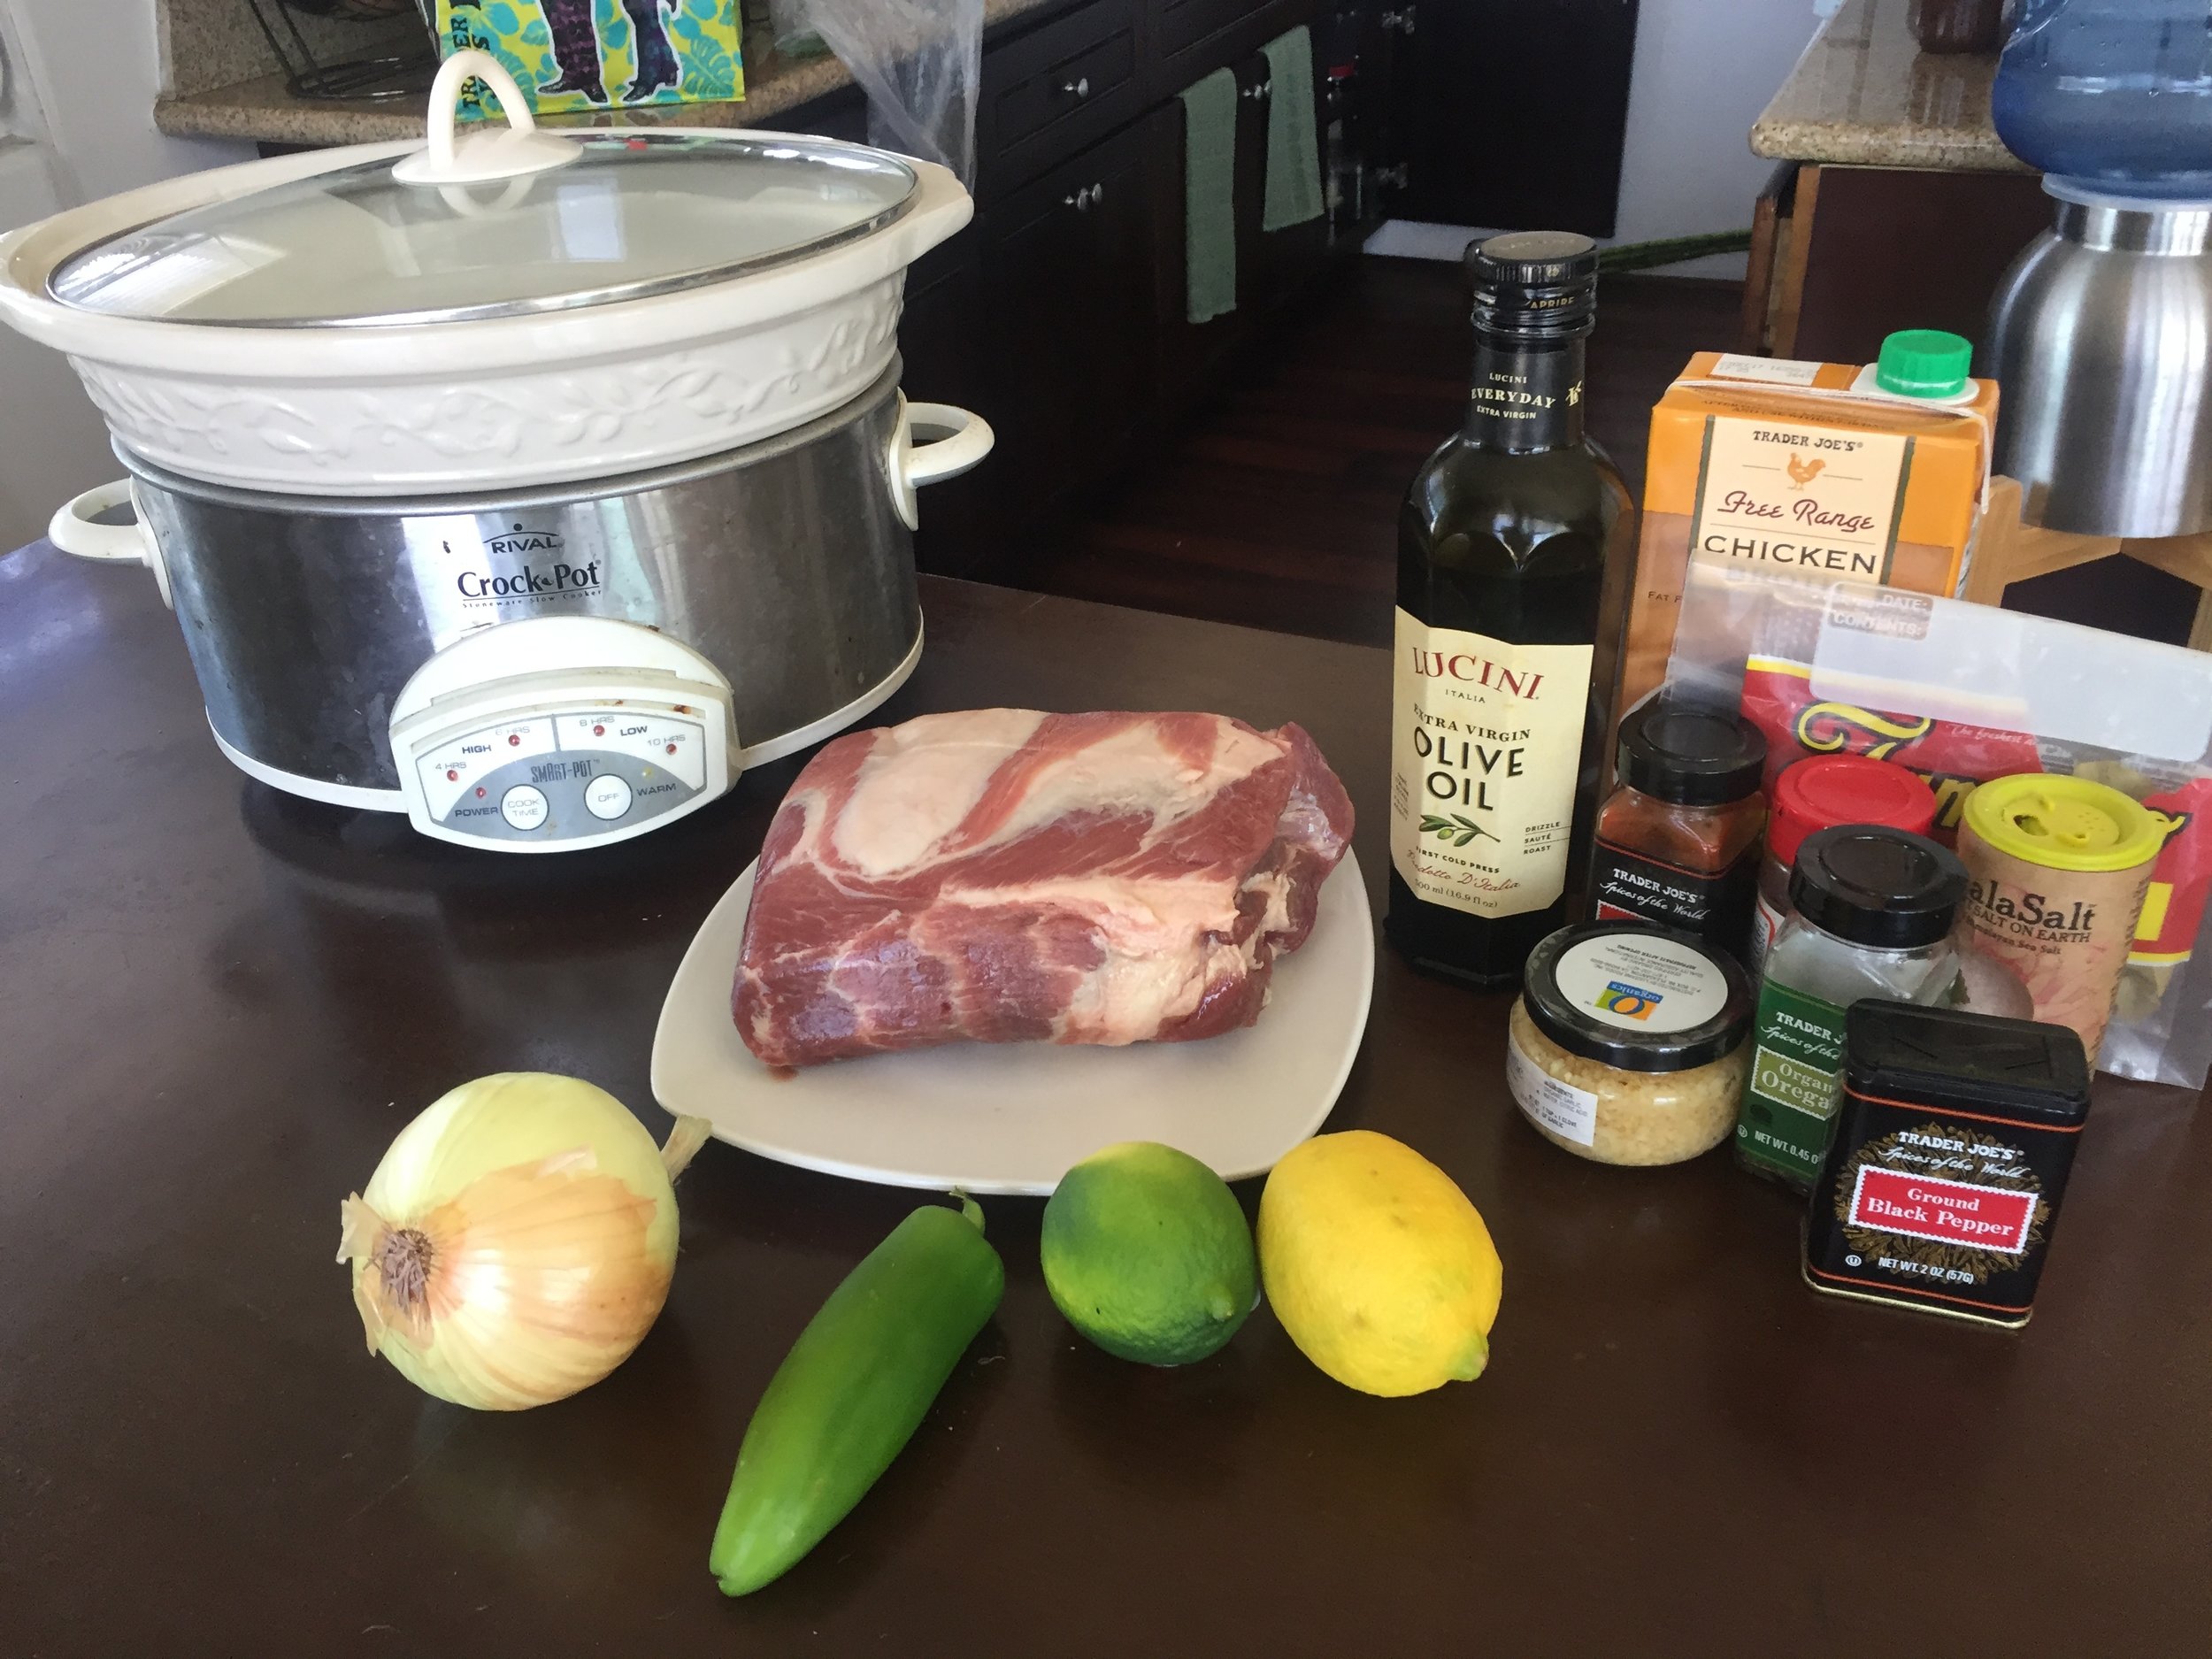
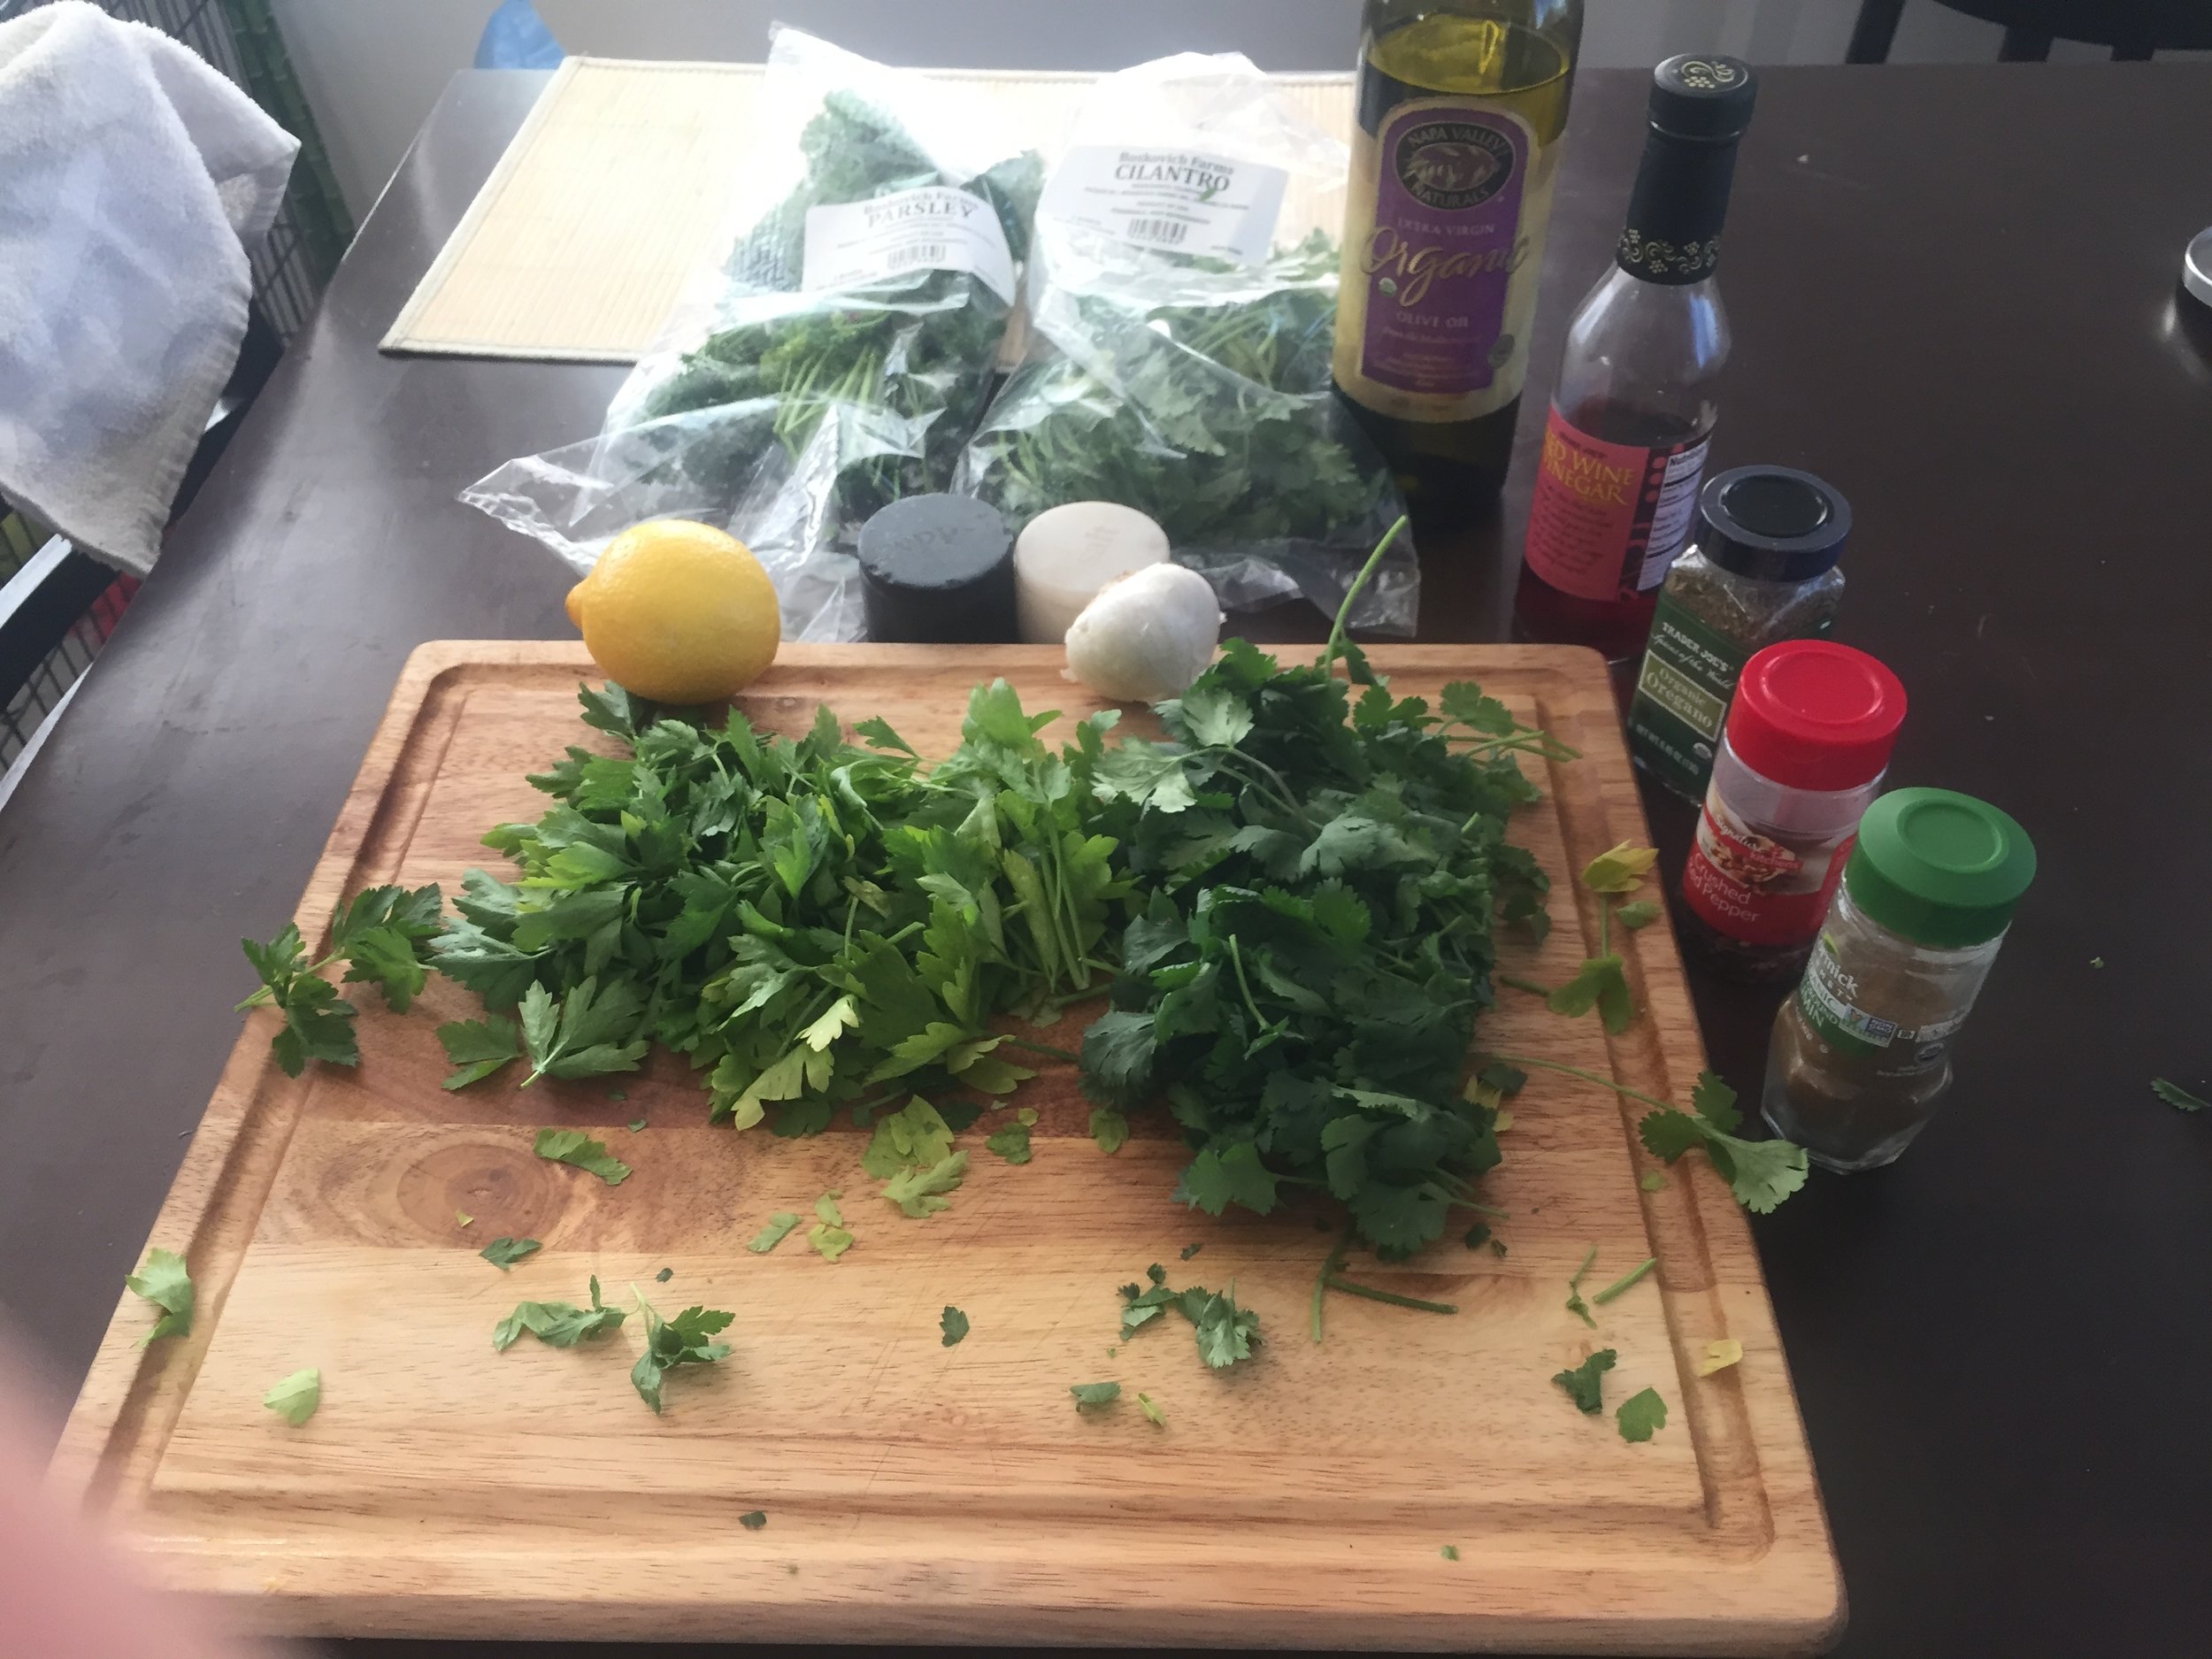
The Ingredients...

  • Whole Chicken (4-5 lbs) 
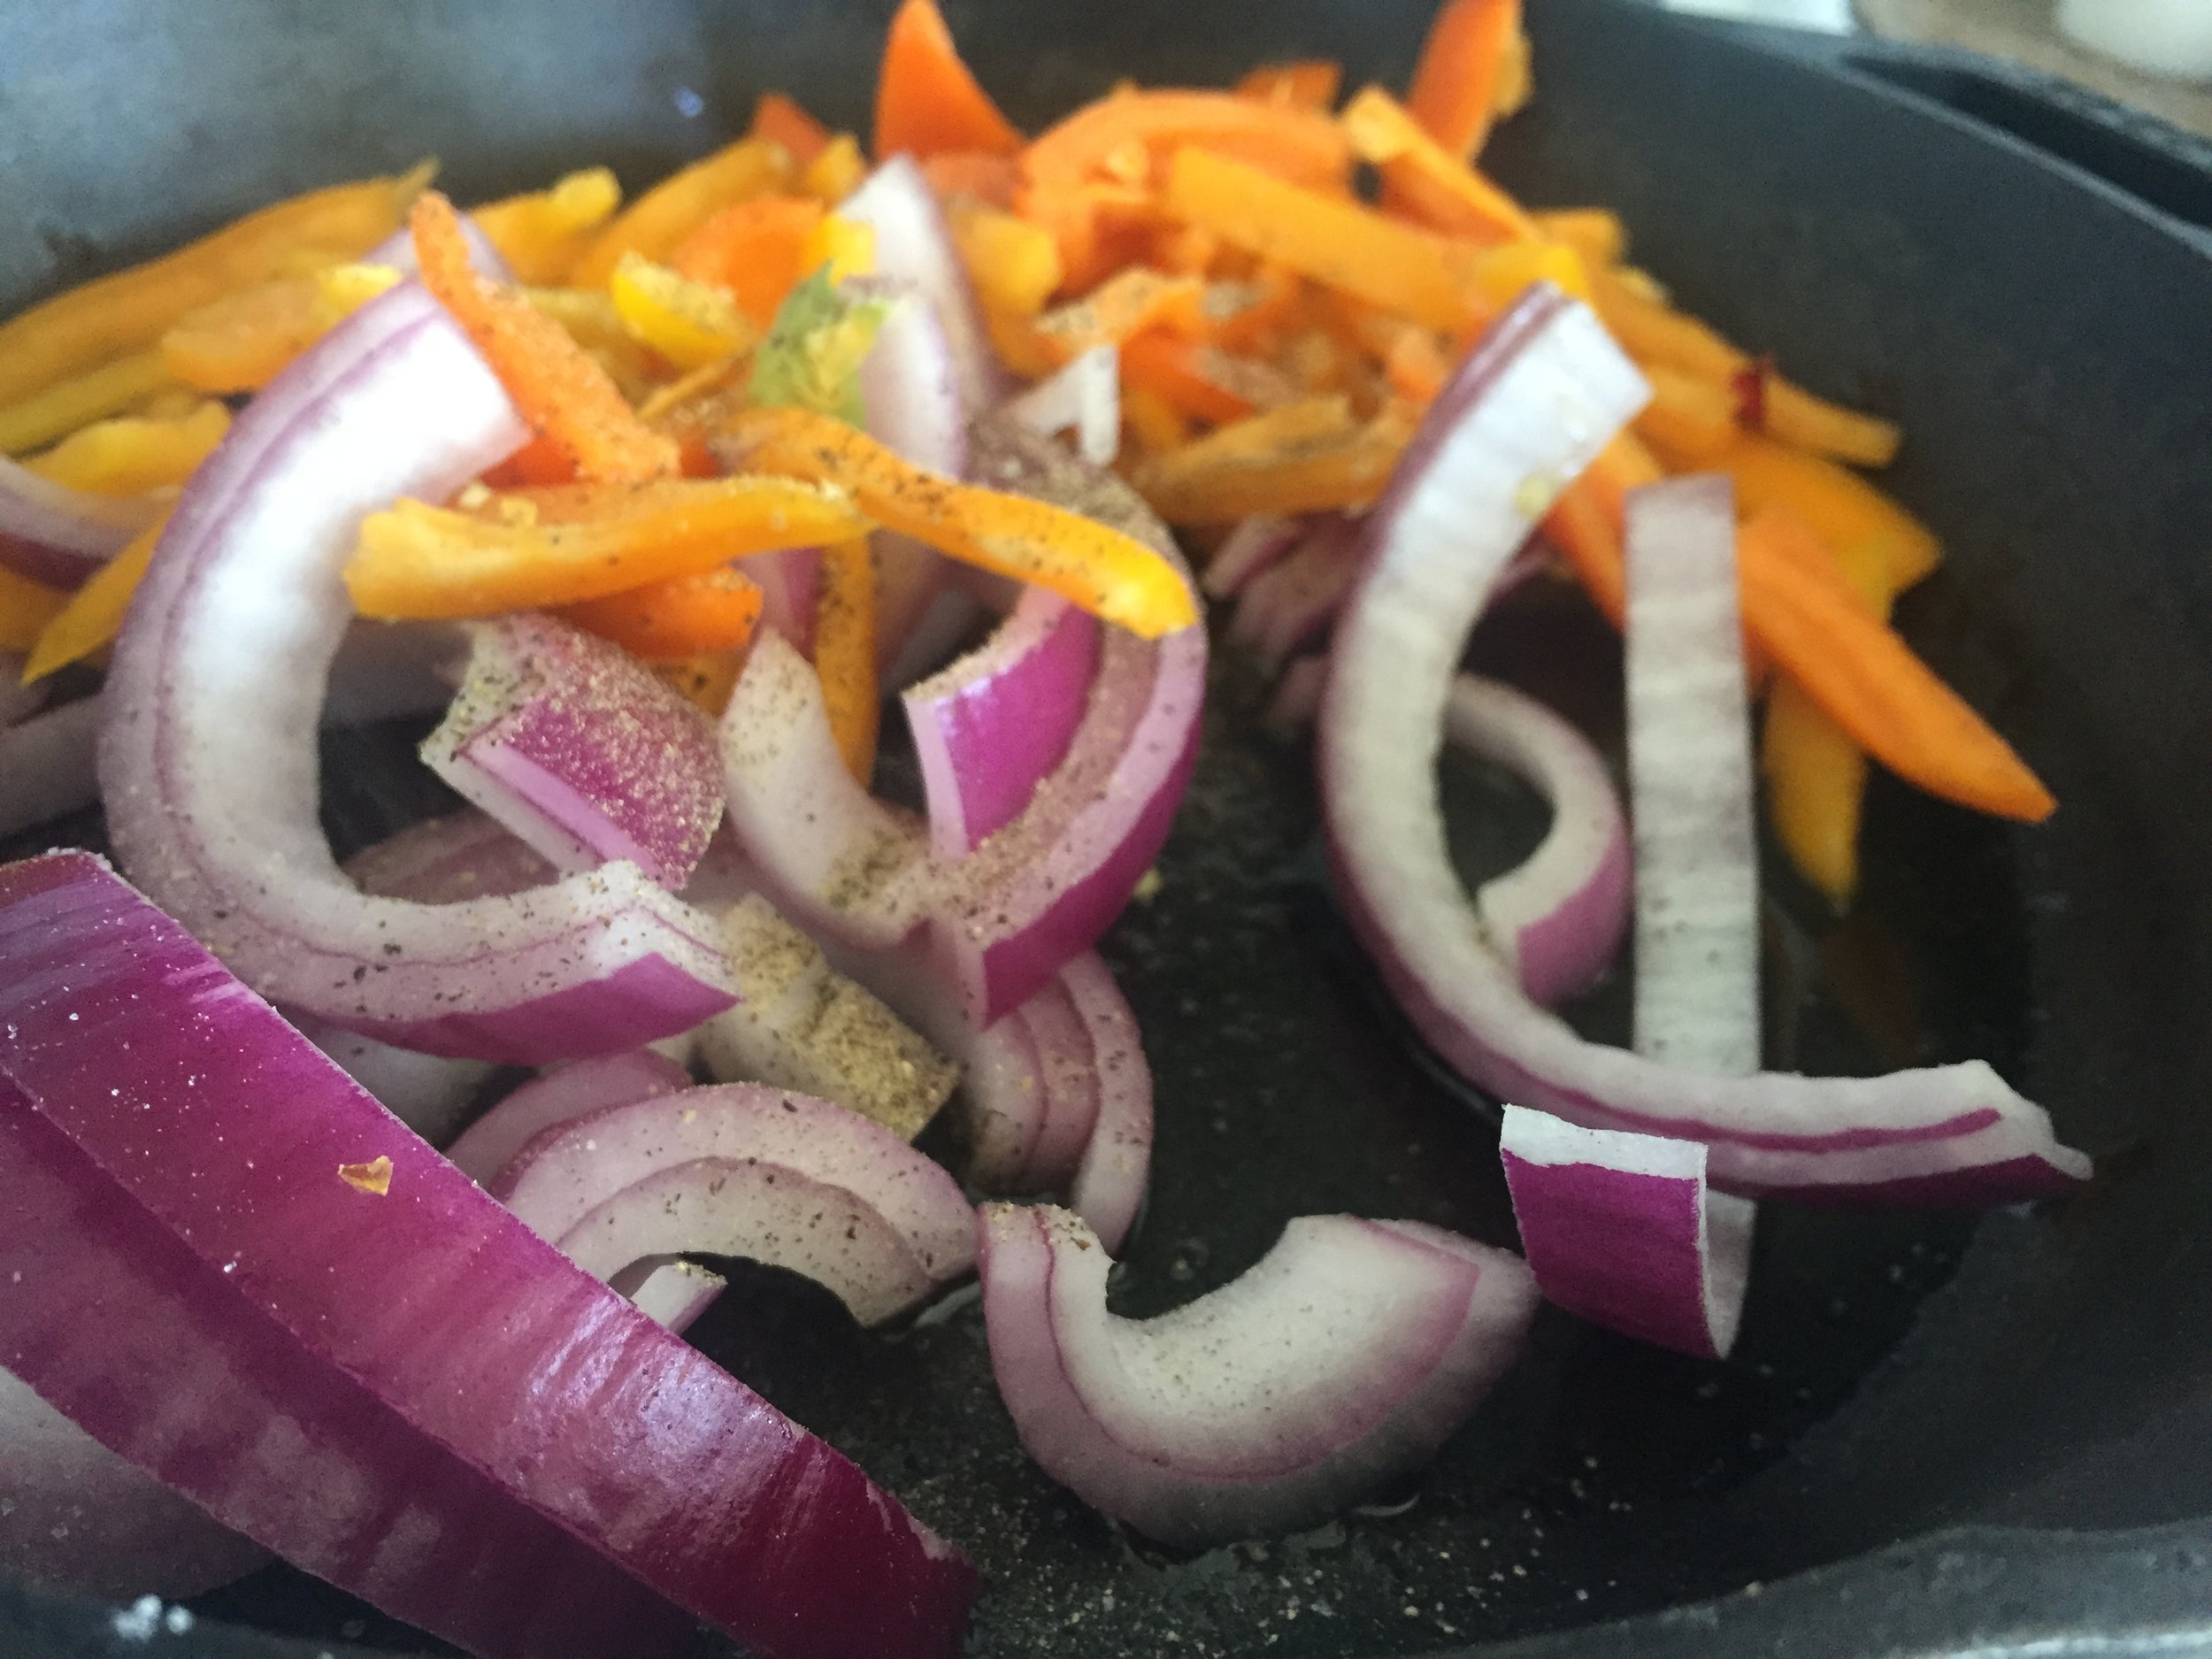
  • 7-8 Mini Sweet Bell Peppers 
  • 1/2 large onion (I prefer Red Onion) 
  • 1/4 cup of butter 
  • 1/4 cup of coconut oil 
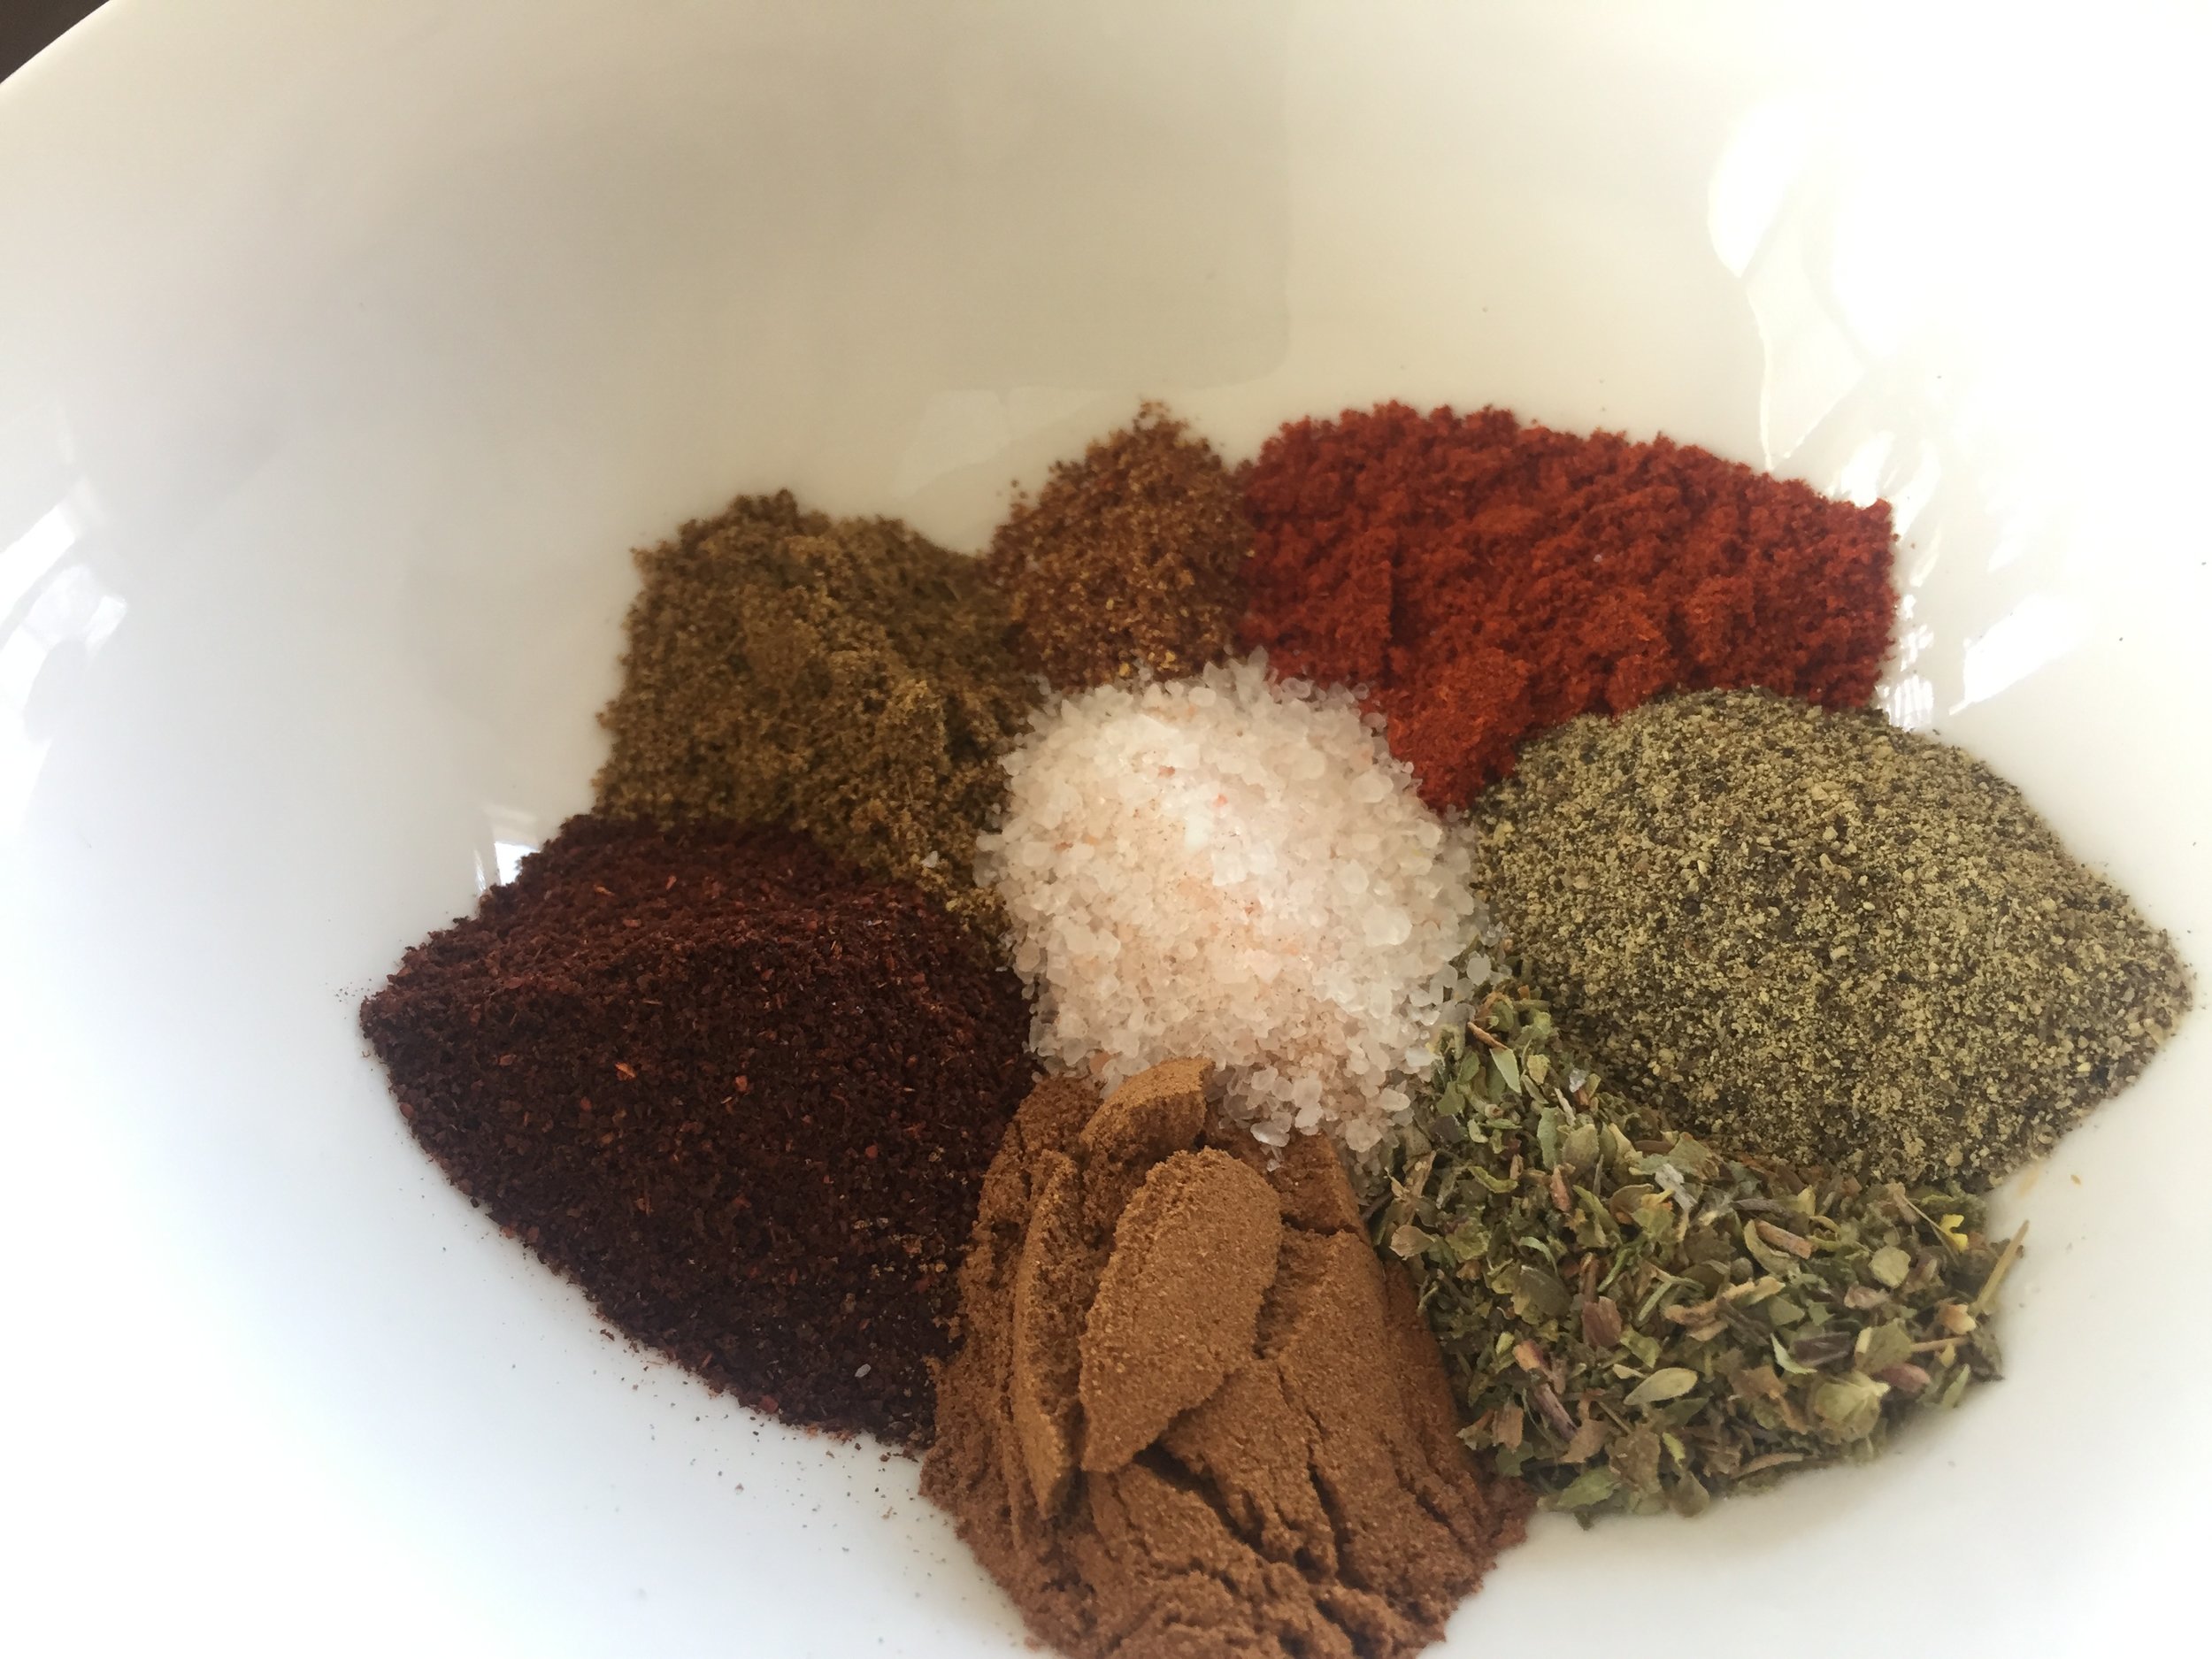
  • teaspoon cinnamon
  • teaspoon oregano
  • teaspoon chili powder 
  • teaspoon cumin 
  • tablespoon garlic (crushed or minced) 
  • teaspoon salt 
  • teaspoon black pepper 
  • teaspoon smoked paprika 
  • teaspoon liquid smoke 
  • 1/2 teaspoon cayenne pepper 
IMG_2051.JPG

The Steps...

  1. Preheat oven to 450 degrees F
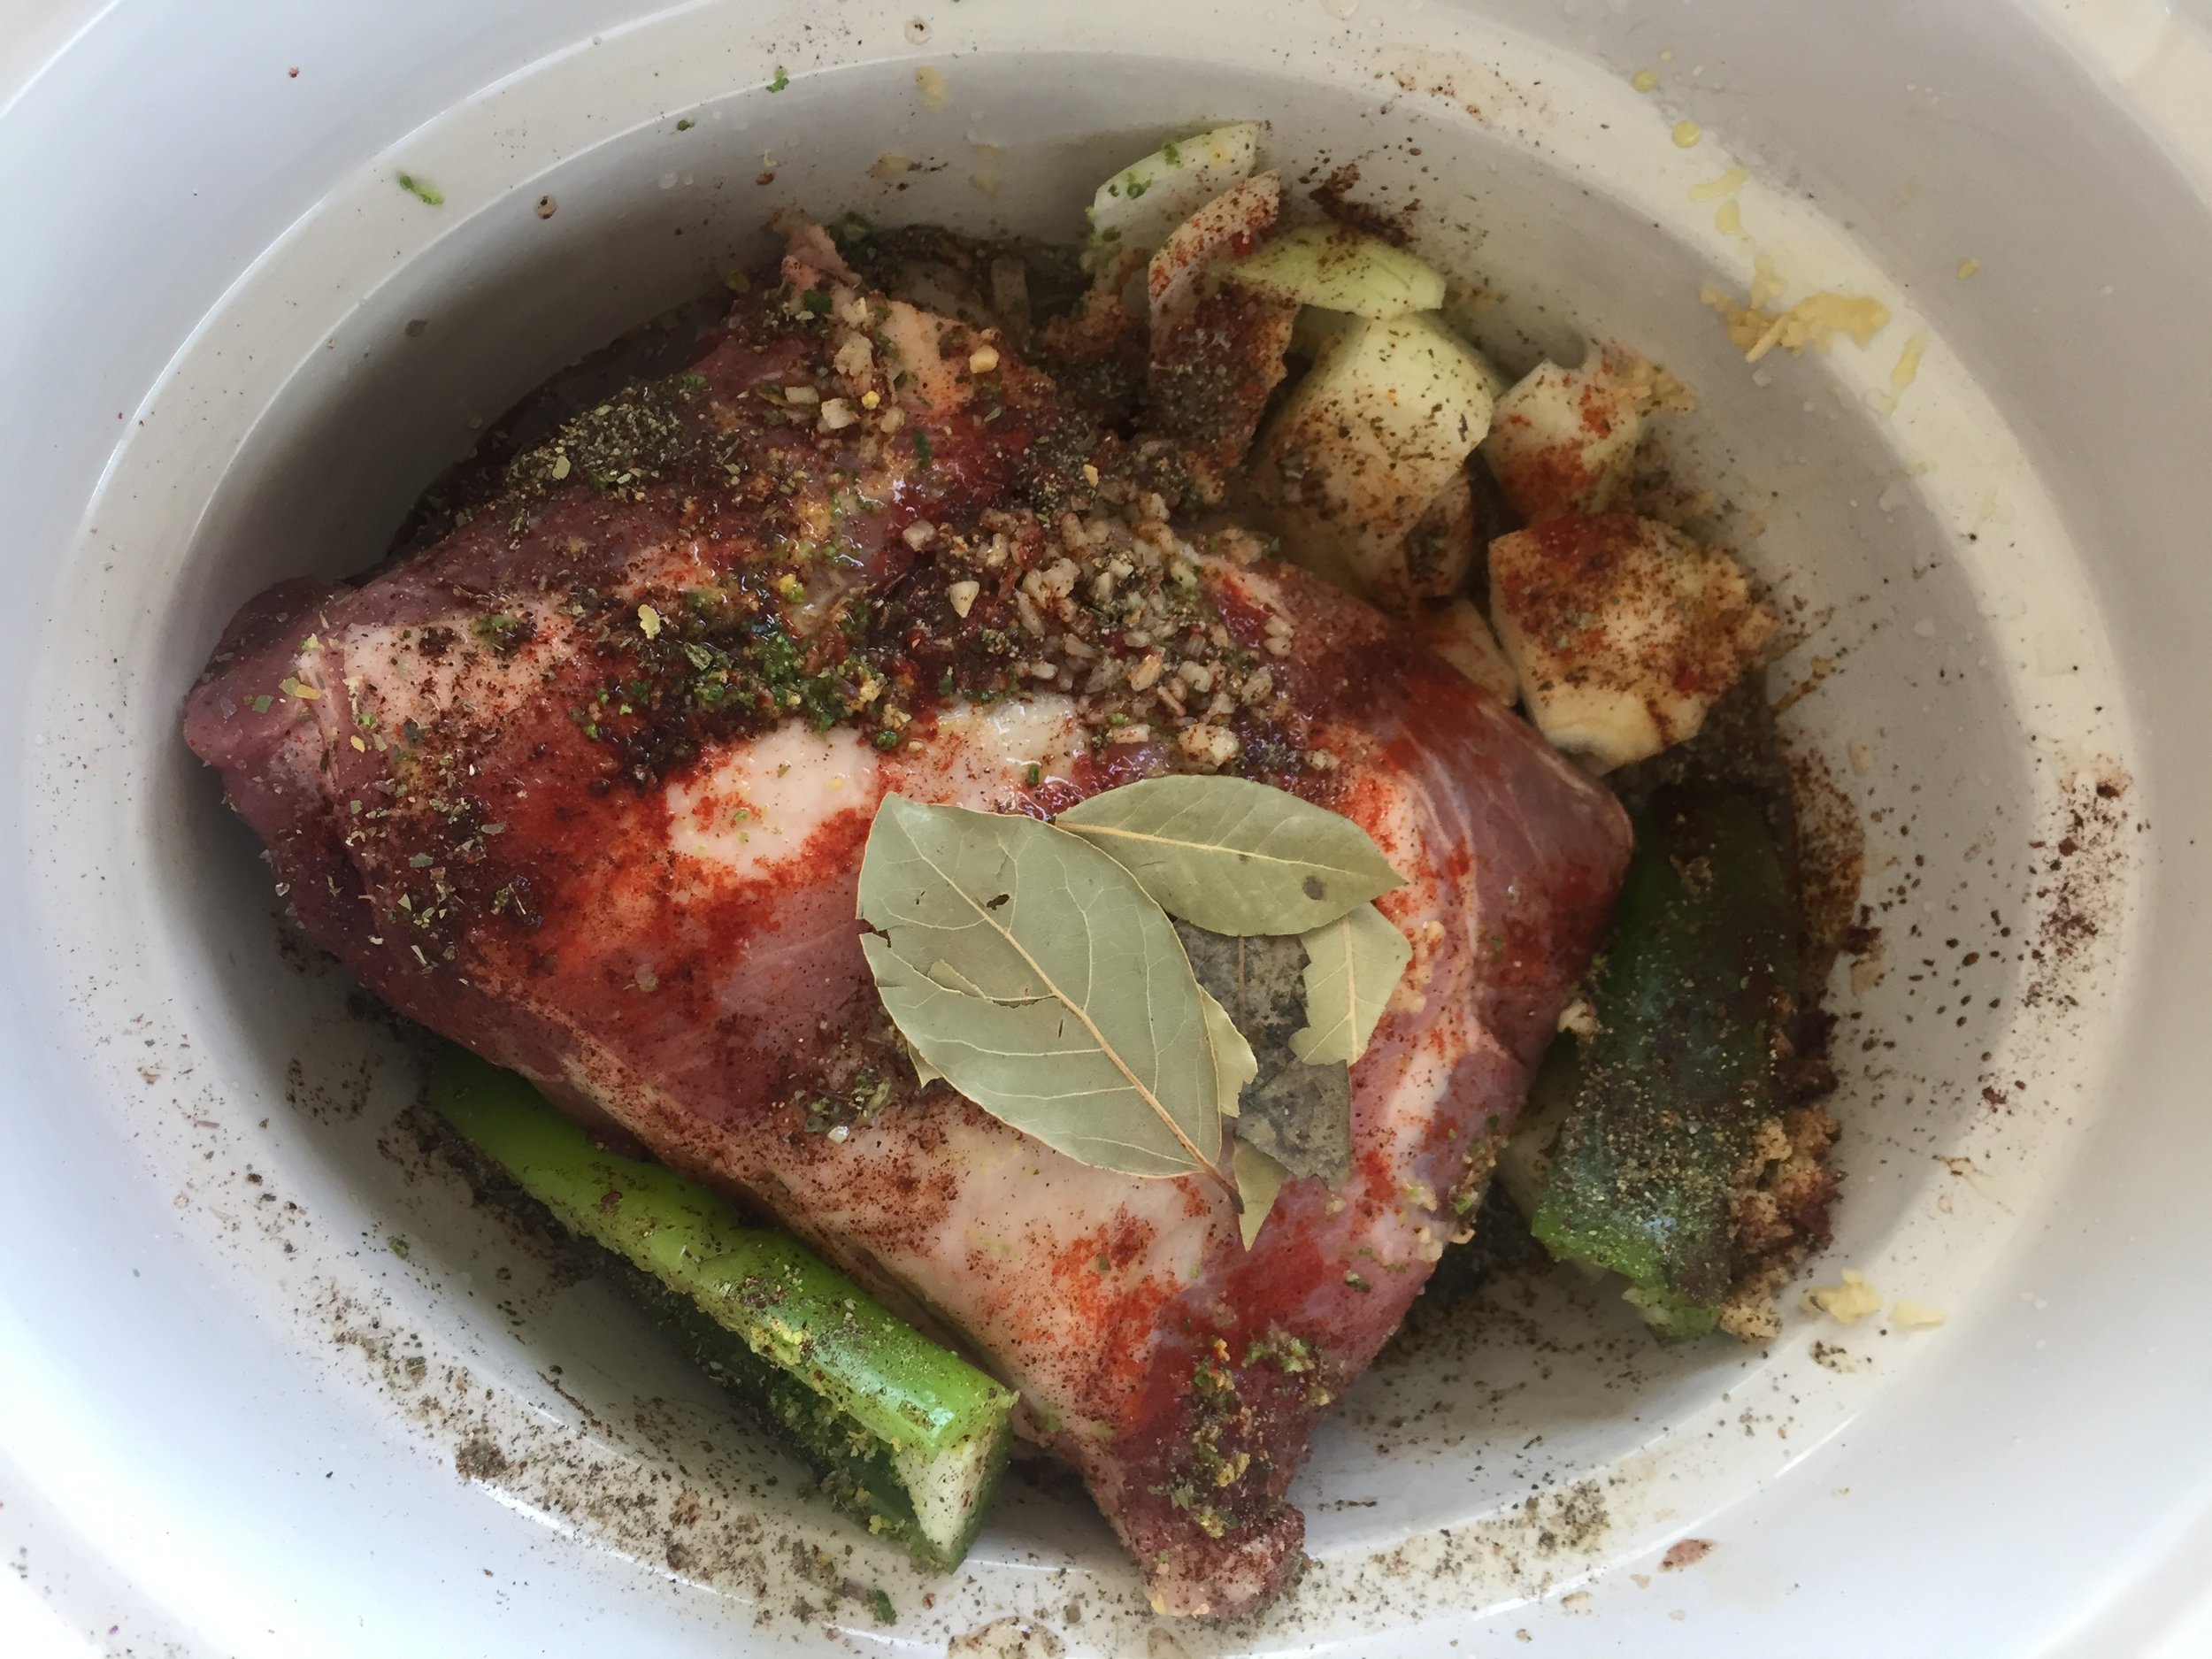
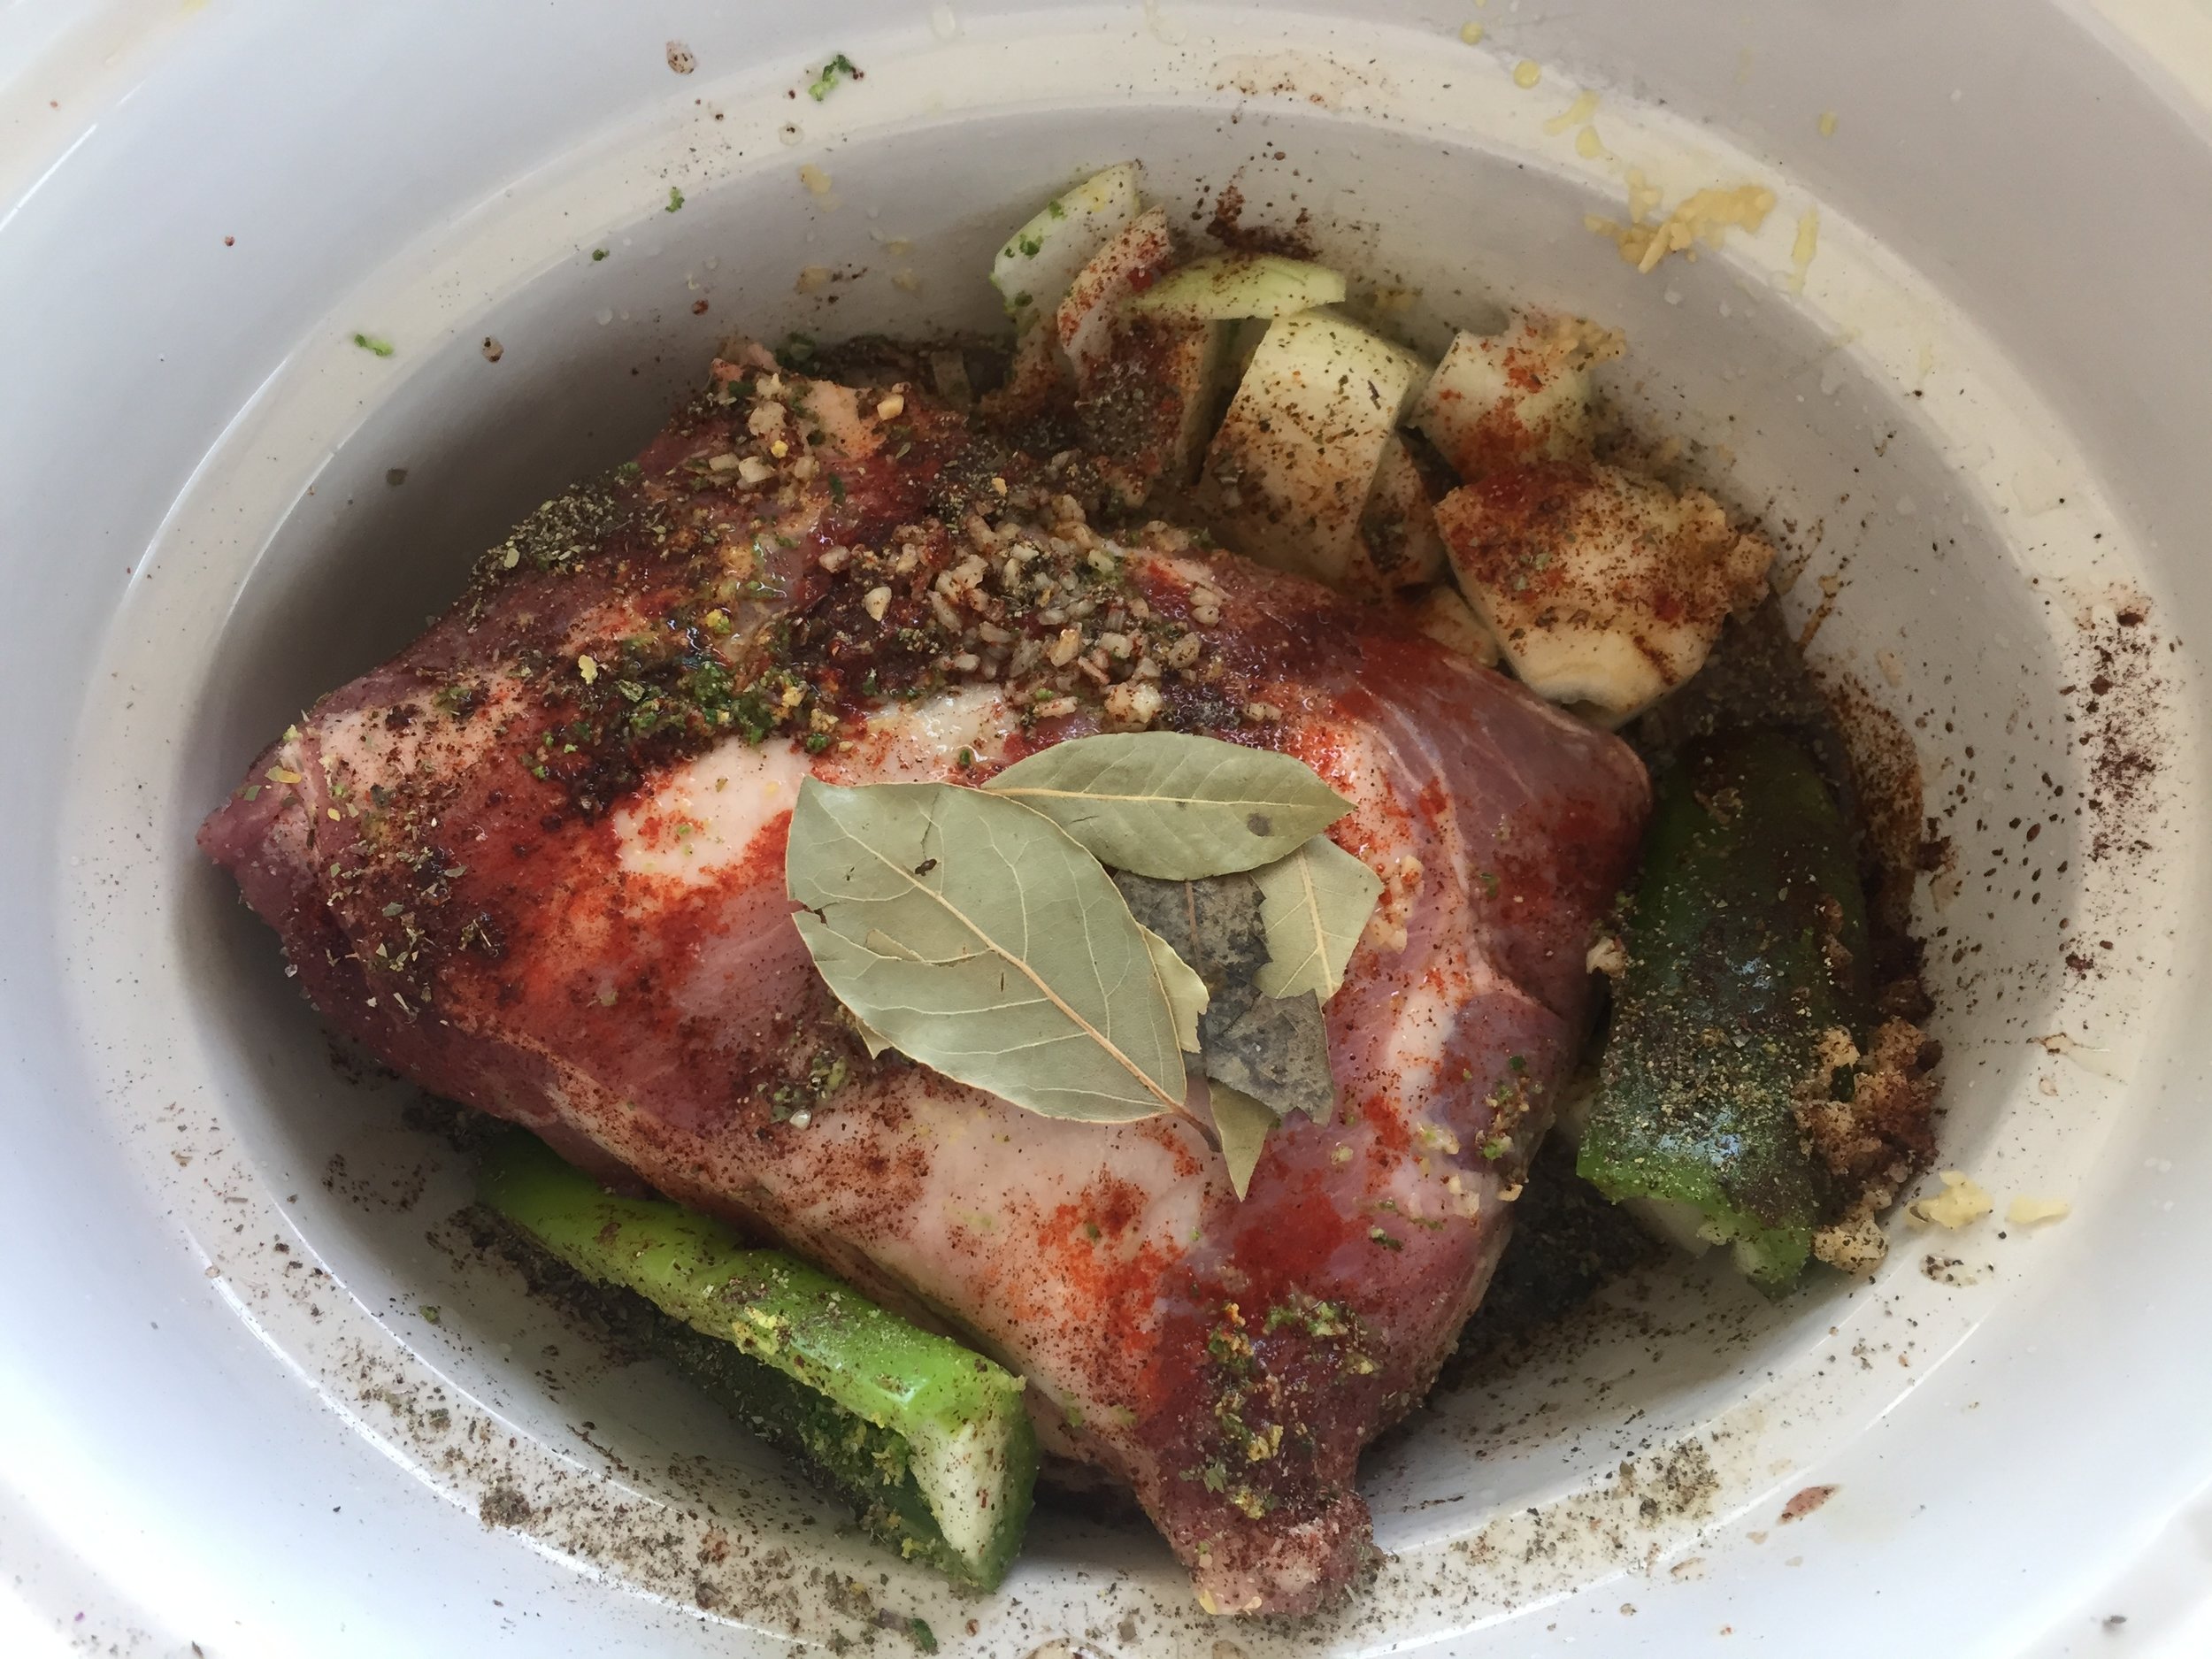
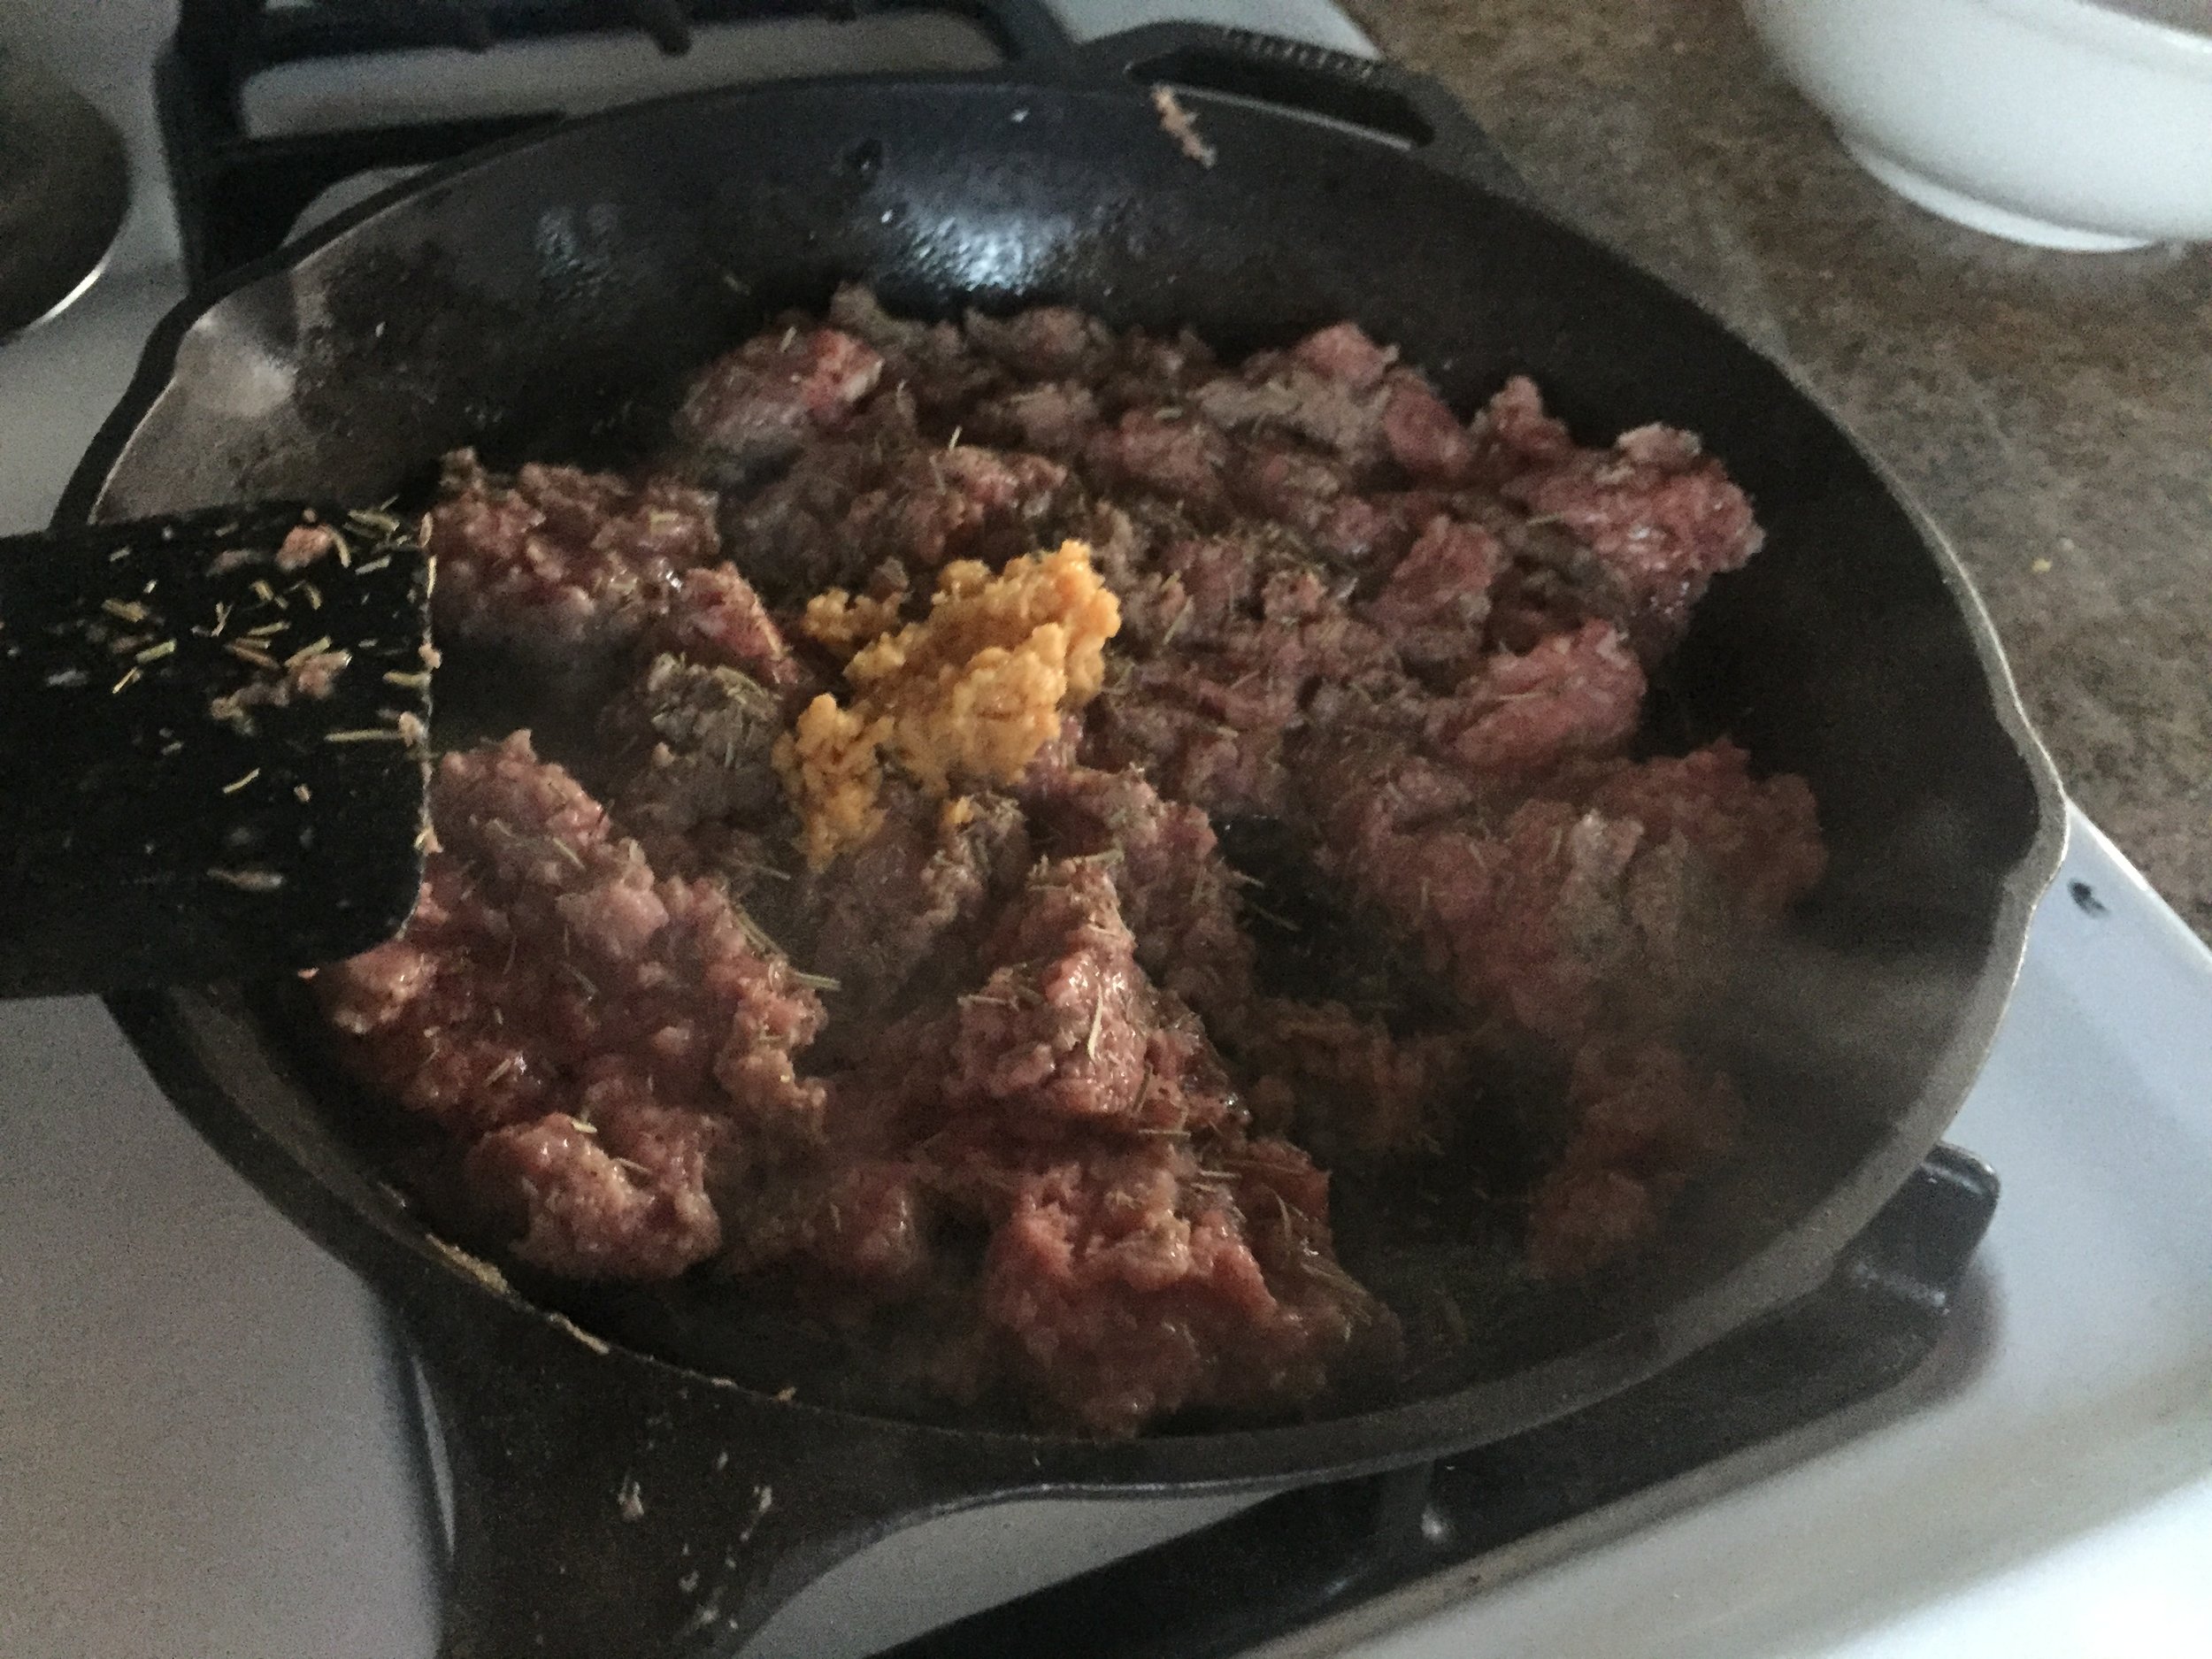
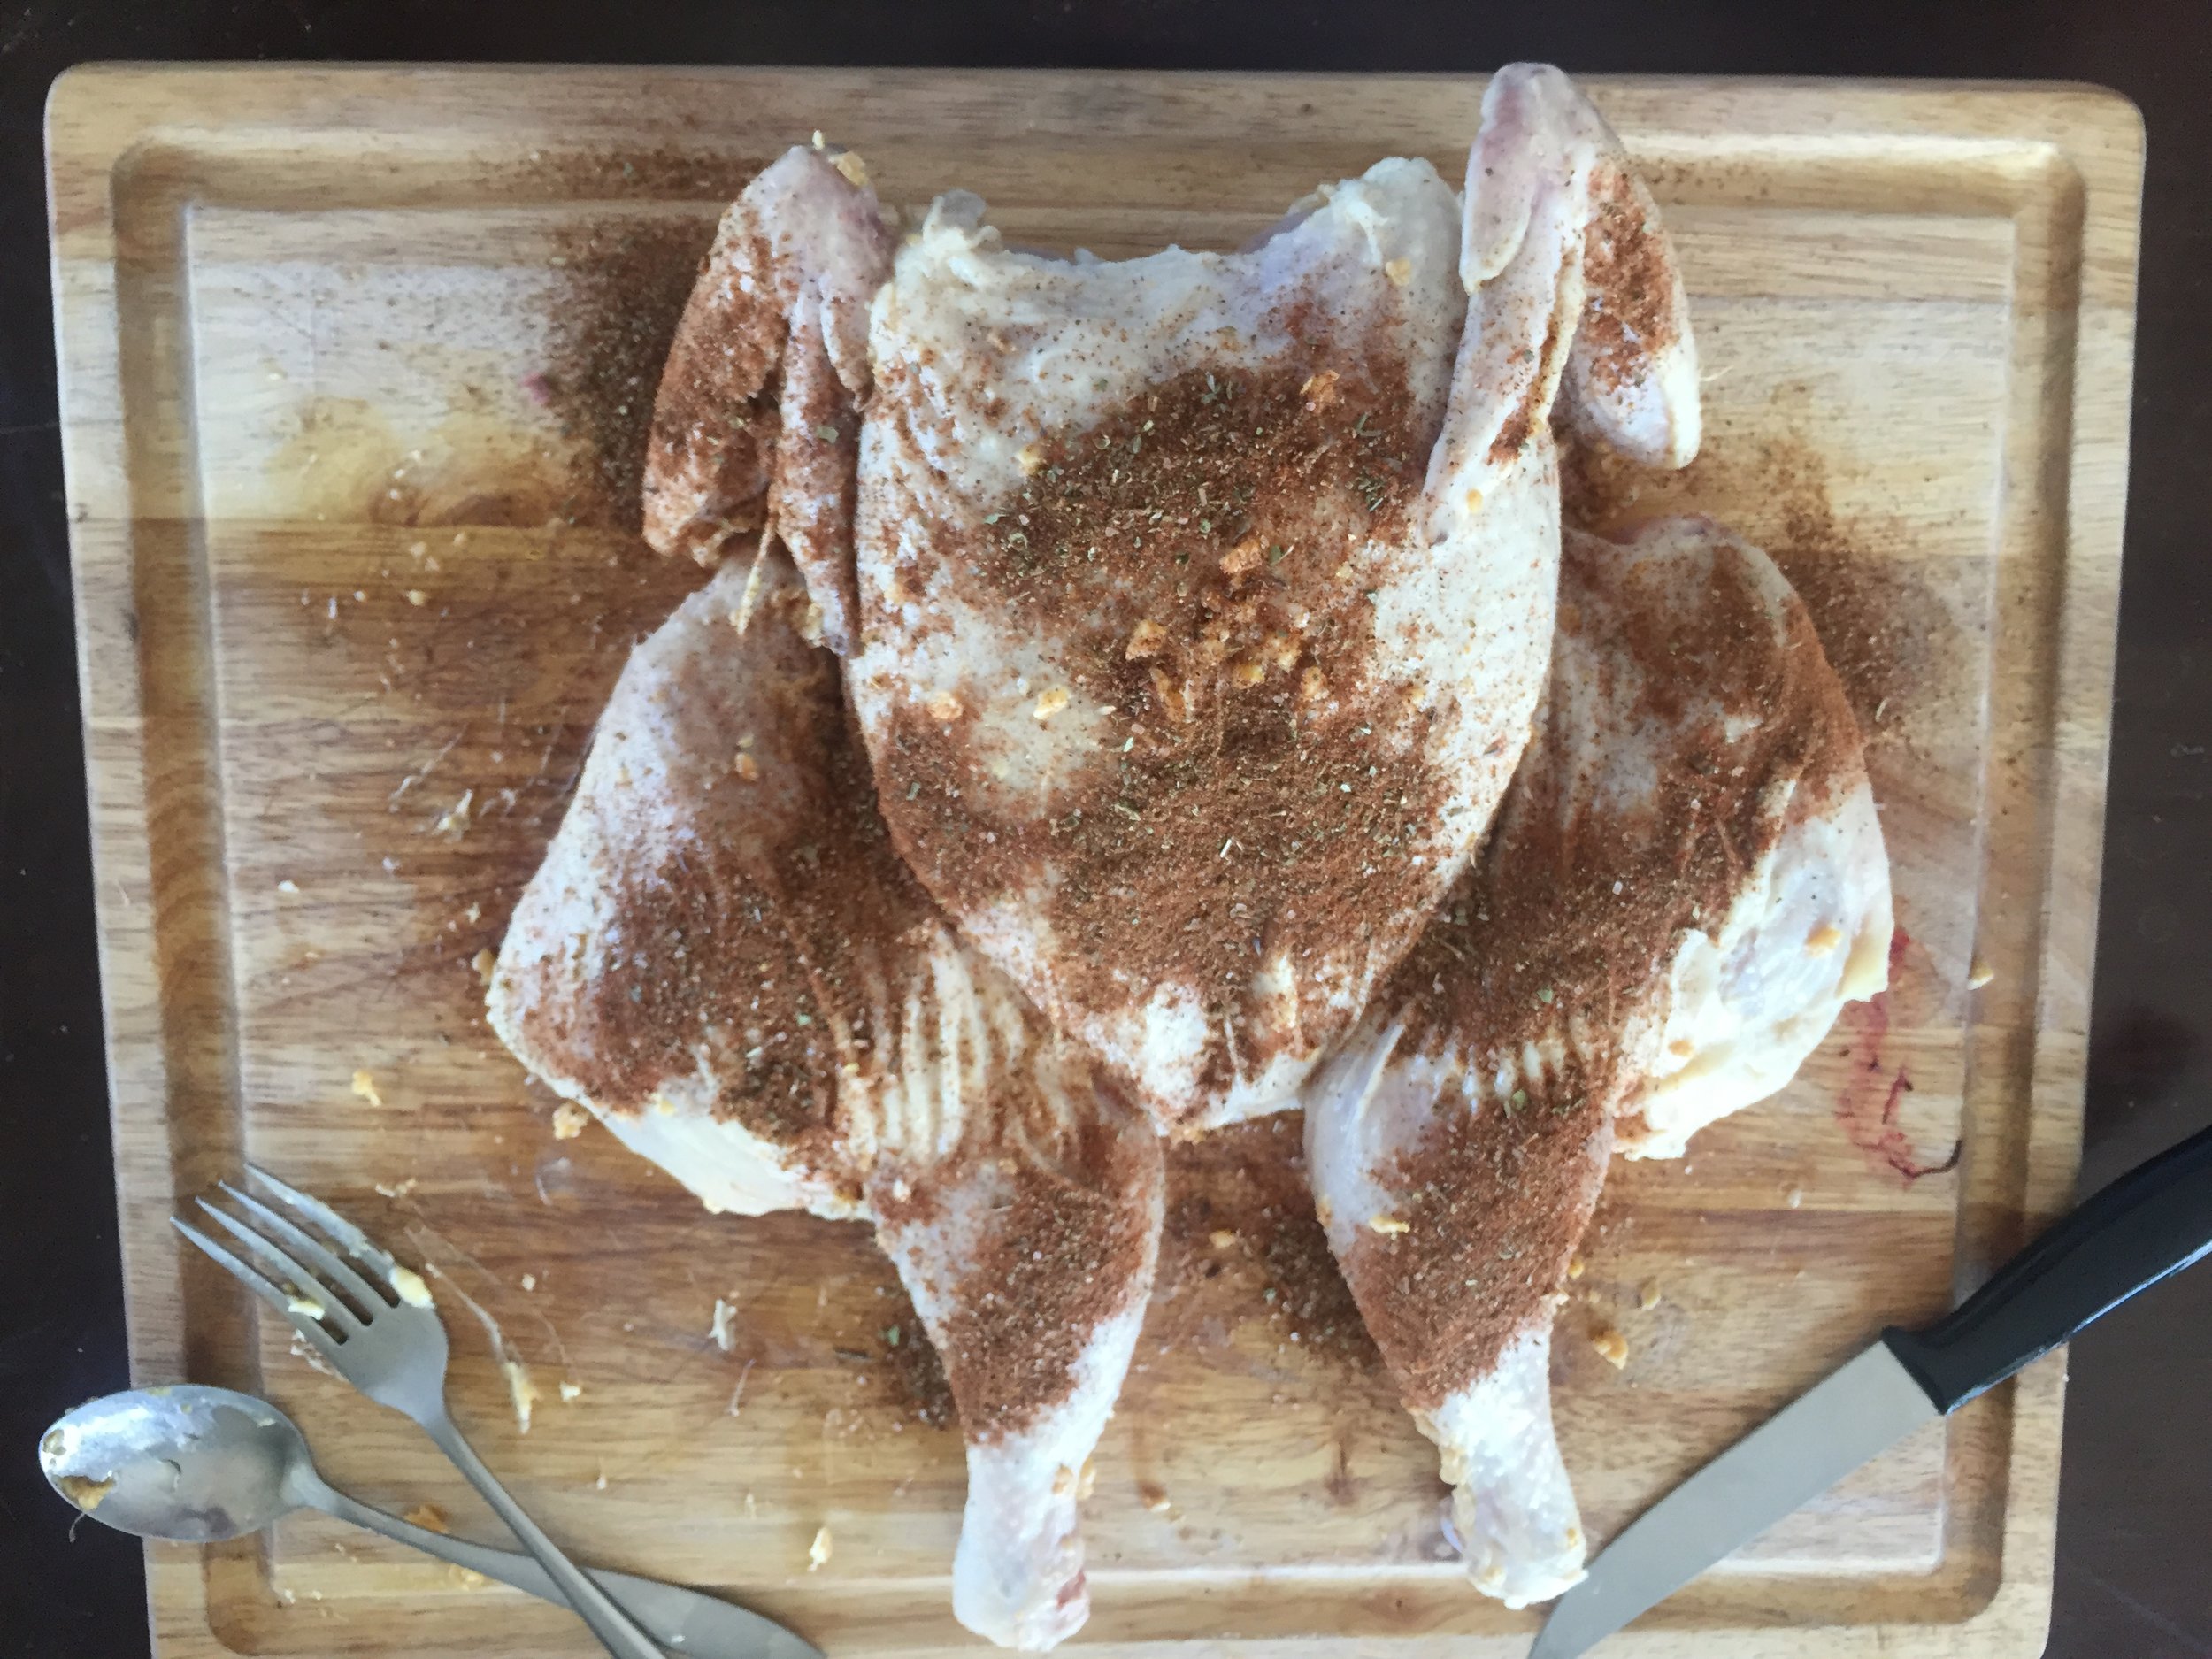
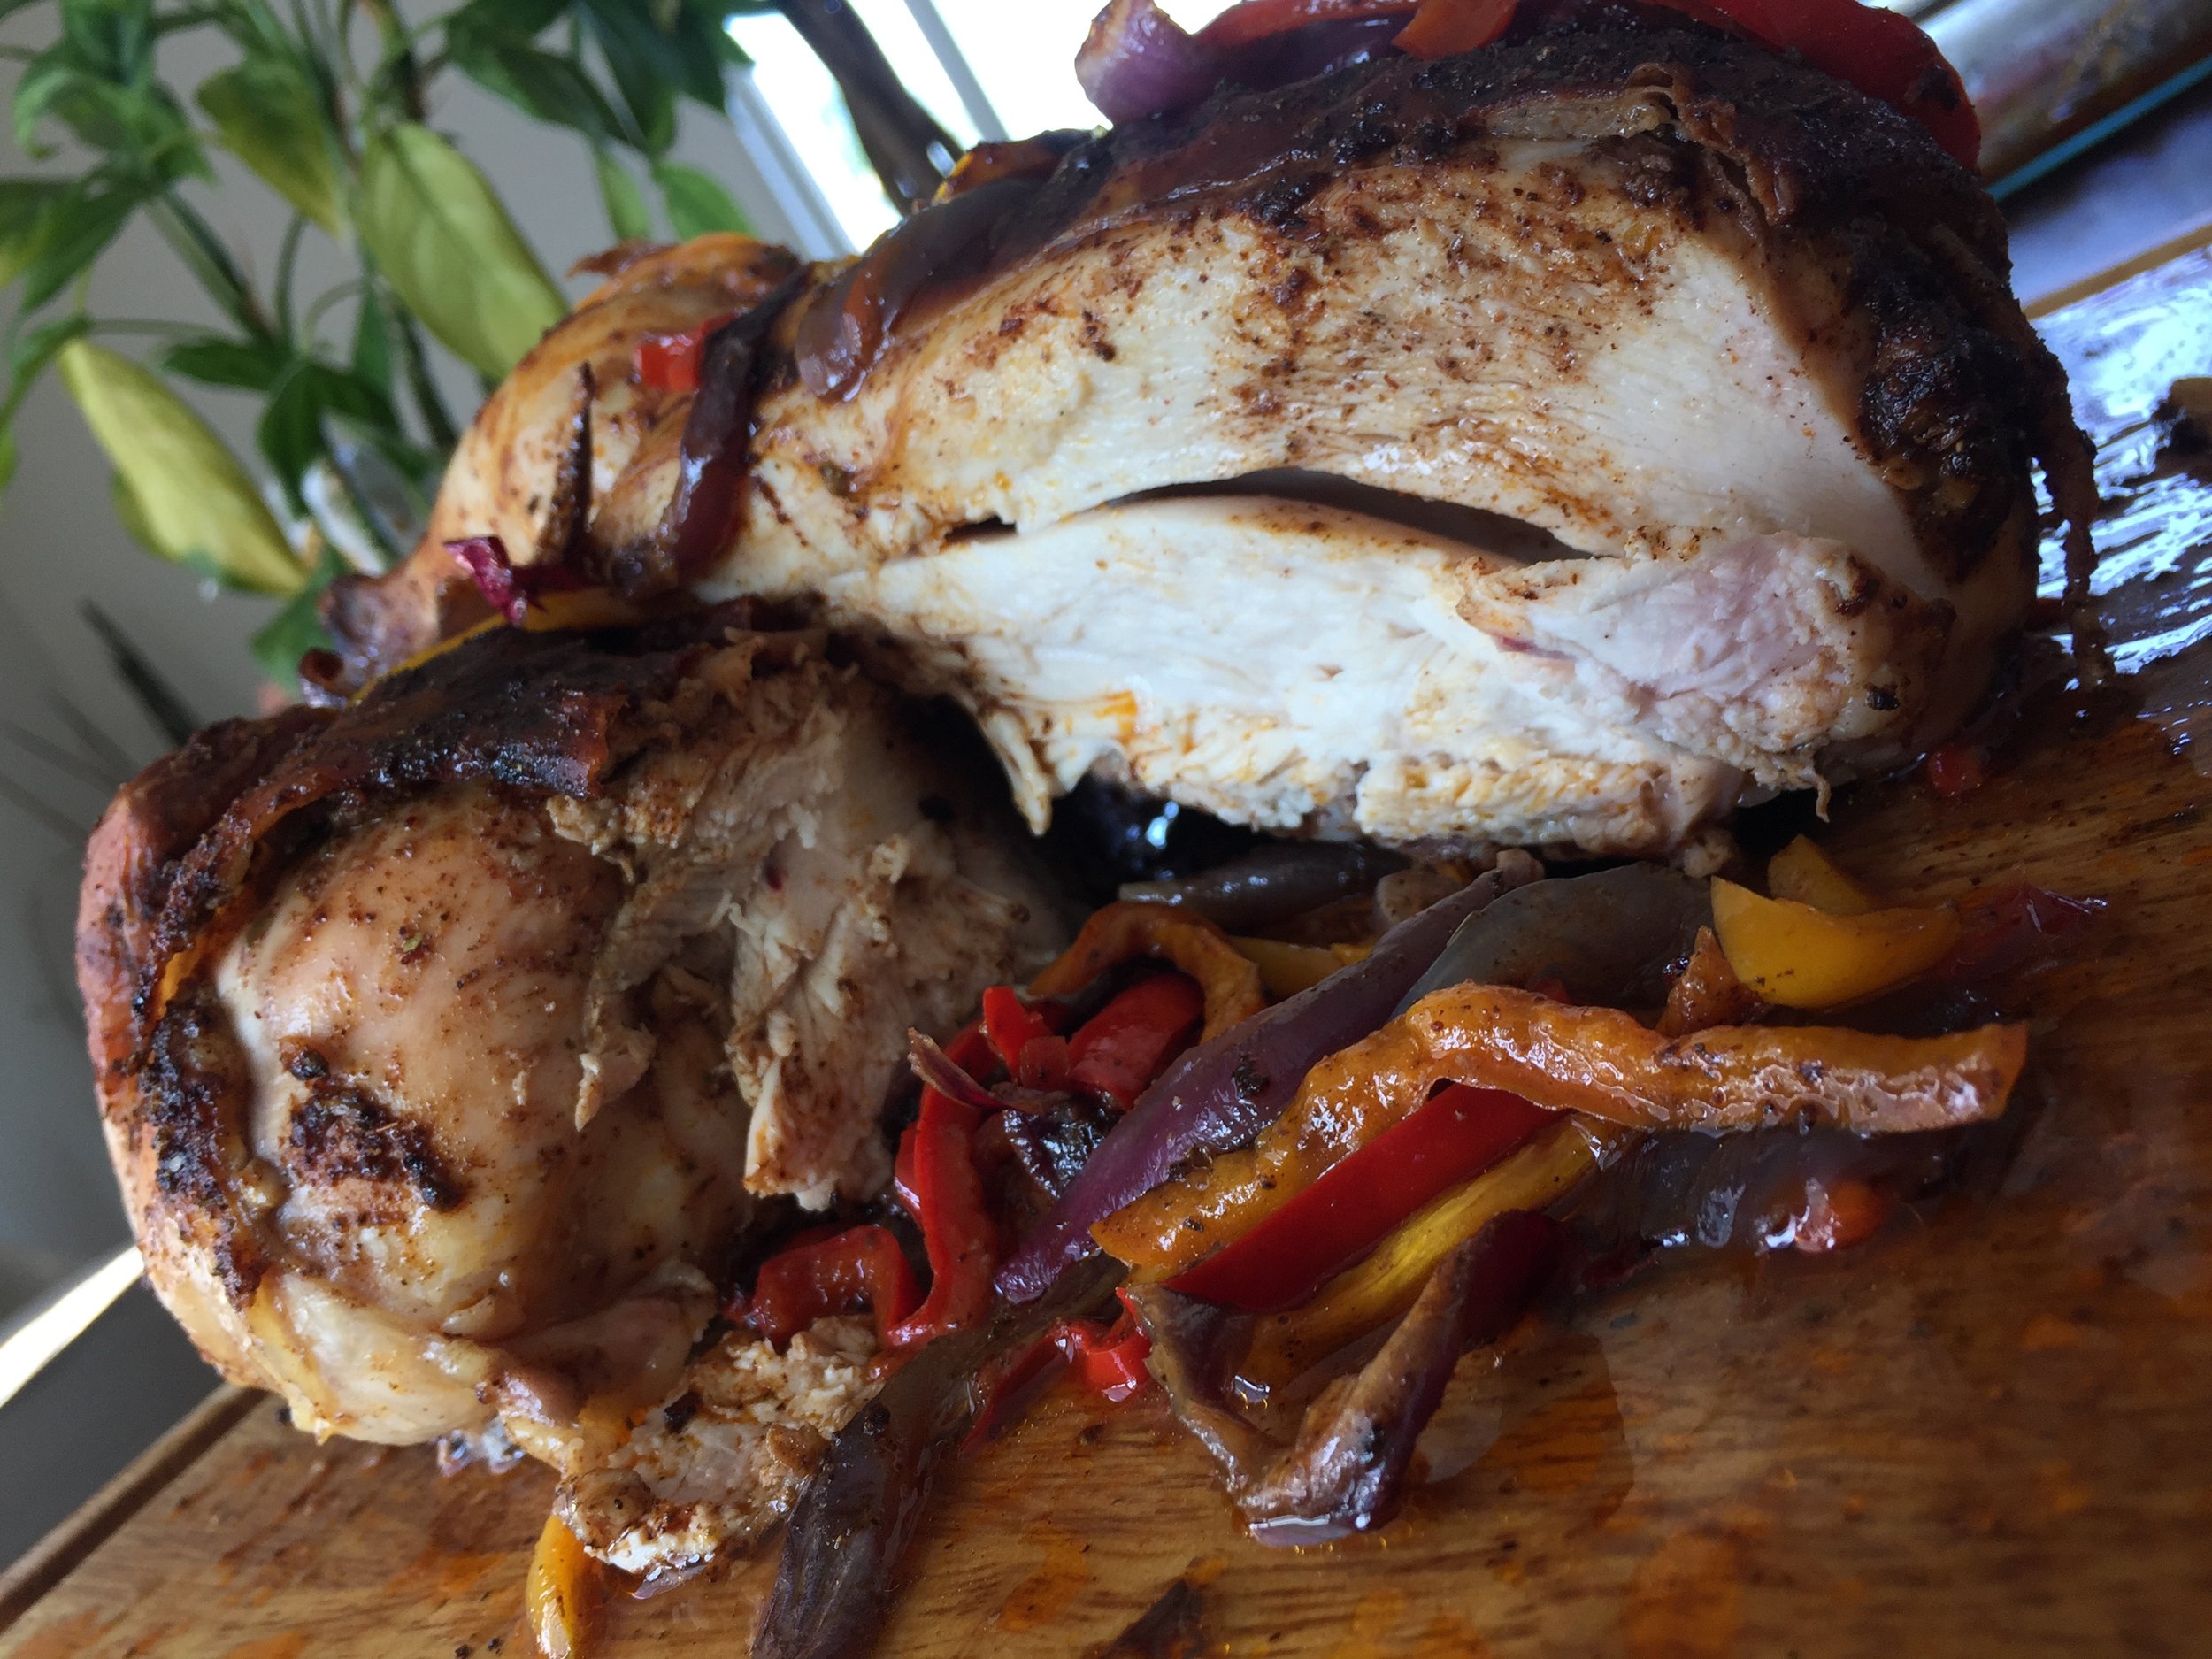
  2. In a bowl mix butter (room temp), garlic and liquid smoke. Lather up the bird everywhere that will be facing up... around the wings, legs, breast and under the skin. It's important to get some of the butter mixture under the skin and on top of the breast. This will really help keep the breast from drying out. 
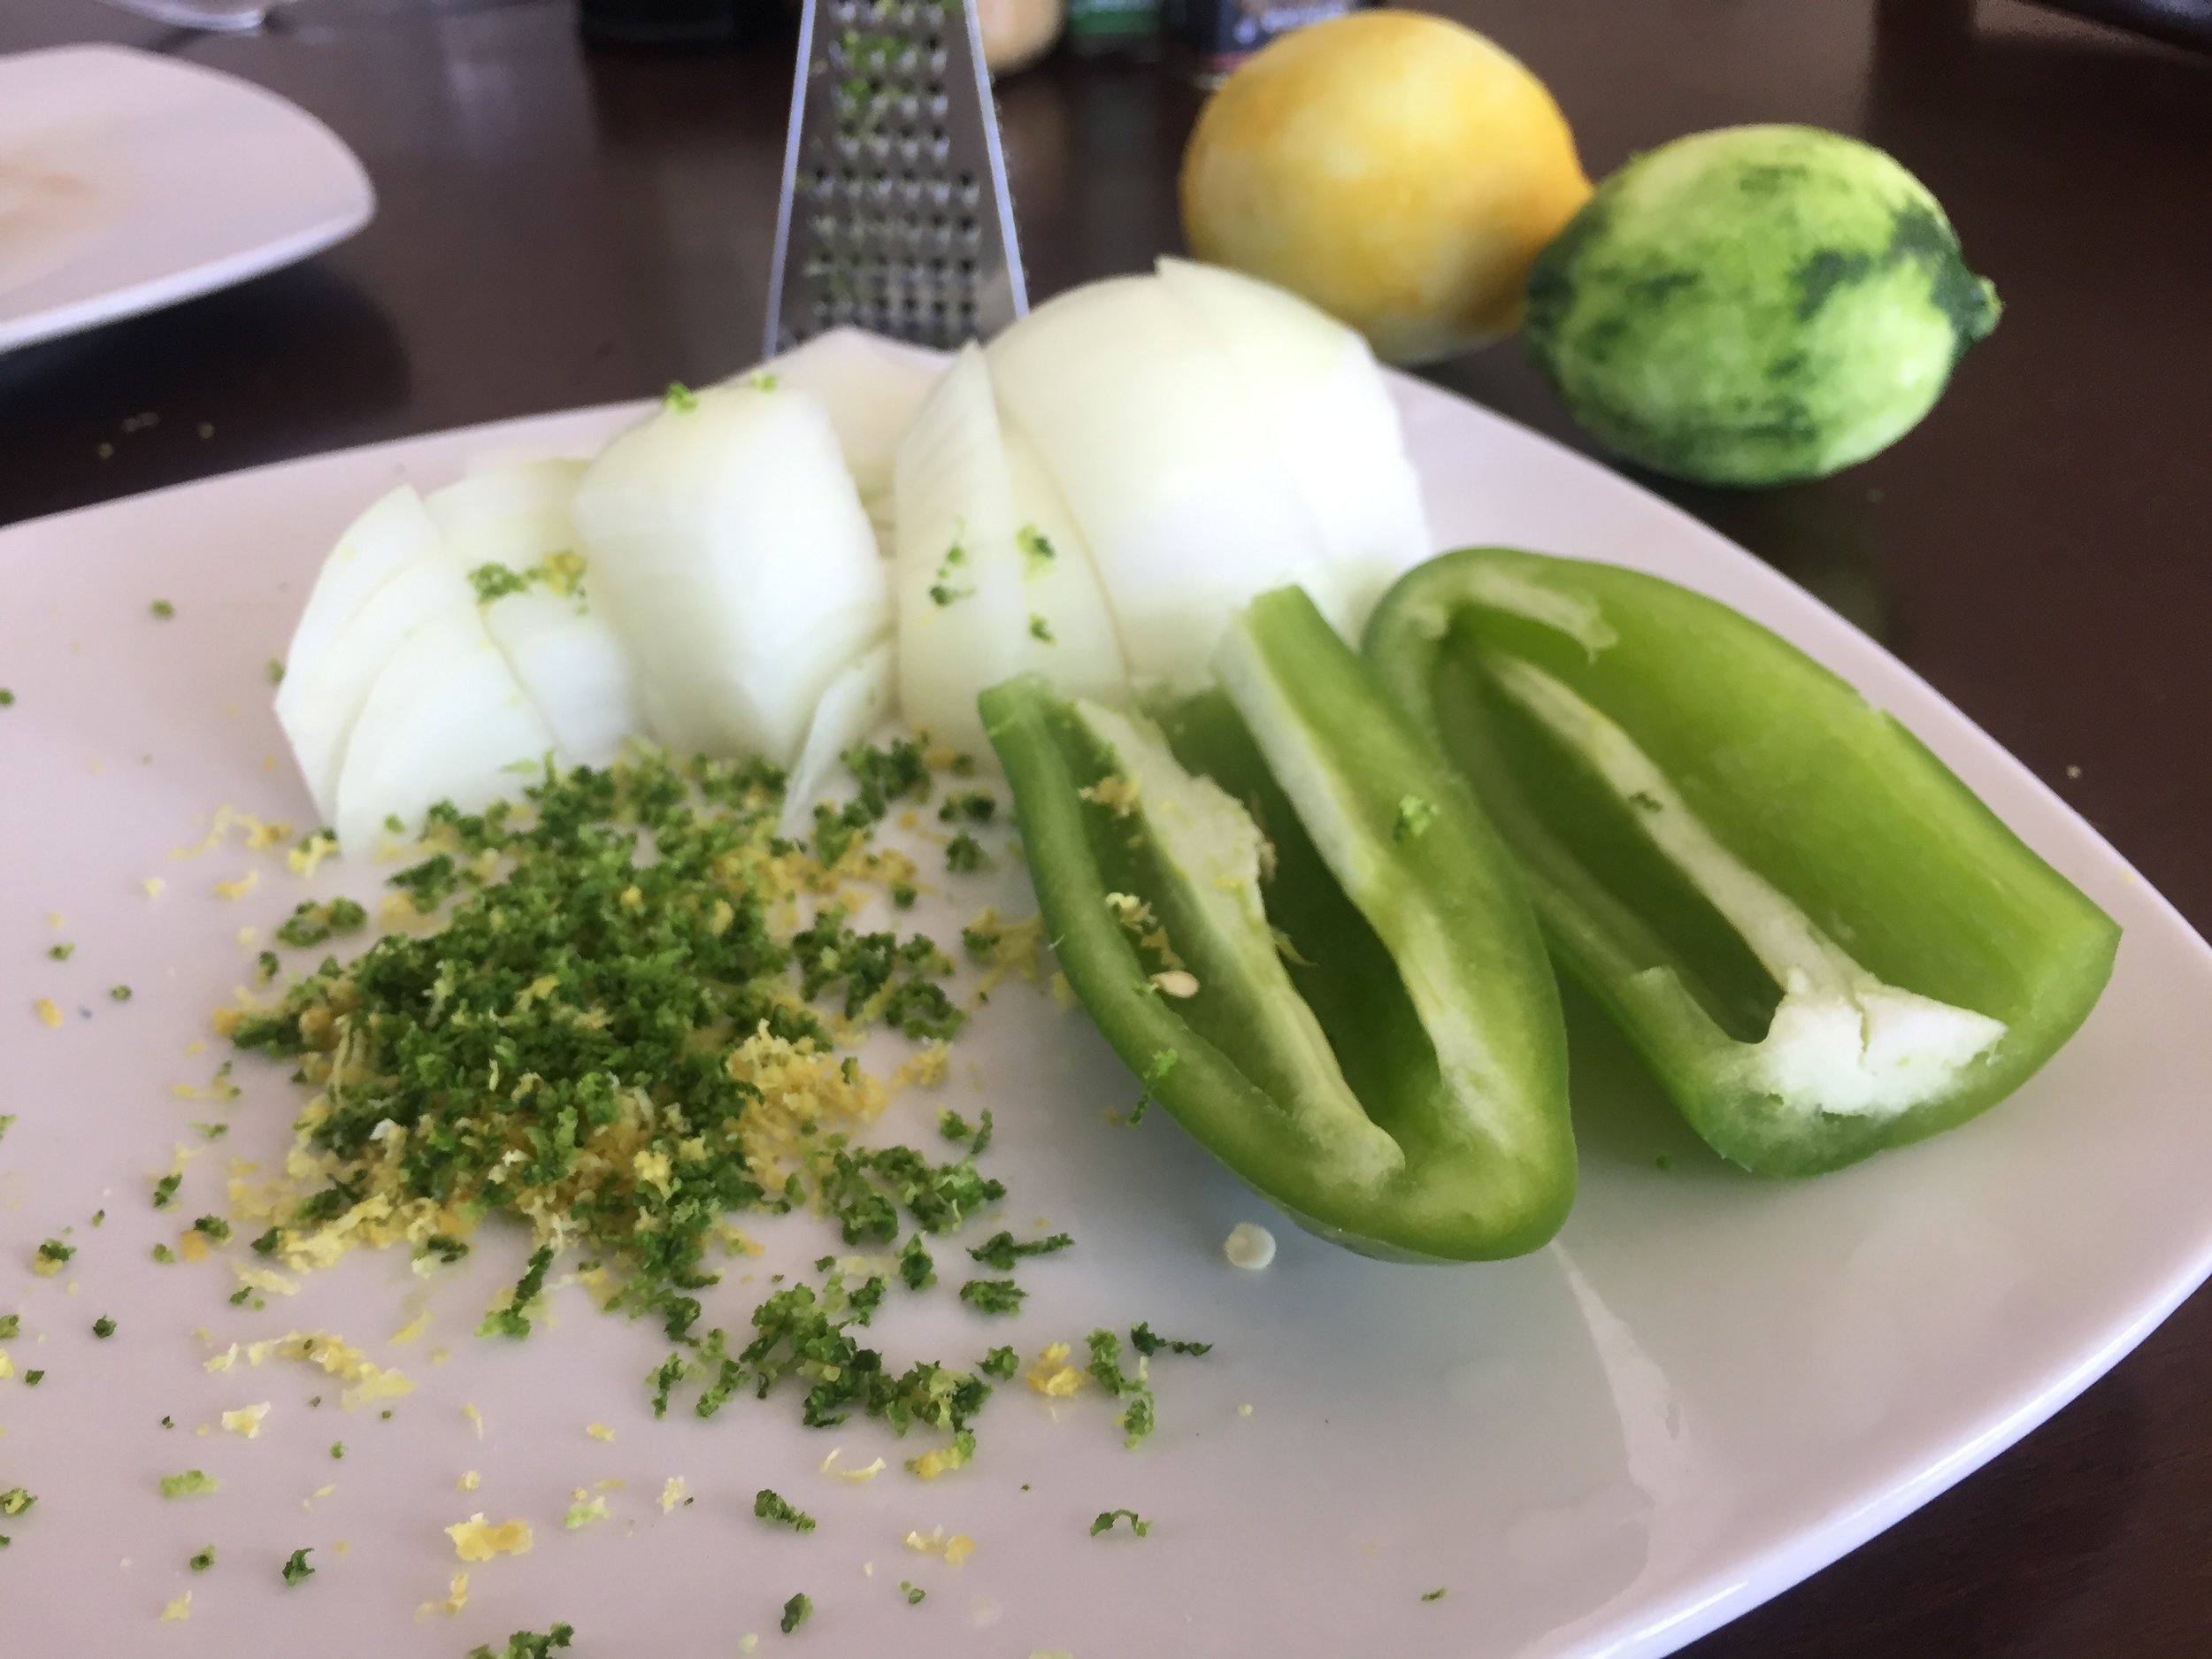
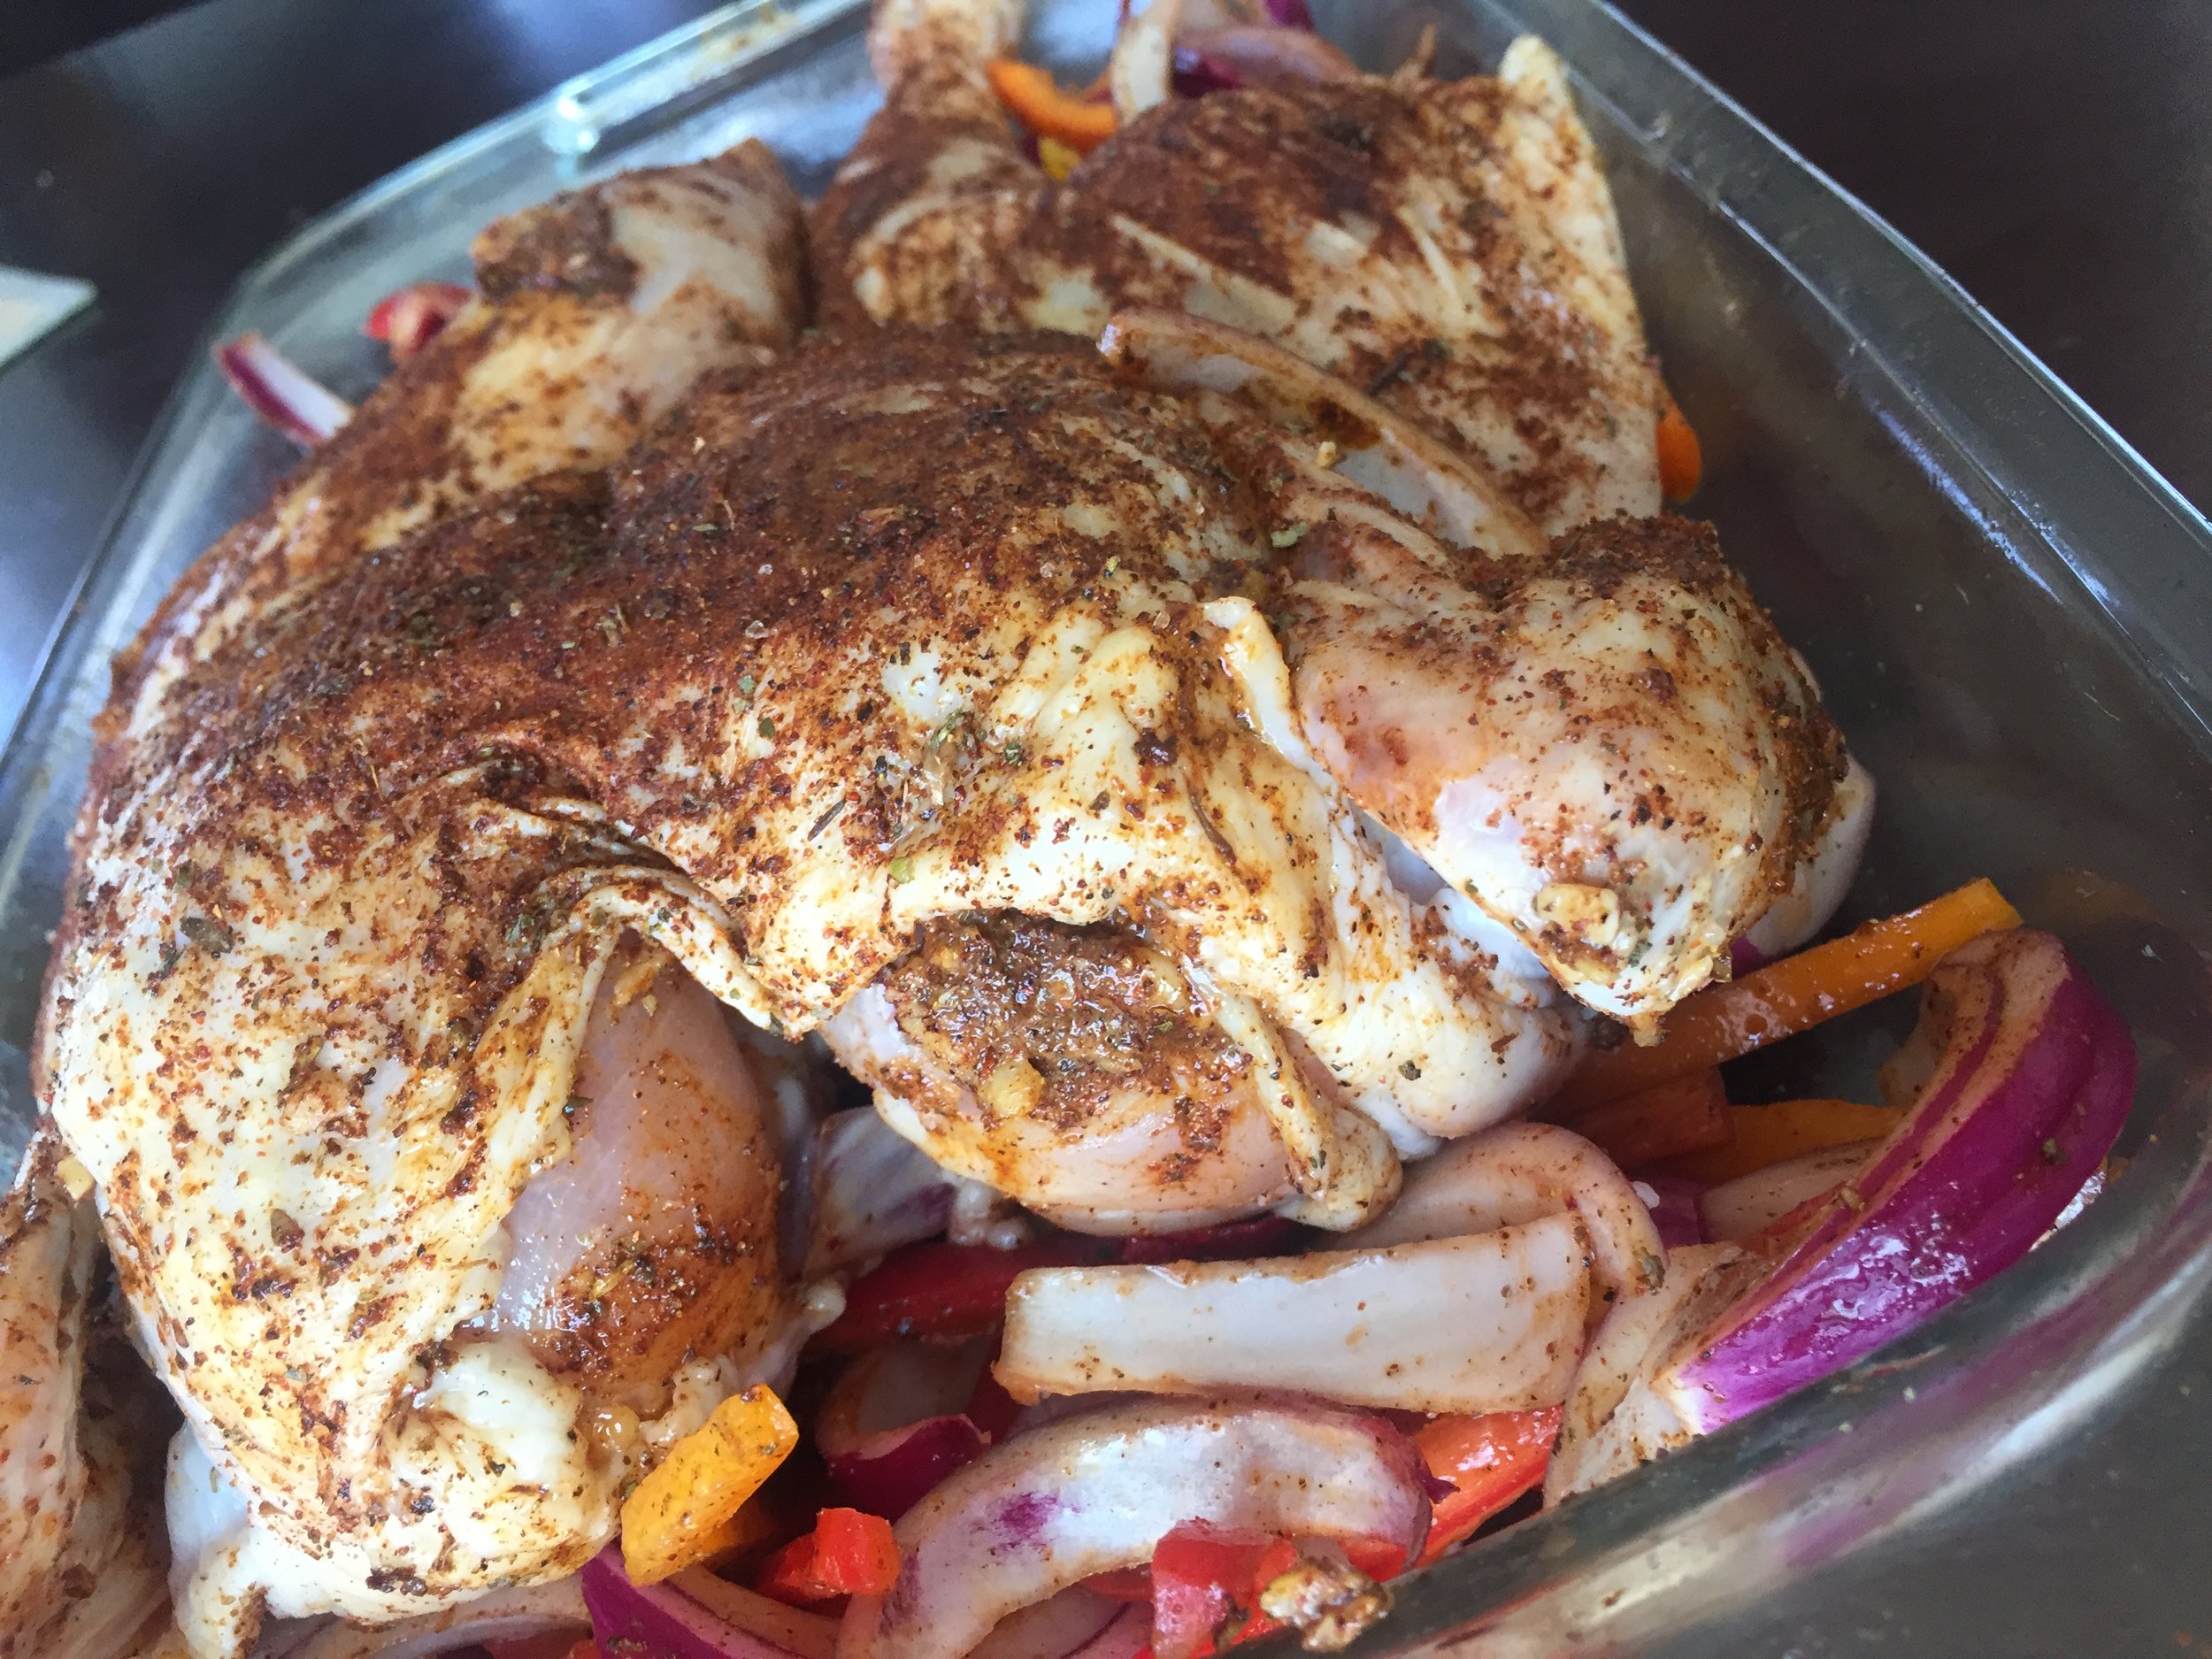
  3. Mix all dry seasonings together in a bowl and the same thing you did with the butter mixture. Rub the bird all over and throw some underneath this skin as well! Save a little seasoning for the peppers and onions... 
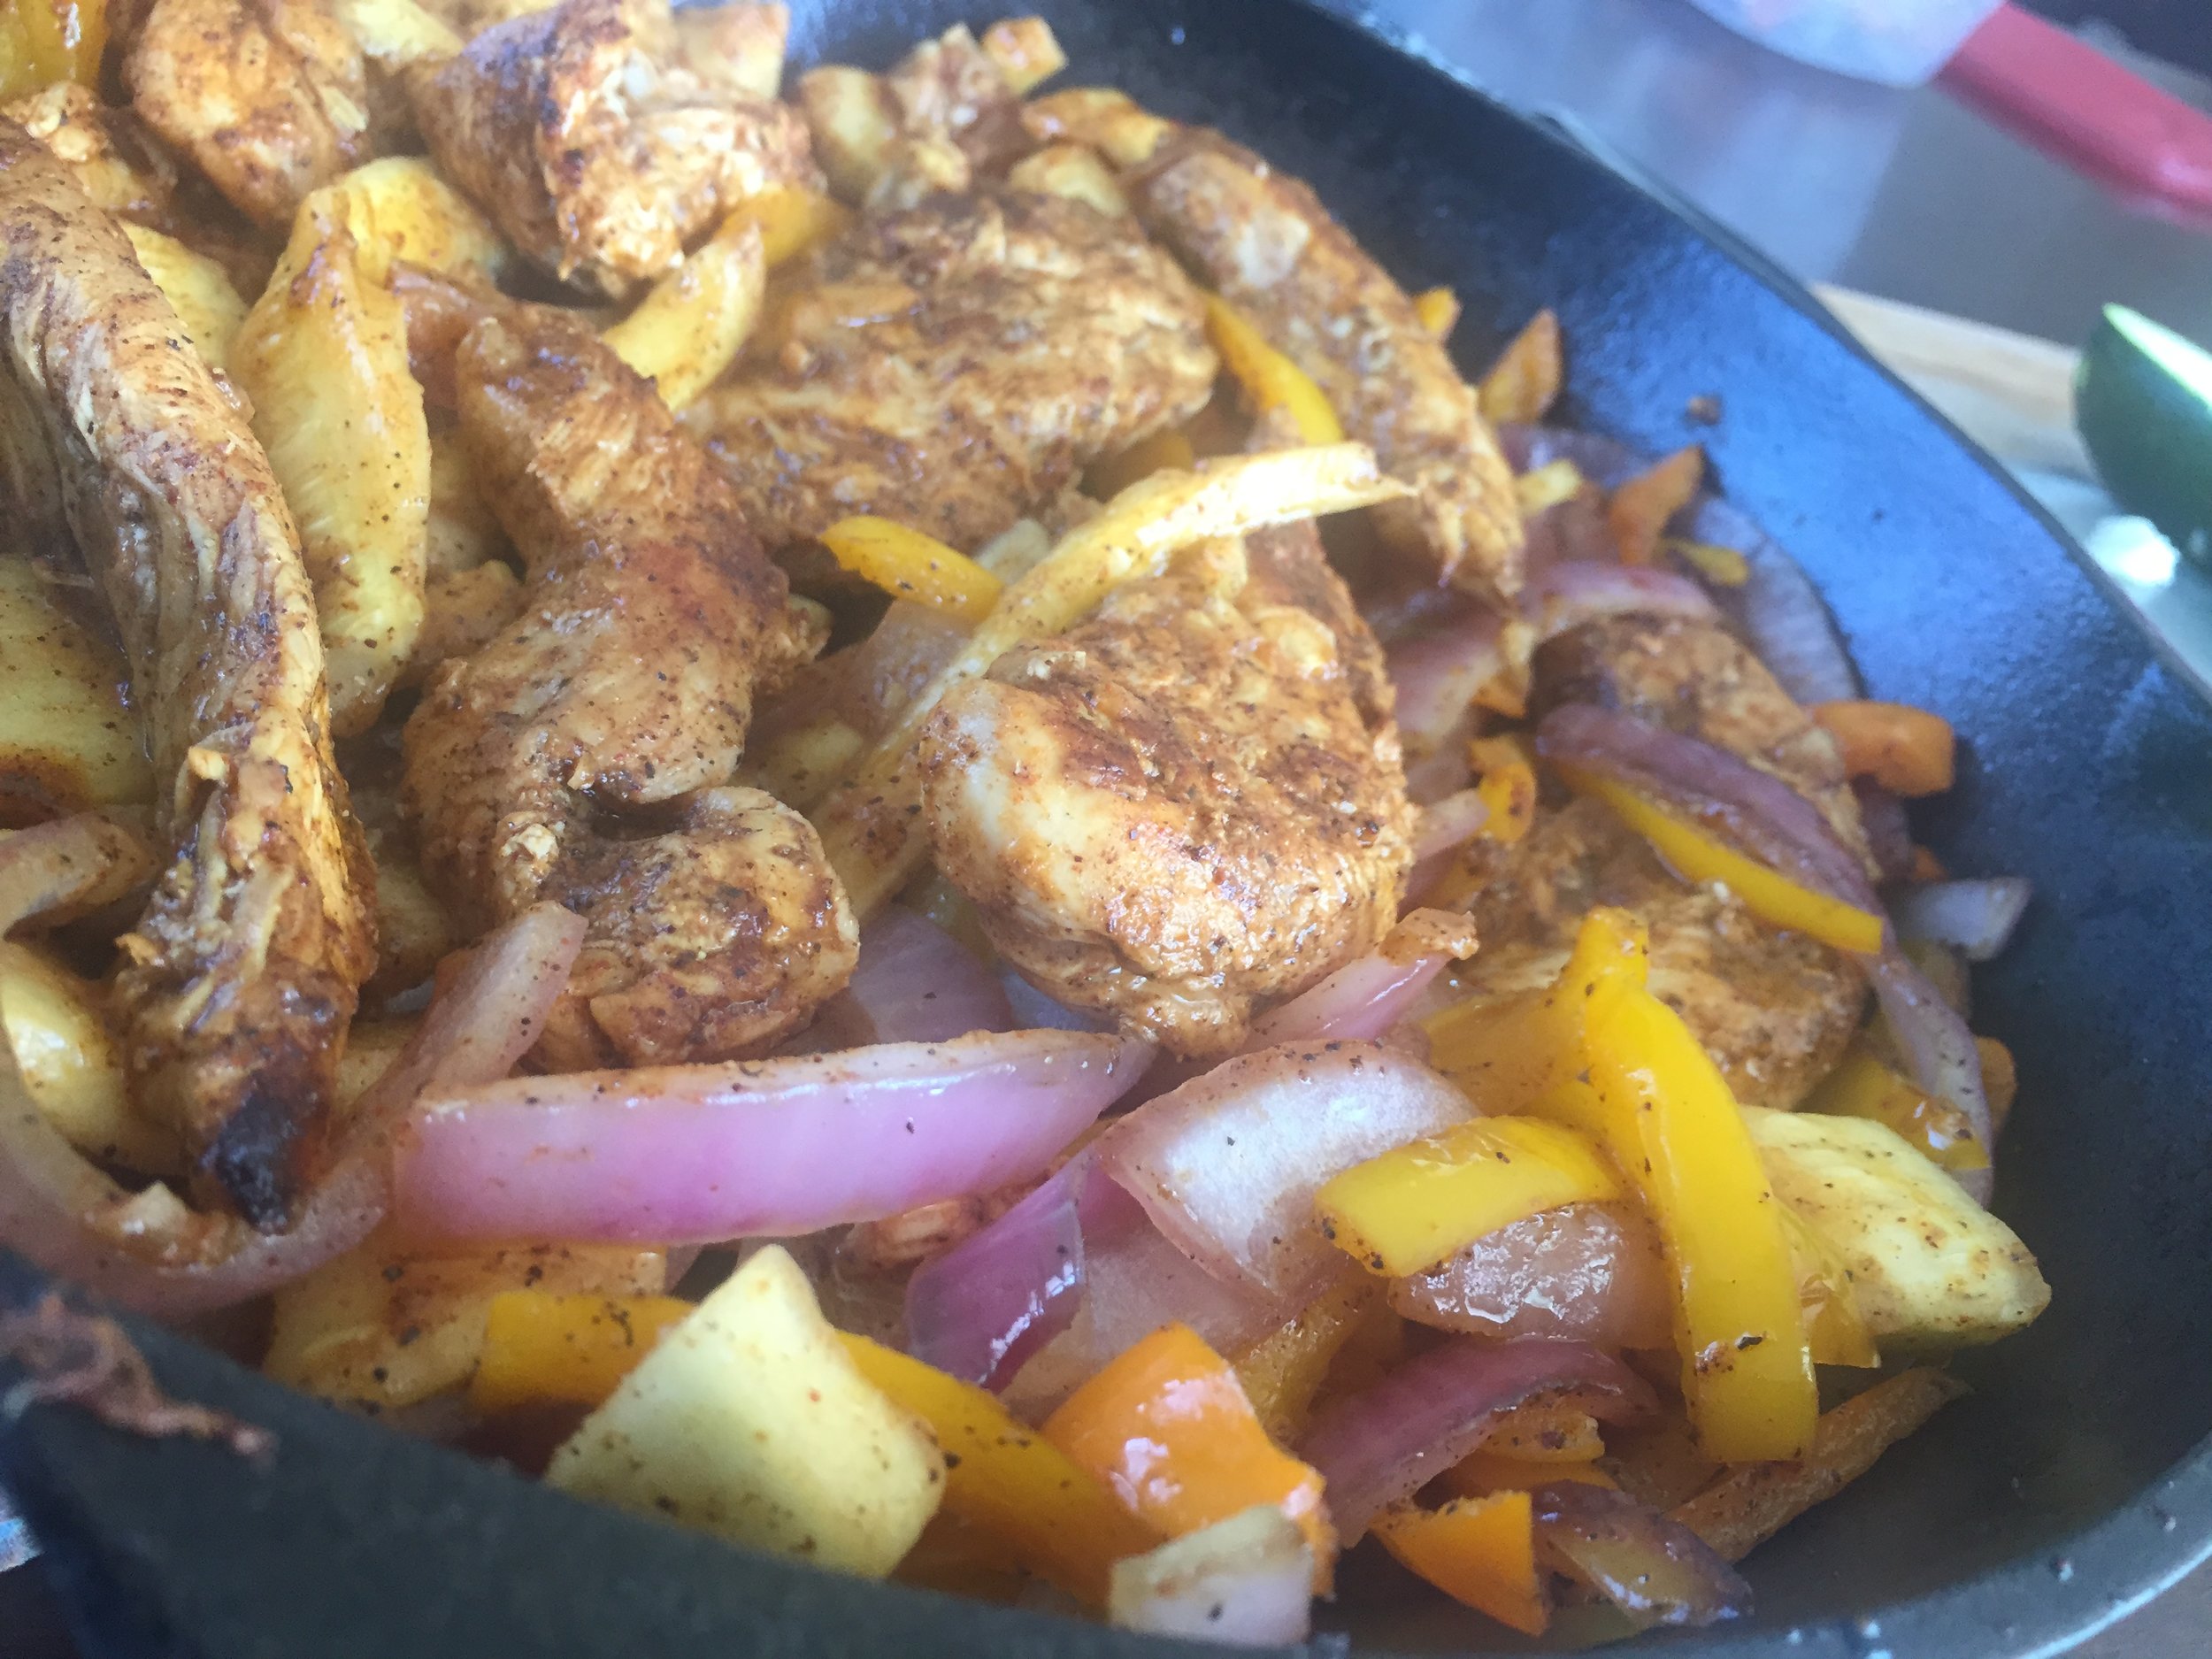
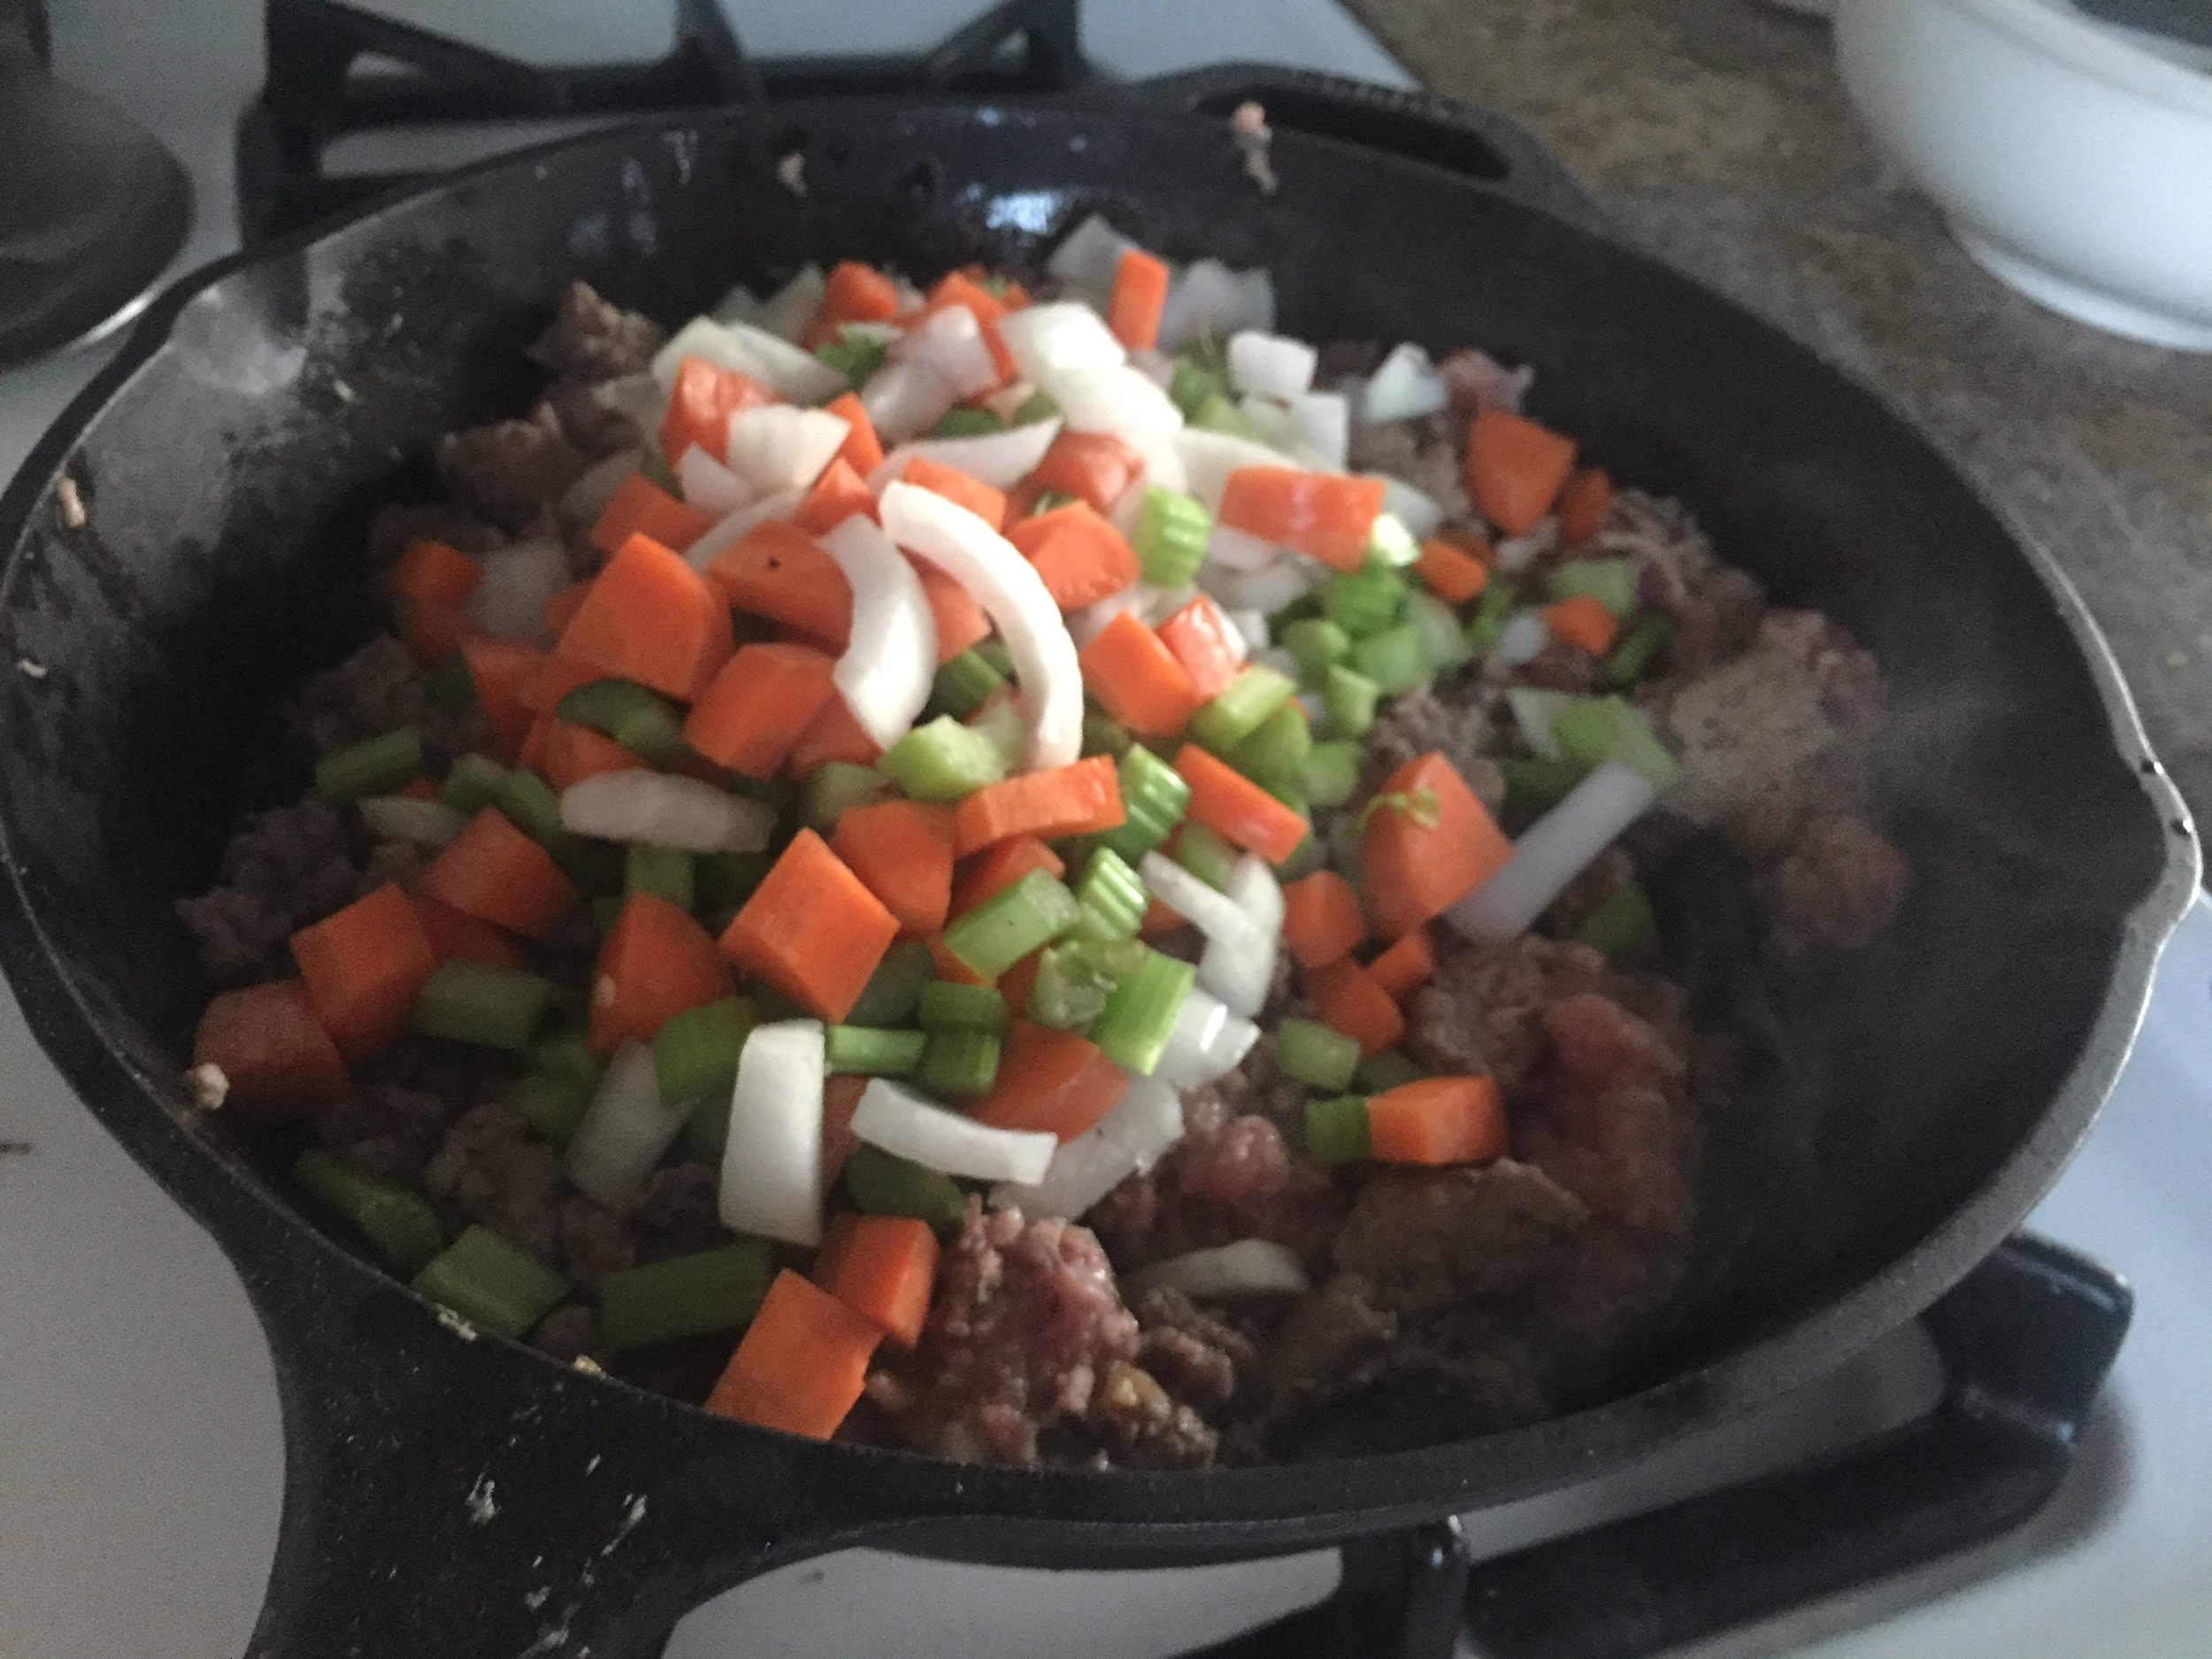
  4. In a large pan add the peppers and onions, cut into strips. Mix in the coconut oil and remaining seasoning until evenly coated 
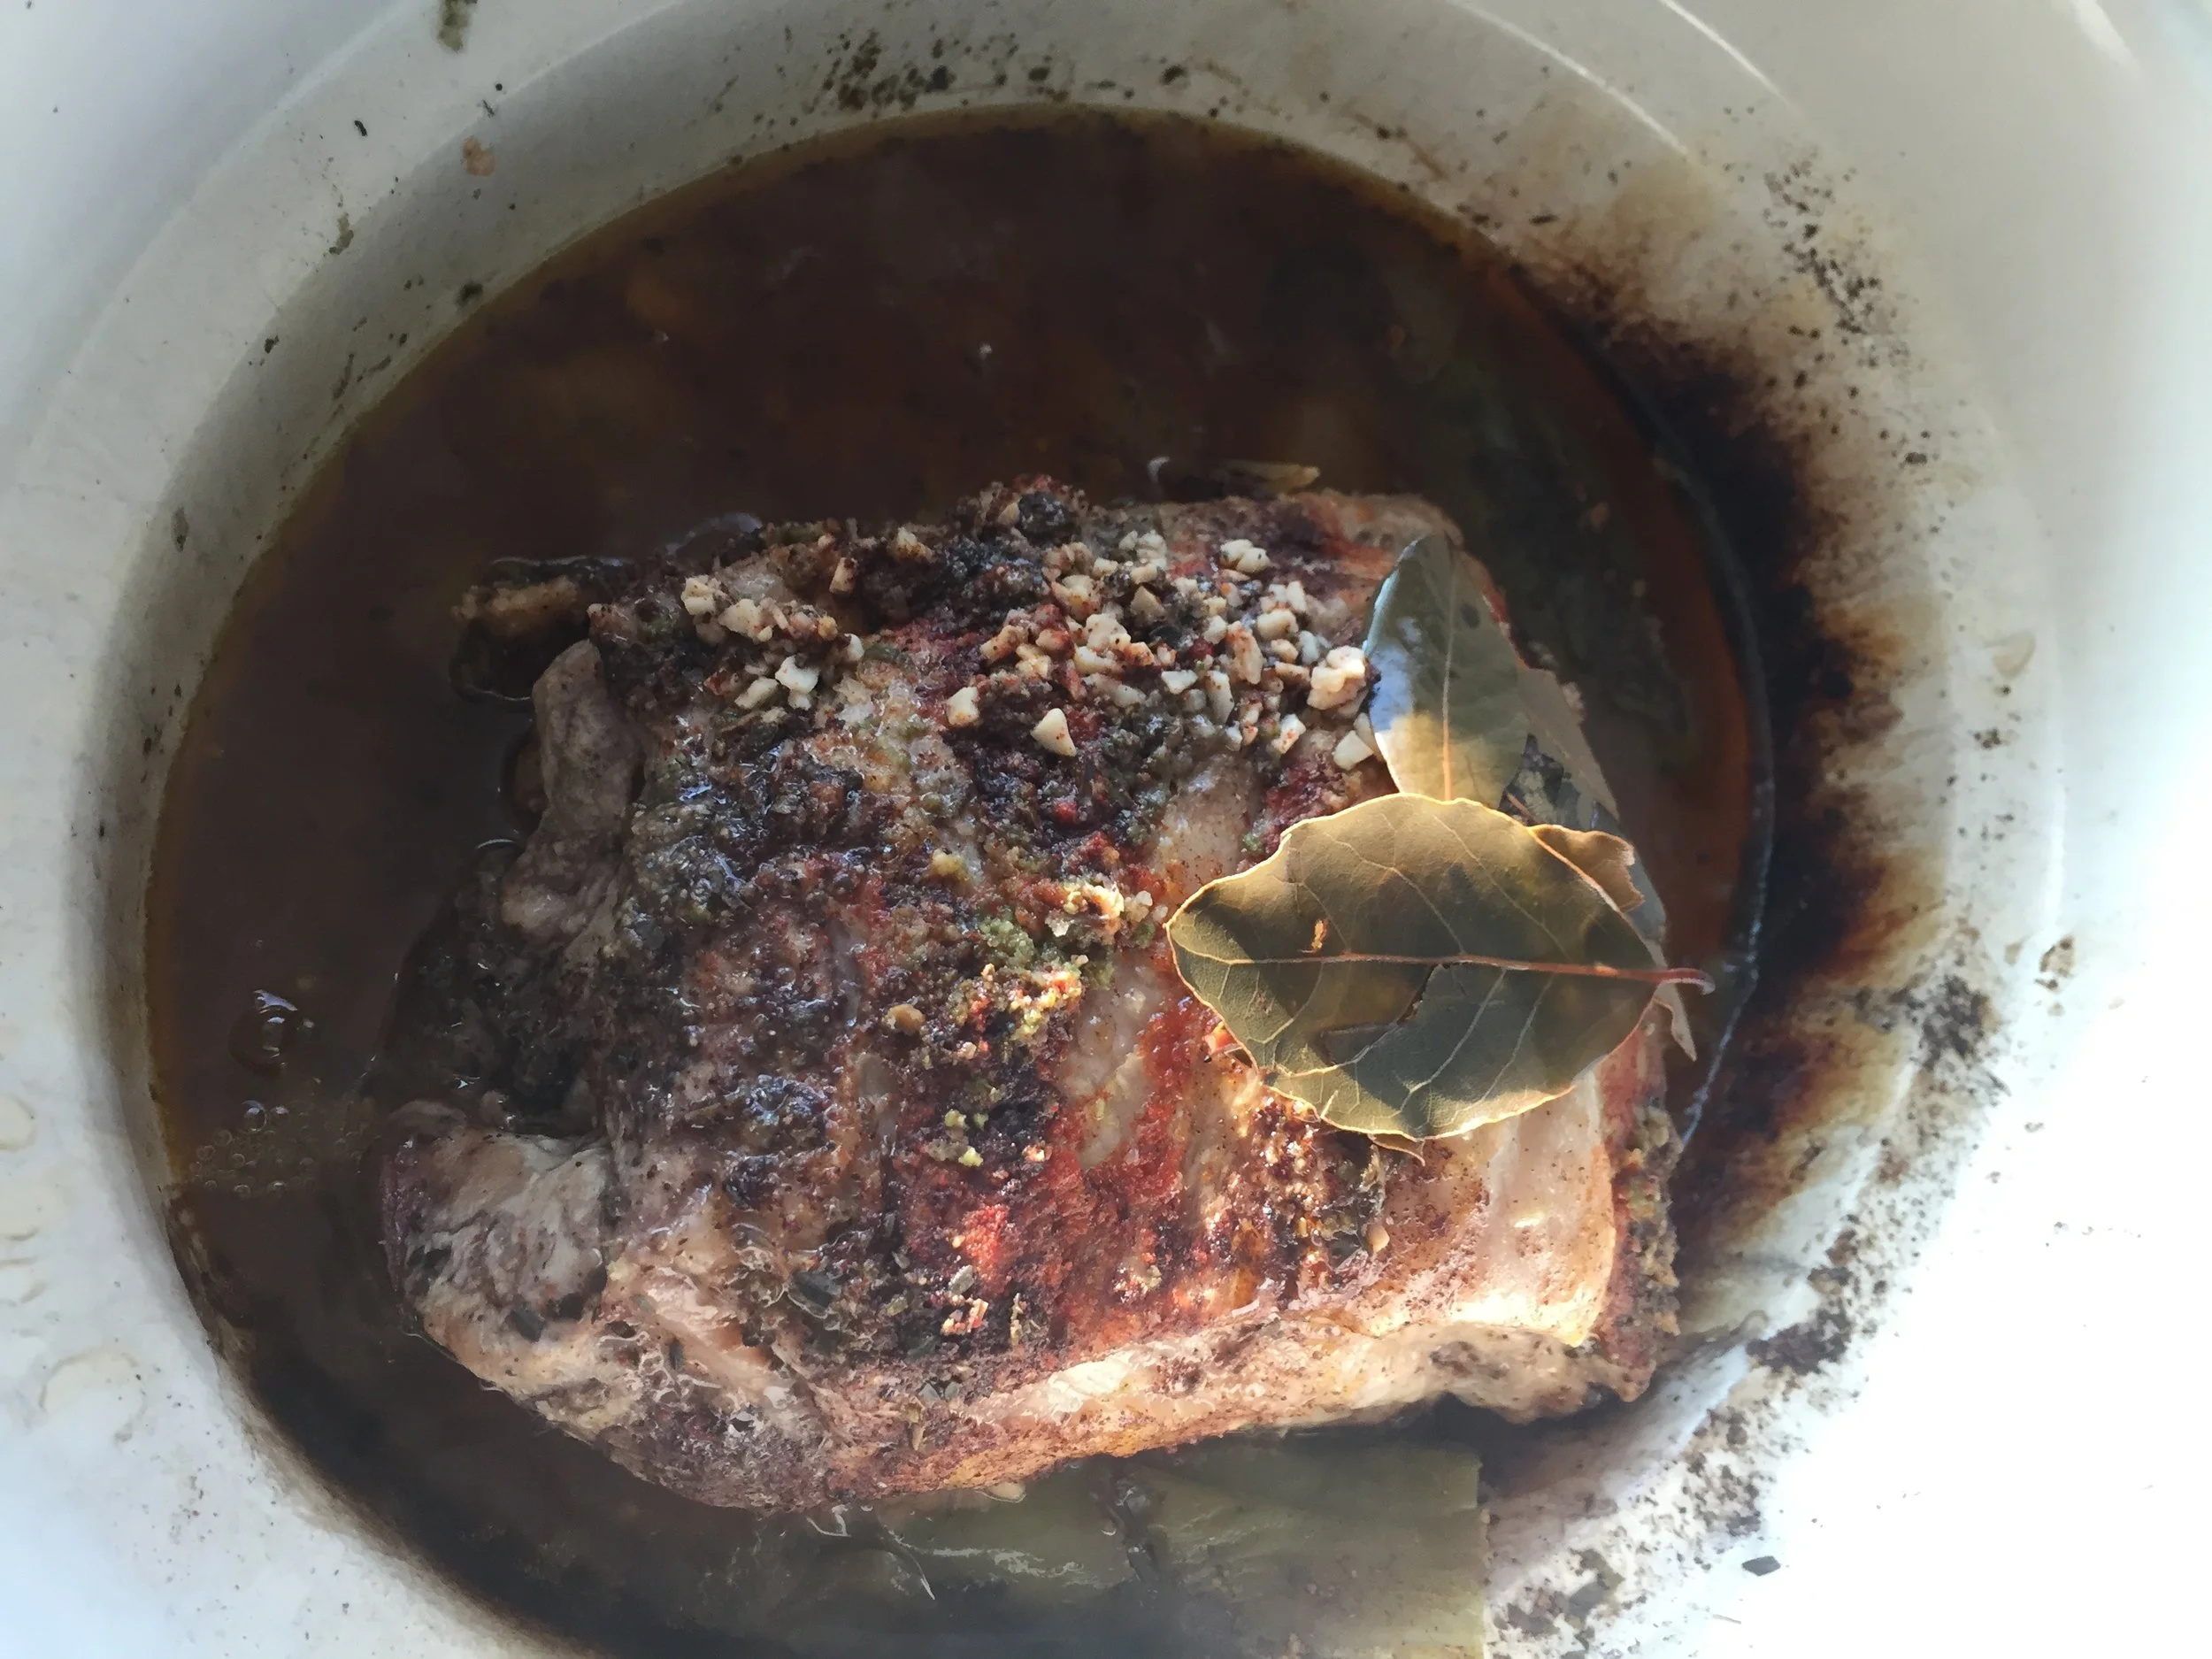
  5. Put the chicken in the pan resting on the peppers and onions. You'll want to make sure the pan is large enough that the chicken isn't bunched up. 
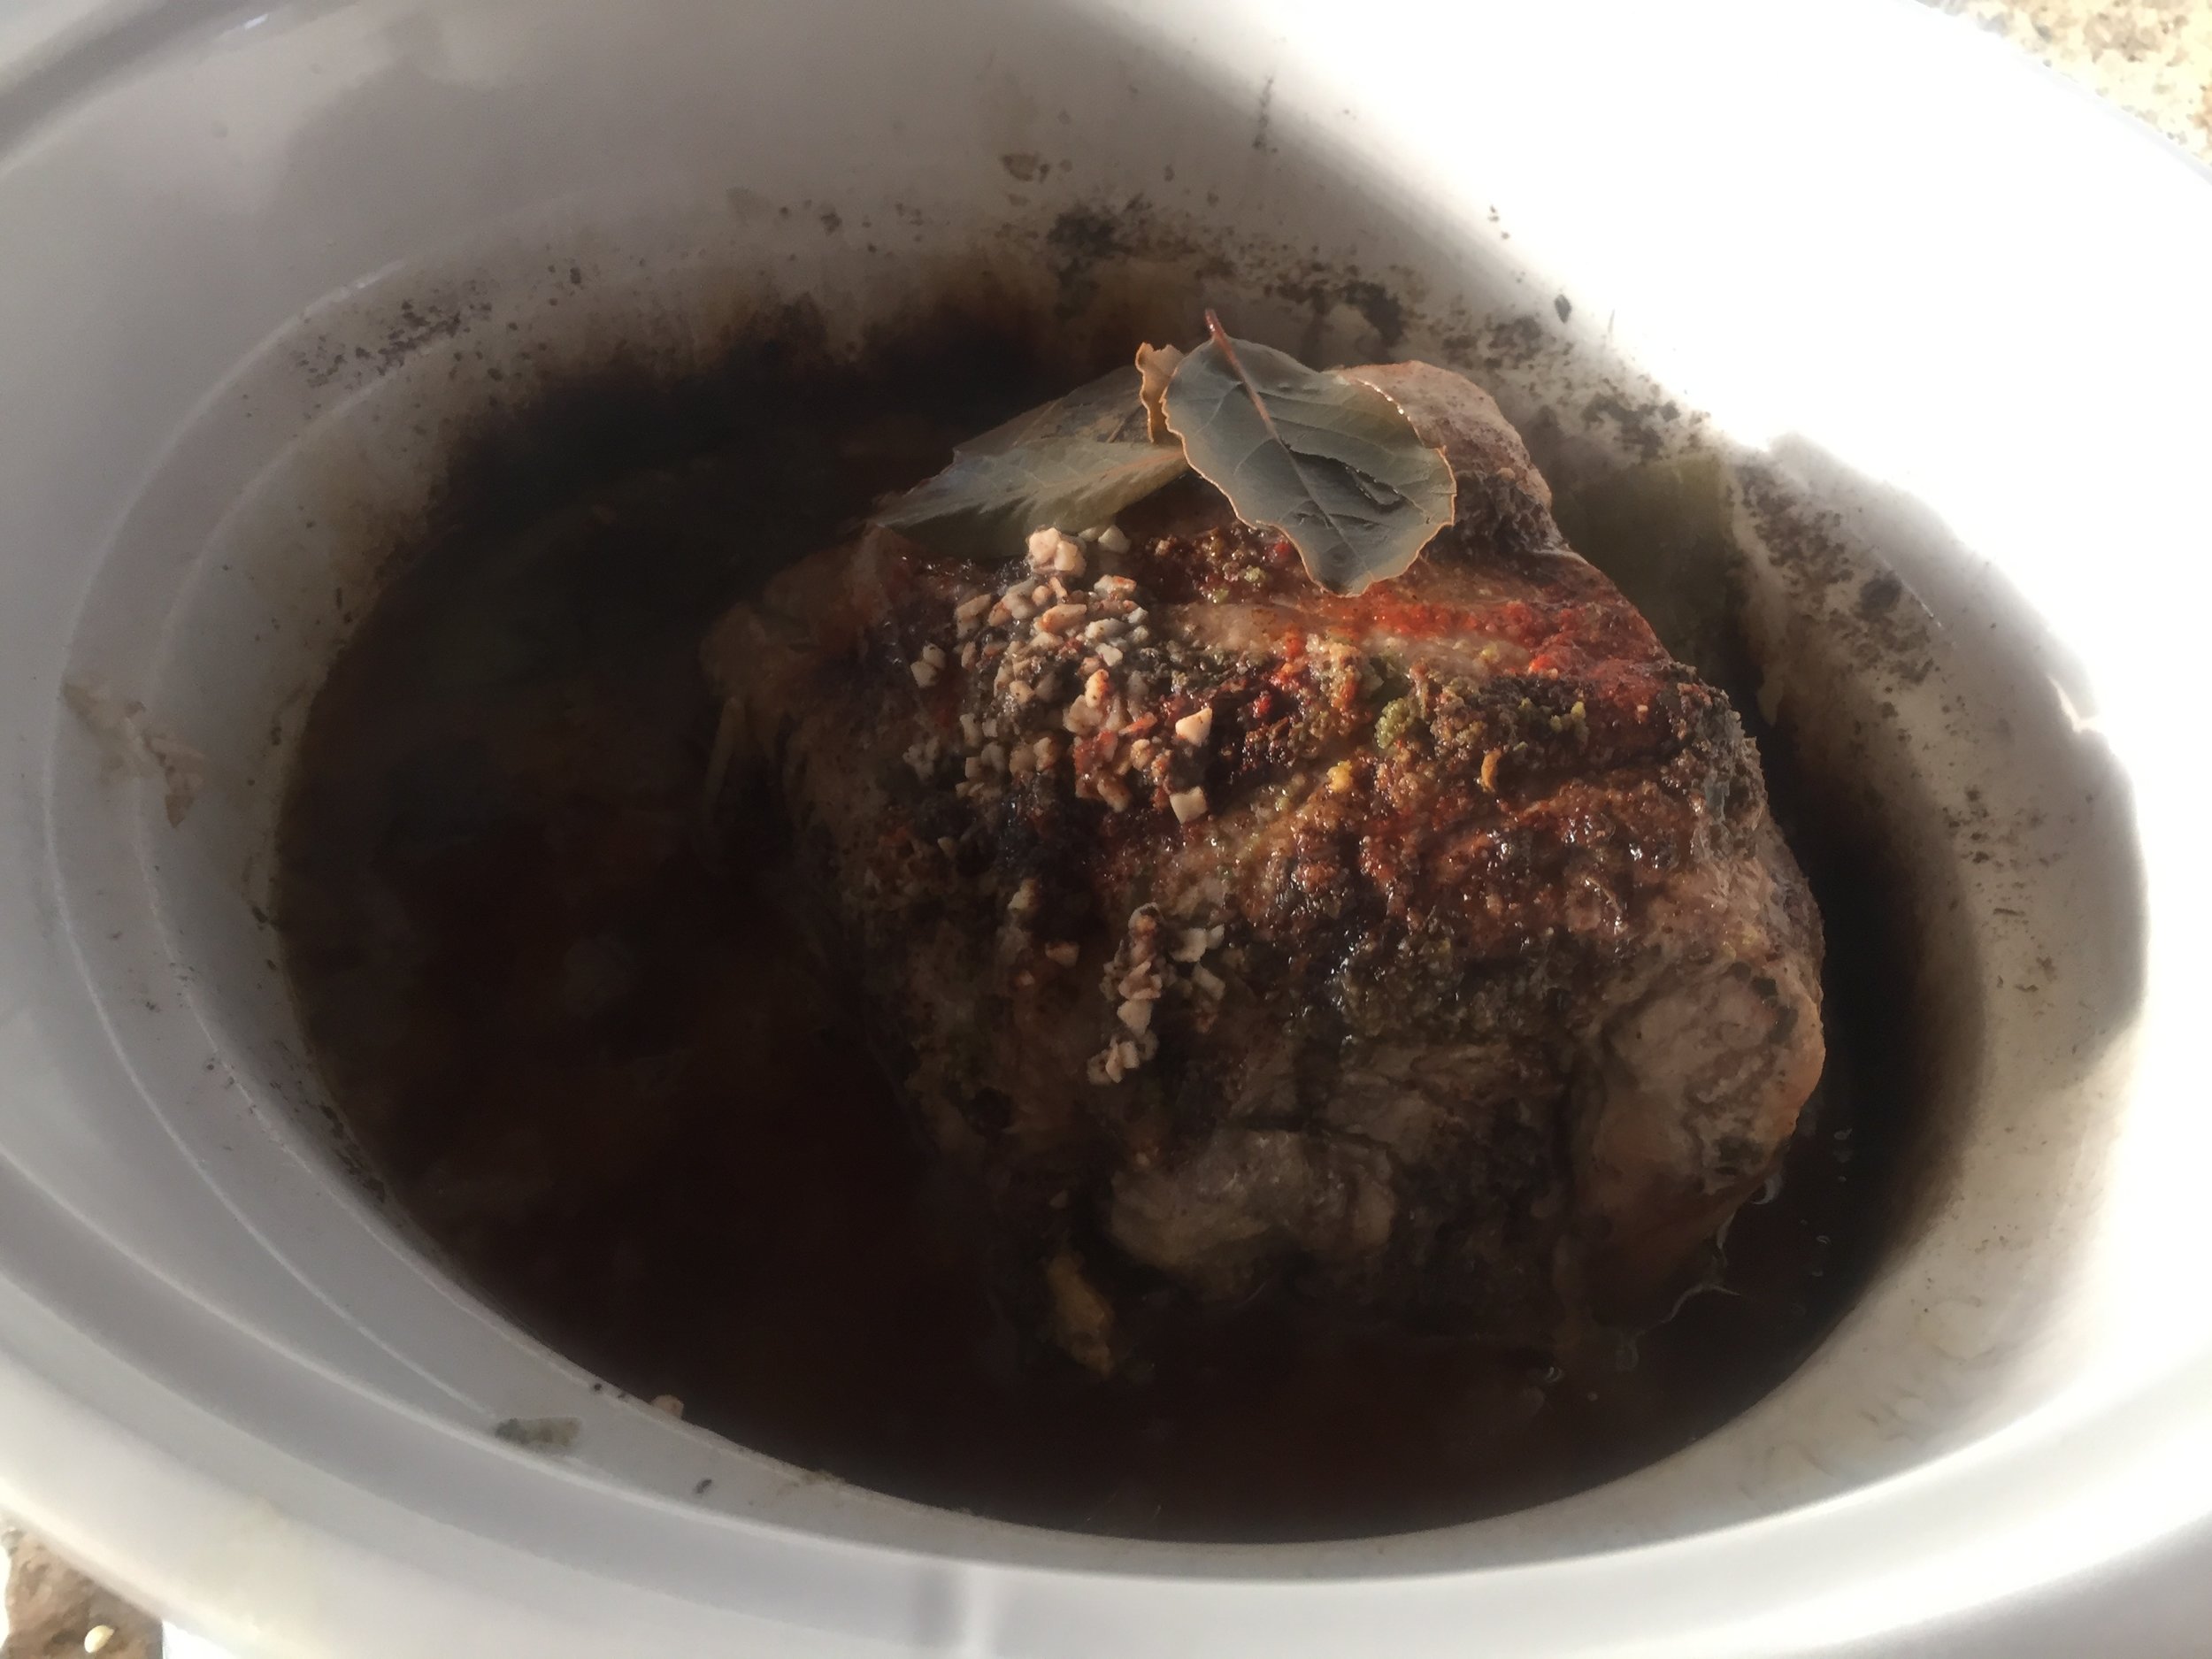
  6. Uncovered put the chicken in the oven for 20 minutes at 450. Then, reduce to 350 and cook for 40 more minutes. FYI this was based on a 4.5 lb chicken. Cooking times will vary depending on how big the chicken is. 
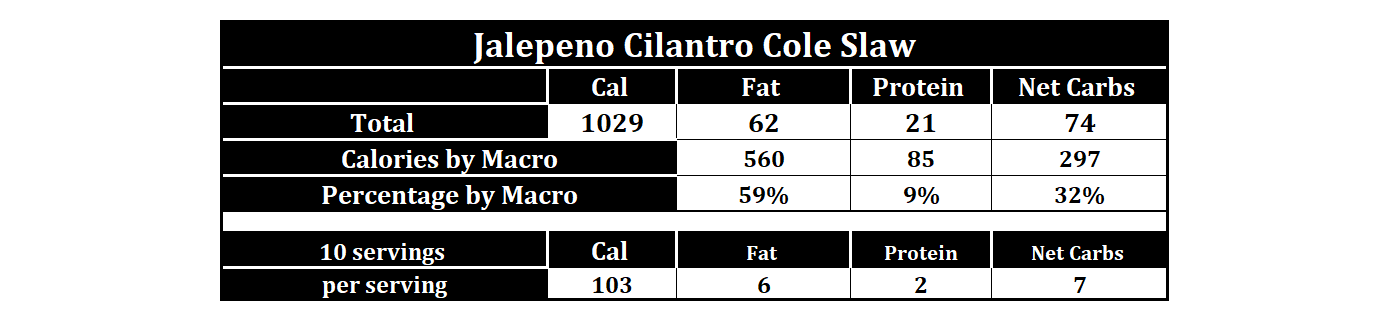
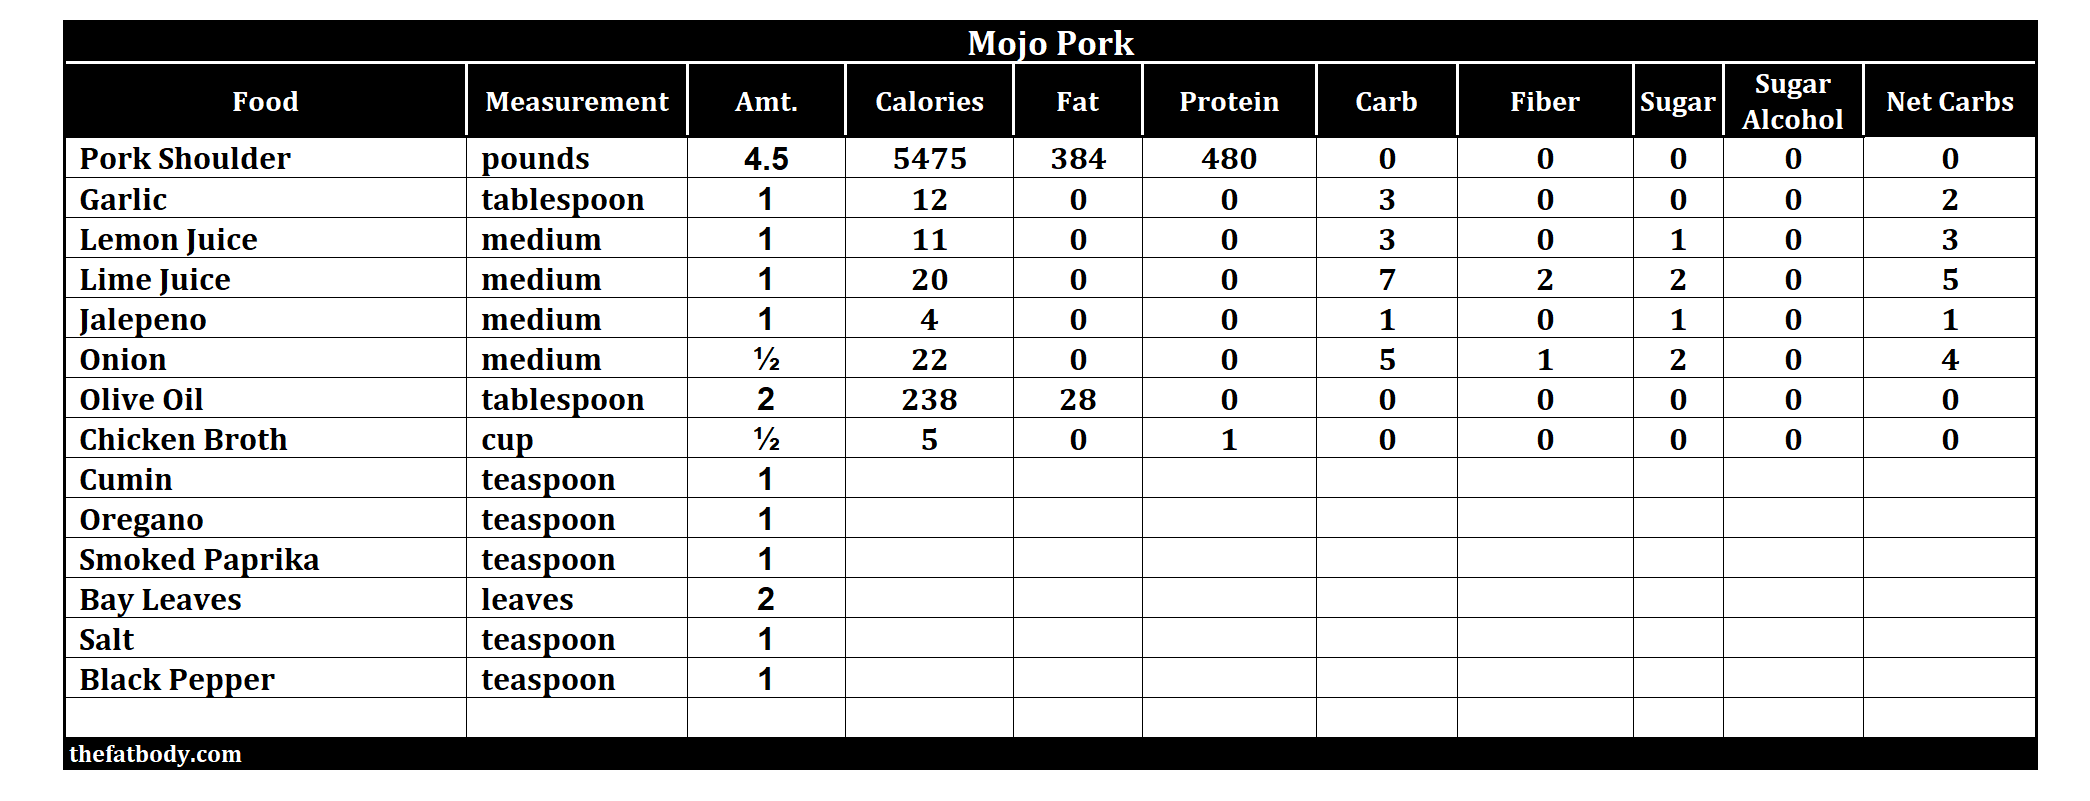
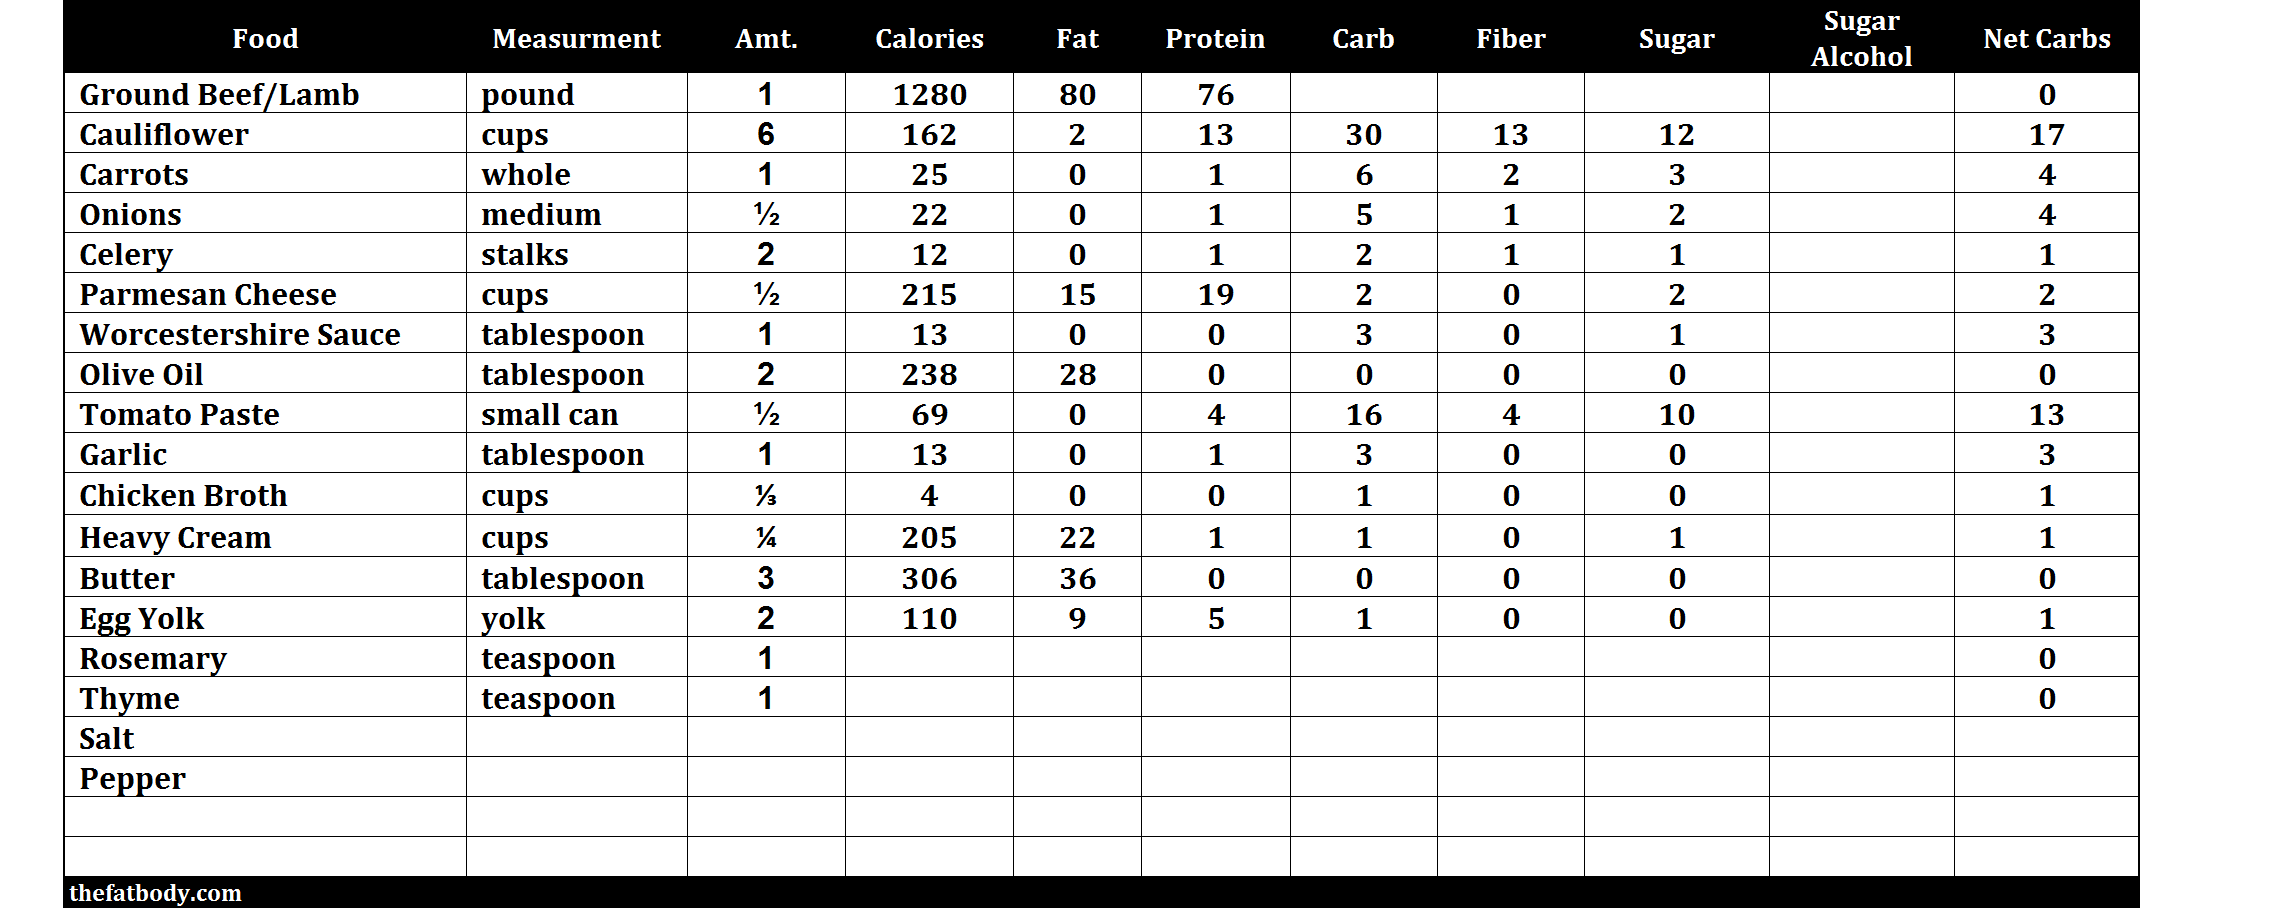
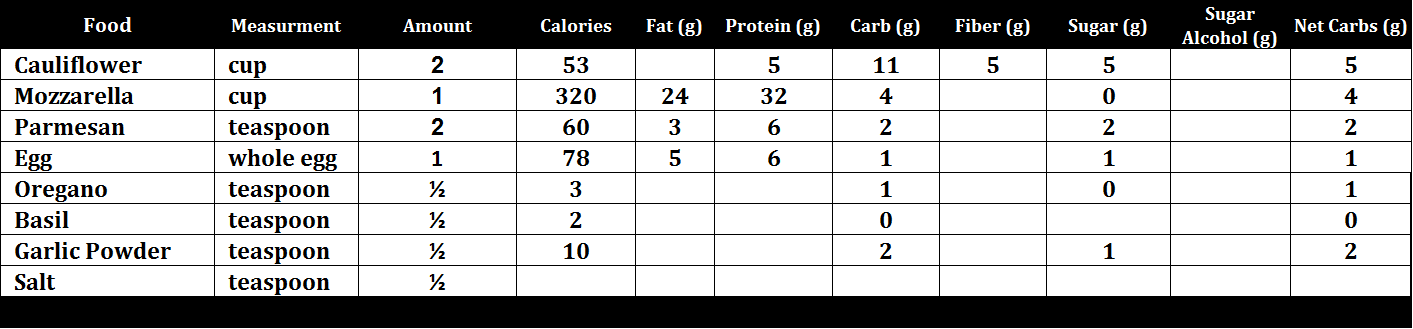
The Macros...

Calculating macros for a whole chicken is not a very accurate measurement considering the particular parts and skin play a big role in the fat/protein content.

In regards to the extra oil and butter added. I would estimate based on how much of the fat/oil you retained considering most of it will be in the pan. 

IMG_2142.JPG

Comment

Jalapeño Lime Coleslaw (No Sugar, Low Carb)

Comment

Jalapeño Lime Coleslaw (No Sugar, Low Carb)

IMG_0463.JPG

If you've been following along with my recipes and posts then you know I am very much focused on ingredients above all else. Not to get all preachy, but there is so much more to getting healthy than abiding to a set of macro limits. Kicking the grains and sugar is a huge step in the right direction, but there are many factors that lead to health problems and that includes certain fats. I wrote a little bit about this in the post for my cauliflower "potato" salad recipe, but looking at the ingredients, in this case mayonnaise, is a major factor. More often than not you'll see a long list of additives and low quality oils. Here's an example...

IMG_0628.JPG

Head down to the grocery store and look at the label to any mayonnaise or salad dressing that notates "made with olive oil" on the front of the packaging. Now look at the ingredients list on the back, what does it say? I'm willing to bet you'll see a combination of olive oil, canola oil, soybean oil, safflower oil or some combination of the group. These other oils are cheap and produced in large quantities. They are also highly unstable, damaged and highly inflammatory. Olive oil, on the other hand, is significantly more expensive. So, these big food companies put the minimum amount of olive oil required by law for them to call it "made with olive oil" and fill the rest of it will the cheap stuff. A few dollars is saved by the company and you get your mayonnaise and salad dressing a few cents cheaper. 

I've been able to find a few brands in the grocery store (regular stores, not Whole Foods) that use pure avocado oil with no unknown ingredients, chemicals or junk. As far as salad dressing goes, I make my own. Equal parts olive oil and red wine vinegar, a squeeze of mustard, and a few shakes of salt, pepper, oregano and red pepper flakes. Trust me you won't be disappointed! 

This goes for the typical prepackaged coleslaw and coleslaw dressing too, but after making a fresh batch of my MCT rolls I had a few sandwiches in mind and they needed coleslaw! First up, we made a fried chicken sandwich with slaw and sriracha mayo, which came out great. Most recently, I made Mojo Pork in the slow cooker. Topped that with coleslaw and it made a flavor bomb of a sandwich! 

IMG_2617.JPG

 I've made this recipe a few times now and it's been a big hit. My friends, aka my taste testers, gave this one two thumbs up, so I feel good about sharing this one with you guys! Even the ones who claimed to not like coleslaw. If you can find pre-sliced cabbage and carrots, go for it, it definitely makes things easier. This recipe in particular used a full head of cabbage. I prefer the food to look colorful, I think it adds to the flavor experience. Sounds nuts, but science says it's true. 

The Ingredients...

IMG_0429.JPG
  • red and green cabbage (half head of each) 
  • 1/3 cup sour cream 
  • 1/4 cup mayonnaise 
  • 10 oz shredded carrots 
  • 1/2 medium red pepper 
  • 1/2 medium red onion 
  • 3 stalks celery
  • 1/2 bunch cilantro 
  • 1/4 cup erythritol 
  • 2 tablespoons apple cider vinegar 
  • 1 lime (juice) 
  • 2 jalapeno 
  • 1 teaspoon salt
  • 1 teaspoon pepper 
  • 1 teaspoon cumin 
  • 1 teaspoon cayenne pepper

The Steps... 

  1. Slice, dice and cut up all of your vegetables. 
  2. Mix everything into a bowl and stir until all ingredients are evenly distributed. 
  3. Refrigerate for 30 minutes to an hour, this will allow all of the ingredients to settle and for all the flavors to combine. 
  4. Serve and enjoy! 

The Macros... 

slaw macro.png
jalepeno slaw macro 2


Comment

Slow Cooker Mojo Pork

Comment

Slow Cooker Mojo Pork

IMG_2615.JPG

I'm not sure what did it. Maybe it was the high heat or maybe it was the citrus juices, but whatever it was this is one of the most tender slow cooked recipes I've ever crafted up. And isn't the slower cooker just the all time MVA (Most Valuable Appliance)? I mean seriously. You can be the most inexperienced cook in the world and still make magic with a slow cooker. It's amazing! But, there is one very particular reason that ketogenic diets and slow cooked meat go together like bacon and [insert anything]... it's the fat! 

The ketogenic diet is predicated around a fat centric caloric load, which in turn means you are opting for the more fatty cuts of meat. Typical slow cooked meats like the Boston Butt (pork shoulder), which is what you'd use for this recipe, are loaded with fat. This goes for chuck roast, short rib and several other fatty(and cheap!) cuts of beef. It's very cost effective and loaded with good healthy animal fats, which are the very nutrients believed to have evolved the human brain into what it is today. Several studies have suggested that the human brain evolved into the human brain because of the introduction of animal fat and protein. Our brains are big time energy users, roughly about 20% of the total input. Furthermore, these studies suggested that while a raw, vegan diet, still better than the typical western diet, wouldn't have given our brains the appropriate levels of energy for this evolution to occur. The most obvious example of this would be primates and the evolutionary separation of humans and primates. The more scientific example would be the vitamin B3, or nicotinamide, found in meat. This brain boosting vitamin has been shown to play a causal role in increased intelligence, health and longevity. 

I've you've ever listened to a podcast featuring Dr. Rhonda Patrick you've probably heard her speak about nicotinamide riboside and just how beneficial it is to health and longevity. I've listened to her interviews on the Tim Ferriss Show and the Joe Rogan Podcast and I highly suggest checking those out! I will provide links to those episodes at the bottom of the page.  

    IMG_2382.JPG

    Back to the meat. Let's go... 

    The Ingredients...

    • 4-5 pound Pork Shoulder (Boston Butt Roast) 
    • 1 tablespoon garlic minced 
    • 1 teaspoon salt 
    • 1 teaspoon pepper 
    • 1 lemon juice/zest
    • 1 lime juice/zest
    • 1 jalepeno 
    • ½ onion
    • 1 teaspoon oregano 
    • 1 teaspoon cumin 
    • 1 teaspoon smoked paprika 
    • 2 bay leaves 
    • 2 tablespoons olive oil 
    • ¼ cup chicken broth 

    The Steps...

    1. Zest Your Lemon and Lime, Slice your jalepeno in half and cut your onion into 4 pieces, so that each piece is 1/8th of a full onion. 
    2. Place pork loin in slow cooker. Put a piece of onion in each corner and the jalepenos put one on each side. The dry ingredients rub on top of the pork. Add all of your liquids and squeeze your lemon/lime. Top with bay leaves and cook on high heat for about 4-5 hours. Don't touch, don't open! 
    3. Pull apart, remove as much fat as you can and strain out vegetables and bay leaves. Give it some time for the juices to soak in once pulled apart, but you're ready to enjoy! 
    IMG_2605.JPG

    The Macros... 

    mojo pork macros
    mojomacro2.png

    The Sources & Materials... 


    Tim Ferriss Podcast... 

    https://tim.blog/2017/05/04/smart-drugs-fasting-and-fat-loss/

    Study Sources 

    https://www.ncbi.nlm.nih.gov/pubmed/28579800

    Joe Rogan Podcast... 

    Comment

    Creamy Coconut Lime Shrimp over Zoodles (Dairy Free, Pescatarian, Leto, HFLC Friendly)

    Comment

    Creamy Coconut Lime Shrimp over Zoodles (Dairy Free, Pescatarian, Leto, HFLC Friendly)

    Coconut_Cilantro_Lime_Shrimp_Zoodles


    I have enjoyed the increased energy, health and mental clarity of ketosis for almost two years now and I can genuinely say that cutting out carbohydrates and replacing them with liberal amounts of fat has had a tremendously positive effect on my life. However, one of the biggest limiting factors to attaining ketosis is the abundance of meat and dairy that people generally rely on, which for many is an issue and whatever that reason may be, you've got to respect it. So, without getting into any of the discussion around health, ethics and environmental impact I wanted to try my hand with some more vegetarian and pescatarian friendly recipes. 

    My roommate doesn't eat meat or poultry and is trying to avoid dairy, but is also very interested in a high fat/low carb diet. Is it possible? Absolutely! We chatted about different recipe ideas and what foods to avoid. The very next day a coworker and I had a similar conversation! 

    ...challenge accepted.

    FYI... Greg, my longtime roommate and the other half of the Fatbody has moved up to San Francisco but don't worry the ketones are strong with that one. The new roommate is an old friend from home. One of my best in fact, and she's pretty good in the kitchen! So, I'm looking forward to seeing what kind of recipes we can bring to the table! 

    First up, we've got a very flavorful and easy to make sauce. It's light and refreshing, while not having an overwhelming coconut flavor. The coconut cream provides a dense supply of healthy fats with loads of green vegetables. If you are vegetarian or vegan this recipe would work just as well without the shrimp. Just throw in some extra veggies... sautéed kale, broccoli, mushrooms or all the above. Hemp seeds would be a very tasty way to supplement the protein.


    I've made this recipe a few times now and I will most definitely be making it a few more.

    The Ingredients...

    • 1 red pepper 
    • 1/2 poblano pepper 
    • 1/2 lime juice
    • 1/2 bunch cilantro
    • zoodles (3 zucchini) 
    • 1 can coconut cream 
    • 1 teaspoon cumin 
    • 1 teaspoon garlic 
    • 1 teaspoon salt 
    • 1 teaspoon pepper 
    • 2 tablespoons olive oil 
    IMG_2457.JPG

    The Steps...

    1. In a food processor or blender add cilantro and poblano pepper and blend until minced. Add can of coconut cream, salt, pepper cumin and lime juice and blend until you've reached a smooth and creamy consistency. 
    2. In a large sauce pan (you'll eventually be putting everything into this pan so make sure it's large enough) add a tablespoon of olive oil, red pepper, garlic and shrimp. Cook on low heat (so to not smoke the oil) for about 5 minutes or until the shrimp are pink and opaque. Remove from pan. 
    3. Add sauce and remaining oil to pan and raise heat slightly, on a scale from 1 to 10 you were at a 2 and raise it to 4. Let the sauce simmer for about 10-15 minutes. This will help to cook down some of the liquid and thicken up the sauce. 
    4. Reduce heat and add back the shrimp and red pepper. Allow them to simmer with the sauce for another 5-10 minutes. 
    5. Finally, add in your zoodles and toss until you've evenly mixed everything together! The trick with zoodles is to add at the END of the recipe. If you cook them for too long they become very mushy.
    6. Eat a second plate, you've earned it. 

    The Macros...

    macro1.png
    macro2.png

    Comment

    Faux-tato (Cauliflower) Salad - Low Carb, Keto Approved!

    Comment

    Faux-tato (Cauliflower) Salad - Low Carb, Keto Approved!

    cauliflower-fauxtato-salad

    There are a few staple items at every summer cookout and potato salad always seems to be one of them, and for good reason. It’s friggen delicious, but those damn potatoes just have so many carbs! Not to worry though because in typical Fatbody fashion we’re switching things up, ditching the carbs and Keto-fying this recipe.

    So, I called up my mom and a few of my cousins to get the family potato salad recipe, which turns out we don’t have. I’m still very confused about that by the way. I think they’re holding out on me! Just kidding… love you Mom xoxo

    The great thing about making keto recipes is that you have a billion non-keto recipe websites to generate ideas from and with a few ingredients subbed in and out you can totally change the macronutrient profile of the food without altering the taste very much.

    If you’ve read any of my other recipe posts I often talk about ingredient quality and this recipe is no different. I’m talking about you mayonnaise.

    Mayonnaise, traditionally speaking, is mainly just eggs and olive oil, which would in fact be pretty healthy. As we know, eggs are basically nature's multivitamin and olive oil is a great source of quality healthy fats. Unfortunately, the store bought brands have subbed out the quality for the crap (soybean oil, canola oil, sugars, etc.). This is no good and we really want to avoid this stuff in order to avoid inflammation.

    Inflammation is brought on by a number of things, mainly carbs and sugars but also trans fats and processed vegetable oils like canola and soy. As the science progresses we are learning more and more about inflammation and the damaging effects it can have and how it is the precursor to elevated cholesterol.

    So, once again be cognizant of the quality of foods that you are buying. Personally, I made this recipe using Chosen Foods brand, which used Avocado Oil and had a very short ingredient list. I have no affiliation with this product, but I just want to tip my cap because they are making foods the right way! Let’s get down to the ingredients…

    The Ingredients…

    • 1 head Cauliflower
    • 1 pound (precooked) Bacon
    • ½ large Red Pepper
    • 4 stalks Green Onion (Scallion)
    • ¼ cup Sour Cream
    • ¼ cup Mayonnaise
    • 1 tablespoon Mustard
    • 1 teaspoon Garlic Powder
    • 1 teaspoon Dill
    • 1 teaspoon Rosemary
    • 1 teaspoon Black Pepper
    • 1 teaspoon Salt
    • Garnish with a few sprinkes of Paprika
    FYI Yes, there is shredded cheese in this picture but I didn't end up using it but if you love cheese go for it! 

    FYI Yes, there is shredded cheese in this picture but I didn't end up using it but if you love cheese go for it! 


    The Steps…

    1. Roast your cauliflower. I used a dry pan on medium heat. You’re going to want to salt the cauliflower as this will help draw the water out. You can do this in the oven as well but the pan is quicker
    2. Cook you bacon and dice into bite sized pieces
    3. Dice red pepper and green onion
    4. Mix everything in a big bowl, garnish with paprikaand chill for at least an hour or two (this will allow the flavors to really come together and solidify)

    The Macros...

    cauliflower-fauxtato-salad
    cauliflower-fauxtato-salad

    Comment

    Avocado Salad with Simple Lemon Vinaigrette - Low Carb, Keto Approved

    Comment

    Avocado Salad with Simple Lemon Vinaigrette - Low Carb, Keto Approved

    Over the 4th of July weekend I had some guests staying with me. They were visiting from Germany and excited for the 4th of July celebration, so I wanted to make sure they got the full experience. We did a whole American Summer Cookout spread (Keto Style) and to be honest I never intended on making this salad as a “recipe” but when they told me it was the best salad they have ever had, well I knew I needed to share it with you guys!

    Call me crazy, but I love a good fresh salad. Vegetables really are such an important part of a healthy diet even if you are a fat adapted eater… it can’t be cheese and bacon for every meal (well maybe). That said I’m always making big salads, which I then load up with some good raw olive oil or some kind of dense fat source. This particular salad has a lot of avocado and olive oil so it is mostly fat calories already.

    One additional side note... Make extra, make a double batch! This stuff goes quick and I swear it tastes better the next day. The acidity in the lemon juice keeps the avocado from browning so that won’t be a concern, but it also breaks down the vegetables allowing them to really come together for a dynamite flavor! Let’s get down to business..

    The Ingredients...

    avocado-salad
    • 3 medium Avocado (or 2 large)
    • Bunch of Basil
    • Bunch of Parsley
    • 2 Vine Ripe Tomatoes
    • 1 Lemon
    • ½ cup of Olive Oil
    • ½ Red Pepper
    • 2-3 Celery Stalks
    • ½ Red Onion
    • 2-3 Persian Cucumbers (smaller than regular)
    • Garlic Powder
    • Oregano
    • Salt and Pepper

    The Steps...

    1. Dice your veggies, remove your stems and throw everything into a bowl
    2. The Dressing: I did a 2:1 olive oil to lemon juice ratio. 1 lemon yielded about ¼ cup so I used a half cup of olive oil. Add: Salt, Pepper, Oregano and Garlic Powder
    3. Mix thoroughly and you're good to go! I prefer to do this first when preparing a meal because I like to give the dressing time to soak into the vegetables and really enhance the flavor
    avocado-salad
    avocado-salad
    avocado-salad

    The Macros...

    avocado-salad
    avocado-salad

    Comment

    Simple Argentinian Chimichurri Sauce - Keto Friendly, Low Carb

    Comment

    Simple Argentinian Chimichurri Sauce - Keto Friendly, Low Carb

    In this picture I used the chimicurri sauce for a delicous lamb shank

    In this picture I used the chimicurri sauce for a delicous lamb shank

    Chimichurri Sauce is something I’ve started using a LOT lately, and I’ve noticed it’s increasing in popularity within the restaurants. Lucky for us it’s super simple to make…

    There are a number of ways to make and prepare this amazing sauce. Some recipes yield a bright red sauce, some call for a food processor while others call for a fine chop. This is an Argentinian based sauce and to prepare mine I used a food processor and it came out as a bright and vibrant green sauce. This is a completely raw and perfect for just about any sensible diet… notice I said sensible, so not the low fat diet... Get out of here with that.

    This is an olive oil and red wine vinegar based sauce. Both of which are very healthy for you. Olive oil, as we have known for a long time, is rich in healthy monounsaturated fats. Primarily Oleic Acid which is known to be anti-inflammatory and loaded with antioxidants. Raw olive oil is known to help combat many diseases from diabetes to cancer to Alzheimer's and Parkinson’s. (1-3)

    Red Wine Vinegar is no slouch either. There are many healthy properties associated with red wine vinegar one of the most notable is the ability to aid in weight loss. Red Wine Vinegar has high amounts of acetic acid, which reduces ghrelin, the hunger hormone. Reduced ghrelin will suppress appetite and tell your brain that you’re not hungry. Also, red wine vinegar contains anthocyanin, an antioxidant that has been shown to kill cancer cells and have anti-aging properties. (4)

    Now, here’s my issue with a lot of the recipes I’ve seen in cookbooks and websites they all tend to say something that, well frankly, just isn’t true:

    Chimichurri will lose it's color within a day or two therefore it goes bad in a few days.

    Wrong. In order to maintain that bright vibrant green color that chimichurri is commonly known it should be consumed within a day or two, but that doesn’t mean it’s bad afterward. This is a vinegar based sauce. Vinegar makes things last LONGER! Have you ever heard the old trick about berries? Give them a vinegar wash to kill bacteria so they last longer. Well… what do you think it does to the leaves in the sauce?? It makes them last longer! They won’t maintain color, but the flavor will actually mellow out and age really well. I have a jar in my fridge that’s about a week old and it still tastes amazing.

    On to the good stuff.

    The Ingredients…

    • 1 cup packed cilantro
    • 1 cup packed parsley
    • 1 cup Olive Oil
    • ⅓ cup Red Wine Vinegar
    • ½ a medium Lemon Juice squeezed
    • 2 teaspoons Oregano
    • 4 cloves Garlic
    • ¼ teaspoon Crushed Red Pepper (more if you like spicy)
    • ¼ teaspoon Cumin
    • ½ teaspoon Salt
    • ¼ teaspoon Pepper
    chimichurri-sauce-keto-low-carb

    The Steps…

    Ready for this? These completely raw sauces are tough ones…

    1. Add all of your ingredients except olive oil to the food processor and blend
    2. Add olive oil in slowly until desired

    This is all a matter of preference really.  That is the beautiful thing about cooking, it’s ultimately up to YOU. There are a billion chimichurri recipes on the internet, we’re not reinventing the wheel here. Personally I think the sauce has a much better look when the leaves are finely chopped and mixed with the red pepper flakes will make for a nice contrast of the green and red within the sauce. The processor is the lazy man’s way, but it saves time and I’m all about that

    If you don't have a processor:

    1. Chop your cilantro and parsley up to a fine pepper flake size

    2. Mix all ingredients into a bowl and thoroughly mix. Done!

    The Macros...

    chimichurri-sauce

    Comment

    Chicken Fajita Zucchini Boats - Low Carb, Keto Friendly

    Comment

    Chicken Fajita Zucchini Boats - Low Carb, Keto Friendly

    chicken-fajita-zucchini-boats

    A little while back I posted a very easy recipe for Philly Steak & Cheese Zucchini Boats and they seemed to be a big hit! FYI... my basis for that statement was that it got twice as many likes as I usually get on Instagram.  So, we’re bringing the boats back, but this time with chicken fajitas! This is a great recipe that you can make with very little time and effort.

    You can make it even easier by using a fajita seasoning packet, but READ THE INGREDIENTS. I stress this idea in just about every recipe post. But the fact is most seasoning packets, just like most foods that come from the big box food brands, are filled a lot of unnecessary/unhealthy crap, including sugar.  Not to beat a dead horse but anytime you are buying marinades, salad dressings, mixed seasonings, jarred sauces, etc. you really should be making sure it’s not a bunch of fillers and foods that you don’t want. Let’s take a look at one very common grocery store brands (cough Ortega cough) and the ingredients list:

    Ingredients: Maltodextrin, Salt, Spices, Modified Corn Starch, Sugar, Caramel Color, Dried Red Bell Peppers, Citric Acid, Garlic Powder, Autolyzed yeast Extract, Silicon Dioxide, Soybeans, Wheat, Smoke Flavor. Allergens: Soybeans, Wheat.
    *This comes directly from their website

    So, at the very top of the list we have Maltodextrin as the largest ingredient… that’s not a good sign. Soybean, Sugar, Silicon, Wheat, "Spices"...  we already know that these are no no's.

    But what is Maltodextrin? It’s a thickener/filler for many processed and packaged foods. It’s most commonly made from corn or other starchy vegetables. It also has some unfavorable side effects:

    1. Spikes Blood Sugar - this is the opposite of what you want on a ketogenic diet!!!
    2. Suppresses Probiotic Growth - probiotics are what keep your gut health active, which keeps inflammation down! The current science agrees that gut health may be the most important factor in most of the diseases of today
    3. May cause allergic reactions and negative side effects like gas, diarrhea, bloating, cramping and skin irritations - this is not good, unless you like gas and rashes

    Here at the Fatbody we’re not just about low carb and high fat foods, we’re about real foods. Despite all of the amazing benefits of ketosis you can still yield the same inflammatory issues by eating the wrong fats and ingredients.

    So, once again check your labels my friends :) ok now the good stuff...

    The Ingredients…

    • 1 pound Chicken (I used breast but thigh works just as well)
    • 2 large Zucchini
    • 1 cup Shredded Cheese
    • 1 Bell Pepper
    • ½ medium Onion
    • 2-3 tablespoons Olive Oil
    • 1 teaspoon of each Fajita Seasoning: Salt, Pepper, Chili Powder, Cumin, Paprika, Garlic Powder
    • Cilantro (optional)
    • Guacamole (optional)
    • Sour Cream (optional)
    chicken-fajita-zucchini-boats

    The Steps...

    1. Add Chicken and Seasoning to a bowl with some olive oil and marinate. Cut peppers and onions into strips and set to the side
    2. Hollow out your zucchini and sprinkle some salt on top. Let them rest in between a layer of paper towels and leave off to the side
    3. Heat your pan to a medium heat with a tablespoon of olive oil. Add peppers and onions with a light sprinkling of salt and pepper. Cook until they soften and the onions become lightly transparent. Remove from pan and set to the side
    4. Add remaining oil to pan and add chicken with all of the juices and marinade. Cook all the way through, lightly browned with no pink inside
    5. Add back your peppers and onions and drop the heat down to the lowest setting. Mix thoroughly and turn off the burner
    6. Pat down and dry your zucchini, removing most of the salt. Stuff them with fajita mix and top with cheese.
    7.  Bake for about 15 minutes on 400F, until cheese is gooey and melty! 
    8. Top with fatty ingredients of choice and enjoy! 

    Note: this meal is relatively low on fats for a keto eater, this is why I added avocado (guacamole) and sour cream to the ingredient list. Those two additions should up your fats significantly

    The Macros...

    chicken-fajita-zucchini-boats
    chicken-fajita-zucchini-boats

    Comment

    Sugar Free, Low Carb Berries & Cream - Red White and Blue Trifle (Keto, LCHF)

    1 Comment

    Sugar Free, Low Carb Berries & Cream - Red White and Blue Trifle (Keto, LCHF)

    keto-trifle

    For all of my American readers, the 4th of July is about many things... freedom, independence, burgers and hot dogs, that awesome speech from the movie Independence Day (shout out if you know what I'm talking about) and of course the Red, the White and the almighty Blue! And for as long as I can remember we've celebrated with tasty treats like red white and blue cookies and cakes and sweets on sweets on sweets... 

    Well it seems as though that sugary celebration has done a lot more harm than good. But, that's no worries. We can still have fun, we can still enjoy our tasty red, white and blue treats. We just need to change up the ingredients a bit, because that's what The Fatbody is all about... ditching the sugar without giving up the foods we love. 

    This one simple change in our diets could be dramatically beneficial to our overall health, but that's a battle for another day because we've got sugar free/grain free trifle to eat!

    This year I decided to do a whole 4th of July Cookout spread... KETOFIED! 

    The Hot Dogs in a bun... WITHOUT the Carbs! (PS they were grass fed all beef hot dogs)
    The Cheeseburgers in a bun... WITHOUT the Carbs!
    Fauxtato Salad (cauliflower)... WITHOUT the Carbs!
    BBQ Chicken... WITHOUT the Carbs!

    and of course we had the granddaddy dessert...

    The Berries & Cream Red, White and Blue Trifle... WITHOUT the Carbs, the Grains, the Flour, the Sugar. 

    I had some guests staying with me this week and while everyone loved the food I could tell... all eyes were on the trifle from the second I pulled it out of the fridge. It was just a mountain of red white and blue goodness. I probably could have done it in a nicer dish, but I'm a single guy in his 20s... I don't have a nicer dish. Woops

    So let's get down to the ingredient list... 

    The Pound Cake

    • 2 cups Almond Flour 
    • ½ cup Coconut Flour 
    • 1 cup Erythritol  
    • 6 whole Eggs 
    • ½ cup Heavy Whipping Cream 
    • ¼ cup Butter 
    • 2 teaspoon Vanilla Extract 
    • 1 teaspoon Baking Powder 
    • 1 teaspoon Salt 
    keto-pound-cake
    keto-pound-cake
    keto-pound-cake

    Cheesecake Filling 

    • 1 cup Heavy Cream 
    • 8 ounces Whipped Cream Cheese 
    • ½ cup Erythritol (Confectionery) 
    • 1 teaspoon Vanilla 
    Note: notice the stiffness of the "peaks" and how the cream sticks to the handmixer. This is because we have a thick consistency which is important! 

    Note: notice the stiffness of the "peaks" and how the cream sticks to the handmixer. This is because we have a thick consistency which is important! 

    Raspberry Lemon Glaze

    • 12 ounces Frozen Raspberries
    • ¼ cup Erythritol 
    • ½ medium Lemon Juice 
    keto-berry-trifle

    Remaining Ingredients

    • 8 medium Fresh Strawberries 
    • ½ cup Fresh Blue Berries 

    The Steps...

    1. The first step is to make the pound cake: 
      1. Preheat Oven to 350F 
      2. Mix all dry ingredients: Almond Flour, Coconut Flour, Erythritol, Baking Powder, Salt 
      3. Mix in the wet ingredients using a hand mixer (or a spoon):  Eggs, Heavy Whipping Cream, Butter, Vanilla Extract. 
      4. Mix the batter with a spoon or hand mixer until no clumps or dry flour are left in the bowl and pour into an oven safe dish. I used a 9x5 pan. 
      5. Bake for about 60-75 minutes.
      6. FULL DISCLOSURE NOTE: In the pictures below I messed up a bit... I took the cake out too early and it was still mushy in the middle. This is why the toothpick test is so essential! I forgot to do the toothpick test. So upon realizing the cake was still mushy in the middle I put it back in the oven for an additional 15-20 minutes, which was too long for the outside of the cake but necessary for the inside to get hot enough to cook. Moral of the story is to always check the center! The outside was a bit dark, not burnt or ruined, but not the golden brown that I would have liked. We'll get 'em next time! 
      7. Remove from the pan and allow it to cool to room temperature.  Cut into cubes 
    2. Next let's make the raspberry lemon filling! This is a sweet dish, so the sweet and sour of the raspberry lemon really cuts through the sweetness and provides an AWESOME variety of flavors as you're eating your way through a big old piece of this goodness
      1. In a sauce pan: add frozen raspberries, lemon juice and erythritol and let it simmer on medium-low (3 out of 10) for about 30-40 minutes. 
      2. I usually like to start this right after the cake goes in the oven and let it simmer on the lowest setting until everything else is ready. This will really help thicken up the sauce. 
    3. While the Cake is cooling let's make the the cream cheese filling! 
      1. In a large bowl we're going to make some sugar free whipped cream. Now this can be done by hand but it's far easier with a mixer. The particular mixer I have cost about 12 dollars on Amazon. 
      2. Add in 1/2 cup of powdered/confectioners erythritol and begin mixing. This will take about a minute with the mixer and about 5-6 by hand depending on your intensity. FYI you can also buy sugar free whipped cream, but it's always better to make your own!! 
      3. Once the Whipped Cream has stiff but fluffy peaks add in the whipped cream cheese and continue mixing until everything is thick and evenly mixed. We use whipped cream cheese because it helps for a very light texture that won't be too heavy on the stomach. 
    4. Now it's time to craft this beast! As previously stated they do make nice trifle dishes, but whatever I used a clear bowl and it still tasted great. This isn't the Food Network we don't need to be fancy, we just want it to taste good! 
      1. Prep Work: Dice the cake into squares (roughly a 1x1) cube and slice your strawberries into thin flat pieces (so they can rest against the side of the dish) 
      2. Start Stacking!
        1. Layer 1: Cake > Raspberry > ring of strawberries > cream cheese whip 
        2. Layer 2: Cake > Raspberry > ring of blueberries > cream cheese whip 
        3. Layer 3: Cake > Raspberry > ring of strawberries > cream cheese whip
        4. Layer 4: Design the top! In honor of the 4h of July I made an American Flag using 
    5. Let it chill! Once constructed you'll want to give it time to rest and set in place. At least an hour in the refrigerator is necessary, but 2-3 are optimal. 

    Building the Beast...

    The Macros...

    keto-trifle-macros2
    keto-trifle-macros

    Pound Cake Macros

    keto-pound-cake-macros
    keto-pound-cake-macros2

    1 Comment

    Keto Shepherd's Pie - Low Carb High Fat

    Comment

    Keto Shepherd's Pie - Low Carb High Fat

    keto-shepherds-pie

    This one is for my Grandmother… The kids called her Nanny, the adults called her Mum and I swear she was the most caring person I’ve ever met. She didn’t have an unkind bone in her body. She was born and raised in England (so you know her Shepherd’s Pie was legit) during the war my Grandfather, an American Soldier, was stationed in England. They met and she came back to America with him... 60 years later here I am writing blogs. During the summers when my parents were at work she’d watch my siblings and I and we loooooved Nanny’s Shepherd’s Pie. I ate a lot of potatoes back then. A few too many...

    But no more! We’re doing Shepherd’s Pie Low Carb Style! And plenty of fats to keep those keto macros up.

    You’re going to need an oven safe dish. Now, I always opt for my cast iron. It’s just the best pan ever and I can make this whole meal with just one pan, which is great for clean up. Otherwise you’ll need to use a pyrex or your oven safe dish of your choice.

    The combination of celery, onions and carrots is the saute base for so many recipes, it gives off such a great aroma and really adds a lot of flavor to the meat.

    The mashed faux-tatoes are absolutely delicious and I promise you won’t get that cauliflower vibe. We’re loading them up with enough cream and butter that you’ll forget what a potato is!

    Depending on how fancy you want to get you can either use ground beef or lamb. To be honest, I  intended on using ground beef but the store had grass fed ground lamb on sale for the same price, so I had to go with the lamb. I typically always opt for the grass fed if it’s in my power. Now, some people think that this is a waste of money, but it really isn’t and for many reasons!

    Grass Fed contains as much as 5x the amount of Omega-3s and 2x as much Conjugated Linoleic Acid (CLA), which is a fatty acid known to reduce body fat and boost your immune system.

    Omega-3 needs no introduction. This is the reason you take fish oil pills or omega 3 supplements but it’s all right there in the beef, the grass fed beef! Some of the Omega-3 benefits include(1):

    • Improved Eyesight
    • Improved Risk Factors for Heart Disease
    • Aid with Depression and Anxiety
    • Fights Autoimmune Disease
    • Reduces ADHD Symptoms in Children
    • Reduces Inflammation
    • Reduced Risk of Cancer

    I mean seriously, the list goes on. Grass fed meat is well worth the investment, because you’re doing just that… investing in your health.

    But anyway, let’s get cooking, shall we? 

    The Ingredients

    keto-shepherds-pie
    • 1 pound Ground Beef or Lamb
    • 1 medium Carrot
    • 2 Celery Stalks
    • ½ medium Onion
    • 6 cups Cauliflower Rice (2 Bag’s Trader Joe’s Frozen Organic)
    • 2 Egg Yolks
    • ¼ cup Heavy Cream
    • 3 tablespoons Butter
    • 2 tablespoon Olive Oil
    • ½ cup Parmesan Cheese
    • 1 small can Tomato Paste
    • ⅓ cup of Chicken Broth
    • 1 tablespoon Garlic
    • 1-2 tablespoons Worcestershire Sauce (depending on preference)
    • 1 Rosemary
    • Thyme
    • Salt and Pepper

    The Steps

    1. Prep work: carrots, onions and celery - dice it into small pieces. I like mine a little chunky, but some prefer it minced. Separate your eggs.

    2. Microwave your cauliflower for 7-10 minutes (if frozen) mixing at the 5 minute mark. They should be HOT when they come out. Make sure to strain them thoroughly because you want to sweat out all of the water. (A hot, dry pan works as well)

    3. While the cauliflower is in the microwave start you meat. On medium heat you want to get that olive oil nice and hot and then add your meat, mixing and mincing and stirring until it starts to brown.

    4. Once you’re mostly brown add your seasoning: thyme, rosemary, salt, pepper and garlic. Mix, mix, mix!

    5. Next, add in your veggie mix and keep stirring. Get that mix nice and evenly spread.

    6. Now add in your Worcestershire sauce, tomato paste and chicken broth. Mix this all up and turn down the heat we’re going to let this simmer a bit while we make the mashed pota… I mean cauliflower.

    7. You can use a hand mixer but I prefer the food processor… Add cauliflower, butter, egg yolks, heavy cream, ¼ cup of parmesan (save the other half) and some salt and pepper. Mash that bad boy up

    8. Ok, now that we have some nice creamy mashed cauliflower take a big scoop and mix it into the meat batter, this will help thicken up any residual liquid

    9. The remaining mash gets evenly coated on the top like you’re painting a masterpiece

    10. Sprinkle the remaining parmesan cheese and garnish with rosemary, thyme, salt and pepper.

    11. Broil for about 15-20 minutes on high. My broiler is kind of weak so at the 12 minute mark give it a little look.

    12. Serve and Enjoy :)

    The Macros

    keto-shepherds-pie-macros
    keto-shepherds-pie-macros2

    Sources

    1. http://advances.nutrition.org/content/3/1/1.full

    Comment

    Creamy Mushroom Pork Chops - Low Carb High Fat Keto

    Comment

    Creamy Mushroom Pork Chops - Low Carb High Fat Keto

    creamy-mushroom-pork-chops-cauliflower-rice

    Growing up my Dad did a good amount of the cooking for our family, which is probably why I took an interest in cooking at such a young age. He loves mushrooms… me too Dad, me too. One of his signature dishes was cream of mushroom pork chops with rice. I loved it, fast forward 15 years and we’ve redesigned that recipe to be keto friendly. See, one thing I’ve noticed from similar recipes is that they often call for a can of cream of mushroom soup.

    But what’s in those cream of mushroom soups?

    Well, let’s take a look at the ingredient list from Campbell's Cream of Mushroom:

    INGREDIENTS: WATER, MUSHROOMS, VEGETABLE OIL (CORN, COTTONSEED, CANOLA, AND/OR SOYBEAN), MODIFIED FOOD STARCH, WHEAT FLOUR, CONTAINS LESS THAN 2% OF: SALT, MONOSODIUM GLUTAMATE, SOY PROTEIN CONCENTRATE, DEHYDRATED CREAM (CREAM [MILK], SOY LECITHIN), YEAST EXTRACT, FLAVORING, DEHYDRATED GARLIC.

    Vegetable oil? Modified Food Starch? Wheat Flour? Soy Protein? Flavoring? Wtf is flavoring? Yeaaaaaa, I’ll pass. Thanks anyway can of soup, but we’ll take it from here.

    Corn, Cottonseed, canola and soybean oil are all cheap, damaged and toxic oils that lead to oxidation and free radicals. Those are bad news. Free radicals are basically atoms that are missing an electron, making them reactive and causing a chain reaction of oxidation, inflammation and autoimmune conditions. (1)

    You can avoid all of this with a little heavy cream, olive oil and broth, which is exactly what we’re about to do! Let’s get to it…

    The Ingredients…

    • 1 pound Pork Chops
    • ¼ cup Olive Oil
    • 4 ounces Mushroom
    • ¼ cup Shallot*
    • 1 cup Heavy Cream
    • ½ cup Chicken Broth
    • 2 tablespoon Butter
    • ½ teaspoon Salt
    • ½ Teaspoon Black Pepper
    • ½ Teaspoon Thyme (not necessary but great flavor)
    • Fresh Parsley to Garnish

    *Shallots are basically a onion/garlic hybrid. If you don’t have a shallot I’d use 2 ounces of onion and a tablespoon of garlic

    Cauliflower Rice Ingredients…

    • 3 cups Riced Cauliflower
    • 1 tablespoon Butter
    • Salt and Pepper to taste

    The Steps....

    1. In a large pan, add half of the olive oil on medium heat.

    2. Sear pork chops, season with salt and pepper and cook for about 7-8 minutes on each side (depending on thickness). Remove from pan and let them rest.

    3. Add remaining olive oil, shallots and mushrooms. Cook for 2 minutes just until they begin to brown.  

    4. Add in heavy cream, chicken broth, 1 tbsp butter, salt, pepper, thyme. Reduce to a low heat and allow to simmer until broth cooks down and you are left with a creamy consistency. Allow about 15 minutes for this, stirring every couple of minutes. If you are getting any burning on the pan, lower your heat! This is just a simmer, so you’re going to want to have some bubbling but minimal, too much bubbling will lead to burning.

    5. Slice Pork chops into strips of desired size and add them to the pan.

    6. Stir thoroughly mixing everything up and garnish with parsley. Remove pan from heat.

    7. Serve over cauliflower rice and enjoy!

    Cauliflower Rice…

    This is a pretty basic “rice” recipe.

    1. I usually buy the frozen Organic Riced Cauliflower from Trader Joe’s. Microwave the bag (3 cups) for about 7-8 minutes. This will help evaporate much of the water so you don’t have soggy cauliflower.

    2. Add 1 tbsp butter, salt and pepper and mix.

    3. Boom. Done.

    Take a big heaping scoop of cauliflower rice and smother it with deliciousness. Garnish with (more) parsley, I like parsley, and enjoy!

    The Macros…

    creamy-mushroom-porkchops-low-carb-high-fat
    creamy-mushroom-porkchops-low-carb-high-fat2

    Comment

    Chicken Pesto Eggplant Roll Ups - Low Carb High Fat, Keto

    Comment

    Chicken Pesto Eggplant Roll Ups - Low Carb High Fat, Keto

    Nothing quite compares to the flavor of a freshly made pesto sauce. The robust flavor of the basil, the sweet buttery texture of the pine nuts and a good rich olive oil. It all comes together in a flavor bomb for your mouth, plus the time commitment is so minimal for what it can do to your meal prepping!  I’ll make a pint of pesto and keep it in my fridge to use throughout the week. This is a good healthy boost of fats when made at home, but you have to watch out for the grocery store brands. More of often than not when you look at that tiny ingredient section on the back of the label the first ingredient is usually soybean oil or canola oil, which makes sense because it’s cheaper to manufacture but not so great for your health.

    These oils are high in polyunsaturated fats which are very unstable and are more susceptible to oxidation. Oxidation makes the oils rancid and loaded with free radicals, which is the first step down a path of poor health. Oxidation is more likely to happen when these oils are exposed to heat and light.

    Canola oil for example is made from an industrial seed called the rapeseed (seriously, who came up with that name?). This seed has been used for years as a cheap and easy to manufacture industrial oil. So, a team of scientists got together and performed some extremely high heat processing to alter the oil into a liquid, edible oil.

    Wait didn’t we just say high heat to polyunsaturated fat makes it damaged and oxidized?

    Yup. Totally rancid and damaging right out of the gate. Bottom line is that oil based sauces, marinades and dressings are almost ALWAYS cut with these damaged oils because they are cheap. So steer clear my friends! 

    These Chicken Pesto Eggplant Roll Ups are loaded with healthy oils from the pesto, vitamins and minerals from the eggplant and spinach and the free range chicken thighs supply a healthy dose of proteins and Omega-3s like DHA and EPA which are great for good gut health.

    Real foods are always the best way to balanced nutrition and well rounded meals like this are exactly how to do it!

    So, let’s get down to business…

    The Ingredients…

    chicken pesto eggplant roll ups
    • 1 Medium Eggplant
    • 1 pound of chicken thighs
    • 2 tablespoon olive oil
    • 2 cups Spinach
    • ½ cup of pesto sauce (Click link for authentic pesto recipe!) 
    • 4 ounces of mozzarella cheese
    • ¼ cup Parmesan Cheese
    • Garnish with Fresh Basil
    • Salt and Pepper to taste

    **I will admit that cutting the eggplant into thin slices wasn’t exactly easy. One eggplant yielded about 10 roll ups, mainly because I messed so many of the damn slices up! Lot of excess eggplant left over, but that will come with practice, and you can use it for other things like sauteed with zucchini, red pepper and cauliflower!, yum yum!

    Here is a quick cutting techqine video that shows exactly how the eggplant should be cut:  

    The Steps…

    1. Cut eggplant into thin slices, roughly about ⅛ of an inch. This was the most difficult part for me. Cutting thin, even slices was not my strong suit. 
    2. Let the eggplant rest, salt each piece and lay them out on an oven sheet or cutting board, on top of some paper towels and cover with paper towels as well. Let them rest for a good 20-30 minutes. These are thin slices so they’ll dry out much faster, but we don’t want soggy eggplant so be sure to give them the time they need.
    3. Preheat oven to 400F
    4. Heat 1 tablespoon of olive oil in a pan on medium heat. Cook chicken for about 5-6 minutes on each side. Seasoning lightly with salt and pepper (about ½ of a teaspoon each). Remove and let rest for about 10 minutes. Reduce pan to low heat
    5. Next, while the chicken is resting grill your eggplants. I used a grated skillet, which gives the eggplant slices the cool looking grill marks, but a regular frying pan works just as well. You’re going to want to do this on a dry pan at medium heat. Cook them very lightly , so they brown a little bit, but don’t lose their stability. About 2 minutes each side and not the same pan as the chicken, we’re still using that.
    6. Dice chicken into cube size pieces
    7. On low heat, add the spinach to the original pan and mix as much of the oil and chicken drippings as possible. Add the pesto sauce (saving a little bit to drizzle over the top) and mix. Let the spinach reduce for about a minute and then add back the chicken. And mix until the pesto is evenly distributed and the spinach is reduced to your liking. About 1-2 minutes.
    8. Remove everything from pan and put into a bowl.
    9. Lay out your grilled eggplants. On the wider end add a piece of mozzarella, a scoop of the chicken mix and sprinkle the top with parmesan cheese.
    10. Roll eggplants up starting at the wide end. You should have enough mix for at least 8-10 roll ups.
    11. In an oven safe pan, coat the pan with remaining olive oil and lay the eggplants down with the end of the roll down (this will keep them from opening) or use a toothpick if necessary.
    12. Top the rolls with the remaining pesto sauce giving them a thin coat.
    13. And Finally top the rolls with the remaining mozzarella and parmesan. Garnish with fresh basil.
    14. Bake for about 15-20 minutes. Remember, you are really just looking to melt and brown that mozzarella a bit. So check it at 15 minutes and if you see the mozzarella starting to crisp up, you’re good! .
    15. Serve and enjoy.

    This goes very well with the simple pesto zoodles. My go-to recipe for zoodles is: roast some tomatoes in a pan, add the pesto sauce and then mix in the zoodles at the end. You don’t really want to “cook” the zoodles because they will soften up and get mushy.  

    chicken pesto eggplant roll ups

    The Macros...

    chicken pesto eggplant roll up macros
    chicken pesto eggplant roll up serving macros

    Comment

    Fatbody MCT Bread- LCHF & Keto with boosted MCTs!!

    2 Comments

    Fatbody MCT Bread- LCHF & Keto with boosted MCTs!!

    mct bread 8

    Ok, can I just start by saying that I am PSYCHED for this recipe. I have been playing around with a few variations and yesterday I made this batch, so I cooked up a cheeseburger with fried onions and an egg. Oh man, it was full on cheeseburger glory. The bread was moist and soft and it soaked up all the burger juices just like a "real" bun, but first a quick keto lesson…

    What’s an MCT?

    In short, a medium-chain triglyceride (MCT) is a unique fat molecule that gets it’s name from the amount of carbon atoms in the chain. What makes the medium-chain’s unique is that unlike their long and short chain friends, they are able to cross the blood brain barrier and will be absorbed directly through your intestines and blood, this means the energy gets to your brain FASTER, which gives you an immediate surge of brain power, focus and that euphoric energy MCT oil is typically known for. MCTs strains are commonly found in coconuts, which is generally the source of a (good) MCT oil. 

    This is why MCT Oil and coconut oil are often referred to as brain fuel…

    The strain of MCT plays an important role too, but that’s a topic for another day. MCT supplements usually comes in two forms: oil and powdered. Well, after a bit of experimenting I’ve discovered that the MCT Powder makes a pretty great super ingredient for these rolls… that’s right sandwiches are back on the table and now they’re brain fuel.

    keto cheeseburger low carb high fat bun with mct

    It’s Memorial Day Weekend and I just had a delicious all American Cheeseburger on a healthy bun. A bun that didn’t taste like egg, it didn’t taste like a dried out rock… it actually tasted like a roll. I’m so excited to start eating burgers NOT wrapped in lettuce again. This made my weekend!

    Overall I’d say this was pretty easy to make. You mix all the dry ingredients with a spoon, then the wet ingredients and then you bake. I am still pretty new to the baking world, but if these rolls were any indication I’d say I’m getting the hang of it. In regards to the ingredients, like I’ve mentioned before, doing as much recipe experimenting as I do I’ve cultivated a pretty wide variety of foods and pantry items, so I had pretty much everything available. But, these ingredients are the new flour, sugar, corn starch, etc. If you plan on doing a lot of high fat low carb recipes, I would highly consider investing in some of these ingredients.

    A few ingredient notes:

    • Baking Powder (not in recipe) is made from combining cream of tartar and baking soda, so if you don’t have either you can just use baking powder (google proper ratios)
    • Psyllium Husk Powder, don’t use whole husks, if you do grind them. Psyllium Husk is a fiber that acts as a binding agent. I’ve seem some recipes say mix it with the wet ingredients but I prefer to mix it THOROUGHLY with the dry ingredients because you want it as evenly distributed as possible.
    • Everything Seasoning is obviously optional but it’s awesome.
    • Using egg whites as opposed to the whole egg will help the bread to rise and give it less of an eggy flavor. Use the extra egg yokes to make Hollindaise Sauce that you can put on top of eggs benedict with this bread… wowzers.
    • MCT Powder, is brand of choice. I am going to test the limits and see how much I can add without losing any flavor, updates to come

    The Ingredients…

    mct bread ingredients
    • 2 cups Almond Flour
    • ⅔ cup Coconut Flour
    • ½ cup Psyllium Husk Powder
    • ¼ cup MCT Powder
    • 6 Egg Whites
    • 2 Eggs
    • 2 teaspoon Cream of Tartar
    • 2 tablespoon Butter
    • 1 teaspoon Baking Soda
    • 2 tablespoon Everything Bagel Seasoning
    • 1 teaspoon Salt
    • 2 teaspoon Garlic Powder
    • 1 ½ cups boiling water

    The Steps…

    mct bread dry ingredients mixed
    mct bread dry ingredients
    mct bread pre cooked recipe
    1. Preheat oven to 375F / boil water
    2. In a large mixing bowl add: almond flour, coconut flour, psyllium husk, mct powder, cream of tartar, baking soda, salt, garlic powder. Mix thoroughly! This is important, the psyllium husk will create little jellyish clumps if you don’t mix it well.
    3. Add eggs and egg whites and mix. Use a hand mixer if possible.
    4. Add boiling water and continue mixing. Keep mixing until you have a consistent, somewhat sticky, doughy texture. HOT TIP: Keep your hands WET. This will make rolling the dough much easier.
    5. Roll into evenly sized balls. The ones pictured were about 100g/3.5oz per cooked weight and a good burger bun size.
    6. Melt butter and brush each roll with melted butter and then sprinkle on Everything Seasoning, or seasoning of choice 
    7. Bake the rolls for about 45-50 minutes.
    8. Let them cool off and enjoy!
    fatbody mct bread

    The Macros...

    mct bread macros
    mct bread macros per serving


    2 Comments

    1 Net Carb Breakfast Cups - LCHF & Meal Prep Friendly!

    Comment

    1 Net Carb Breakfast Cups - LCHF & Meal Prep Friendly!


    Up until last week I worked from home most days, which was nice because I never really had to meal prep. Meal prepping saves a lot of time, but when you don’t have to commute across Los Angeles you have more free time than most. Unfortunately, that all changed. New client, new rules. All of a sudden your boy has to wear a suit and sit in traffic just like everyone else. I’m assuming you guys aren’t feeling any sympathy for me so I’ll move on...

    Point is, now I DO have to commute and that means I need to save time when I can, especially in the morning! If you find yourself rushing out the door with your keys in your mouth and your shoes half on, well you might want to consider these breakfast cups.

    They are pretty easy to make, taste great reheated and they are VERY easy to store and transport. Plus, it’s a full balanced breakfast with good healthy fats and only 1 net carb per cup!

    Eggs are one of nature's healthiest foods. They are high in vitamins, minerals and essential fats and proteins. Plus you’ve got cauliflower, mushroom and spinach which provide tons of nutrients. And of course bacon, oh sweet, sweet bacon.

    The Ingredients…

    • 1 ½ cup of Cauliflower
    • 6 Whole Eggs
    • 6 Slices of Bacon (cooked)
    • 2  cups Spinach (loosely packed)
    • 1 cup Crimini Mushroom
    • 2 tablespoons of Butter
    • Salt and Pepper to taste

    *for creamier eggs and added fat - add a tablespoon of heavy cream to the eggs

    The Steps…

    1. Cook your bacon following the standard cooking instructions. Be sure took bacon lightly, as you will need to wrap it around the base of the cup. I'd suggest cooking in the oven for two reasons: First, you're already using the oven. Second, the bacon will cook evenly and you're less likely to over crisp it, making you unable to wrap the slice around the cup  
    2. Preheat oven to 375F
    3. Prepare your cauliflower hash
      1. Microwave 1.5 cups of cauliflower rice (half of a Trader Joes frozen bag) to dryt out the water
      2. In a pan on medium heat add 1 tablespoon of butter, cauliflower, garlic, salt and pepper to taste
      3. Cook for about 10-12 minutes. Until the cauliflower begins to brown and crisp up. Remove from pan when finished.
    4. Prepare your Egg Cups
      1. In a muffin pan, use a light amount of butter or oil to grease the pan.
      2. Wrap bacon slice around the inside edges of the cup.
      3. Next, divide the cauliflower hash into each cup packing it down tightly and making a solid and even base at the bottom of the cup.
      4. In a separate bowl mix eggs, spinach salt and pepper. Note for extra fat and creaminess add a tablespoon of heavy cream
      5. Top the cup with mushroom, salt and pepper and any other seasonings of choice.
      6. Bake for about 20 minutes until center is no longer runny.

    The Macros... 

    Comment

    Sugar Free Low Carb Cheesecake - Keto Diet Game Changer

    6 Comments

    Sugar Free Low Carb Cheesecake - Keto Diet Game Changer

    You know, I was never really a big cheesecake guy… until I learned how to make it. Now, it’s pretty much my favorite.  Greg was more the cheesecake guy and he’s been dying to do a keto cheesecake forever, suffice it to say he was not disappointed.

    In fact, we’ve been talking to Rocco from Rocco’s Cheesecake  in Santa Monica about low carb sugar free cheesecake varieties and he was very much intrigued.

    We brought a slice in for Rocco to try and he gave it the thumbs up! So, if you’re in the Los Angeles area make your way over to Rocco’s and just maybe he will have a keto friendly cheesecake ready to go! Otherwise definitely swing by and grab a slice for your cheat meal. We do pretty much every week.  

    In regards to keto-fication of foods this was a pretty simple one. Using confectionary erythritol instead of sugar was not much different from a standard cheesecake recipe.  I would suggest using the confectionary over the granulated unless you want the granularity in your cheesecake, FYI nobody wants that! The crust was mainly almond flour rather than standard carb based crust and that’s pretty much it. It’s primarily cream cheese.

    This required a spring form, which you can get at most home goods stores or amazon of course!

    The Crust Ingredients…

    • 2 cups Almond Flour
    • 1 teaspoon Vanilla Extract
    • 3 tablespoons Erythritol (for crust)
    • 6 tablespoons butter

    The Filling Ingredients…

    • 32 oz. of Cream Cheese (4 blocks)
    • 1 ¼ cup Confectionary Erythritol
    • 3 Eggs
    • 1 tablespoon Lemon Juice
    • 1 teaspoon Vanilla Extract

    The Topping…

    • 2 cups Blackberries
    • 2 tablespoons Lemon Juice
    • 1 cup of water
    • ½ cup Granulated Erythritol

    The Steps…

    1. Preheat oven to 350F
    2. Making the Crust. In a large bowl mix together almond flour, melted butter, erythritol and vanilla extract until well combined. The dough will be a bit on the crumbly side.
    3. In a greased pan (use butter) press the dough into the bottom of the prepared pan.
    4. Bake for 10-12 minutes and then allow at least 10 minutes to cool.
    5. While the crust is baking, we’re going to make the filling!
    6. Beat the cream cheese and powdered erythritol until it’s rich and fluffy.
    7. Next, beat in the eggs one at a time. *
    8. Finally, beat in the vanilla extract and lemon juice
    9. Bake for about 50 minutes, at 350 until the center is almost set and jiggly. It will still be a bit “liquid” in the center because the cream cheese is melty. So, if you poke it, it will definitely not be dry coming out.
    10. Cool in the spring form pan until room temperature.
    11. Refrigerate until completely chilled and set. Give it at minimum 4 hours, preferably overnight.  
    IMG_7631 (1).JPG

    Making the Topping…

    You can pretty much sub this recipe with any combination of berries. Raspberry or blueberry would be equally as tasty.

    1. In a pan mix all ingredients cook on low heat, covered.
    2. Mash the berries and mix everything together. Uncovering to mix every few minutes.
    3. Allow the water to evaporate leaving you with a rich and thick blackberry glaze.
    4. The slower you do this the better. You want to evaporate most of the water but you don’t want to boil it on a high high heat because this will burn the berries taking away from the natural flavor

    Once done, top the cheesecake and enjoy!

    *You want to let the eggs emulsify with the fats and adding them all at once prevents the eggs from doing that. This is why with most wet ingredients you want to mix in gradually.

    The Macros...

    These are pretty big slices FYI...

    6 Comments

    Low Carb Eggplant Parm Stacks

    3 Comments

    Low Carb Eggplant Parm Stacks

    I haven't done cooking with eggplant but boy oh boy were these tasty. If you've seen my Mary's Meatballs post then you know the backstory. Mary was my "work mom" at my first job out of college and she is one hell of a cook.

    We were accountants and we worked long, long hours. Mary, being the team player that she is, would bring in trays of her (should be) World Famous Eggplant Parm. Our team would devour it in minutes. She was MY work mom because I usually got my own mini tray... again this is why I got fat after college. 

    So here we are years later, I hopped on the phone with Mary and we started talking keto variations. PS she is totatlly on the LCHF train as well. She told me exactly what to do with the eggplant so that it comes out as perfectly as hers. We brainstormed over how to bread it and what to stack it with. She wanted ricotta, which admittedly would have been good, but I'm just not a fan, so sorry ricotta fans! 

    The Ingredients...

    • 1 Eggplant
    • 2 cups Marinara Sauce
    • Fresh Mozzarella (2 balls, the big ones)
    • 1 cup Parmesan Cheese 
    • 1/2 cup Almond Flour
    • 2 Eggs
    • 1 tablespoon Heavy Cream
    • 2 tablespoon Olive Oil
    • 4 ounces of Italian Sausage 
    • 2 ounces Crumbled Pork Rinds 
    • 1 teaspoon Oregano
    • 1 teaspoon Basil
    • 1 teaspoon Garlic Powder
    • Salt and Pepper to taste
    • Fresh Basil for garnish
     

    The Steps...

    1. Prepare your eggplant. You're going to want to give this step a solid hour. Eggplant retain a lot of water, so you need to give plenty of time to "sweat" out the water. Slice the eggplant into half inch slices. 1 eggplant should yield yield about 12 usable slices (3 per stack x 4 stacks). Lay the eggplant out with paper towels underneath, salt liberally, and cover with more paper towels. Let them sit for an hour. 
    2. Prepare your batter.
      1. In one bowl: Almond Flour, Pork Rinds, half of the Parmesan cheese, oregano, basil, garlic powder, salt and pepper
      2. In another bowl: 2 eggs and heavy cream
    3. Once you've patted your eggplant dry they should be good and dried out. Dip them in the egg mix,  followed by the breading batter
    4. Bake in oven or fry in pan with olive oil. I prefer the frying method. I think they came out crispier. 
      1. If baking, 400F for about 15-20 minutes 
      2. If frying, on medium heat cook each side for about 3 minutes or until desired. 
    5. Once you have baked/fried your eggplant now let's get to stacking! 
      1. In an oven safe dish lay a bit of olive oil and marina sauce down to coast the pan. 
      2. Stack your eggplant: eggplant>sauce>mozzarella>sausage crumbles>parmesan>Repeat!
      3. For the final layer smother with sauce and more cheese 
      4. Garnish with fresh basil
    6. Bake for about 15 minutes at 400F or until cheese begins to brown
    7. Serve and enjoy! 

    The Macros...

    3 Comments

    Ultimate Cauliflower Pizza Crust

    Comment

    Ultimate Cauliflower Pizza Crust

    In the battle of fathead vs cauliflower crust the cauliflower has by far the least amount of calories:

    Calories Per Slice:

    • Cauliflower Crust  66
    • Fathead Crust       144

    While I have to admit I do prefer the fathead style, at less than half of the calories, the cauliflower crust is a great alternative when calorie restricting. 

    Seriously though... I could not live without pizza. It's just a fact at this point. Some people have chocolate, I have pizza. I love it. And the discovery of keto friendly pizza crust was a game changer. More importantly it is incredibly easy to make. 

    Ingredients...

    • 2 cups cauliflower (Trader Joe's Organic Riced Cauliflower ⅔  of bag)
    • 1 cup mozzarella cheese
    • 2 teaspoon parmesan cheese
    • 1 egg
    • ½ teaspoon oregano
    • ½ teaspoon garlic powder
    • ½ teaspoon salt

    Pizza toppings...

    • ⅓ cup of pizza sauce
    • 2 cups Mozzarella Cheese
    • Garnish with Basil
    • Parmesan cheese
    20170326_183453.jpg

    Cooking instructions...

    1. Preheat oven at 425°

    2. Microwave cauliflower for 7 minutes on high. (I use the Trader Joe's frozen organic cauliflower rice, It's ⅔ of the bag), mix half way through.

    3. Blend in food processor so it's almost like mashed potatoes.

    4. Mix all dry ingredients evenly: Mozzarella, Parmesan and all seasonings.

    5. Add cauliflower and mix, followed by egg and mix thoroughly. Use a hand mixer if available.

    6. Place the ball of dough on a sheet of parchment paper with another sheet over it. Roll out the dough to preferred size. Note: this dough doesn't need to be super thin to work well.

    7. Once rolled out shape the dough and flip up the edges a bit to mold a crust.

    8. Slide parchment and dough onto baking sheet and let cook for 12-15 minutes.

    9. Once it's done let it cool and add your topping.

    Dressing the Pizza...

    1. Spread ⅓ cup of pizza sauce evenly leaving a little bit of room around the edges.

    2. Spread 2 cups mozzarella cheese over the pizza sauce

    3. fresh sliced basil and Parmesan garnished on top

    4. put back in oven for 7-10 depending on preference

    5. Cut into 8 even slices

    The Macros...


    Comment

    Low Carb High Fat Tortillas

    Comment

    Low Carb High Fat Tortillas

    One of the absolute hardest parts about being on a keto diet in Los Angeles is that tacos are everywhere. Tortillas as far as the eye can see, well I won’t stand for it, not any longer…

    I have been testing a few different recipe variations this one is my favorite so far! This recipe was a mix mash of a bunch of different ingredients, but it came together as a great tasting tortilla with a good texture and consistency. The cook fast and store easily.

    I used them for tacos, and they were awesome. Then I used them for quesadillas and they were awesomer!!

    I used a few extra tools, they aren’t required, but they definitely make the job easier:

    • Food Processor. Or a blender or something, you are going to want to make sure these ingredients are WELL mixed.

    • Parchment Paper is key. These are very sticky before you cook them, so the parchment paper mitigates that problem. I ran out halfway through on one batch, and let's just say I won’t make that mistake again

    • Rolling Pin is another tool quickly becoming a kitchen favorite. I put parchment paper underneath and on top of a ball of tortilla dough and let the rolling pin do the rest. It helps to make them evenly flat, which I seem to have trouble doing by hand.

    • A Big Turner. I had to google what this was actually called… it’s the egg flipper, spatula thing. You know the one cooking tool college guys own, that and a frying pan.

    • Multiple Pans. I was making a lot of these and doing them one at a time in the pan can take a while, so I had 3 pans running at once. This saved a lot of time.

      • You can probably do these in the oven too, but I have yet to try that method.


    Let’s start with the ingredients…

    • 1/4 cup flaxseed meal (process if you have whole seeds)
    • 1/2 cup coconut flour
    • 1/2 cup almond flour
    • 1/2 cup hot water
    • 2 eggs
    • 1/2 cup olive oil
    • 1/4 cup psyllium husk
    • 1 teaspoon baking powder
    • 1 teaspoon salt
    • 1 teaspoon cumin
    • 1/2 teaspoon garlic powder
    • 1/2 teaspoon chili powder

    Cooking Instructions... 

    1. Start with the flaxseeds. I have whole seeds, so I wanted to grind them up in the food processor first.

    2. Next add all of your dry ingredients: coconut flour, almond flour, psyllium husk, baking powder, salt, cumin, garlic powder, chili powder

    3. Process or blend up so the dry ingredients are evenly mixed. Psyllium husk is a great source of fiber, but it is also very sticky the second it gets wet. If you do not have the psyllium evenly mixed it will create jelly like clumps. I made this mistake the  first time I made them. It was a little weird.

    4. Next add the wet ingredients: Start with an egg and half of the water and then blend. Next add the oil and then blend. Finally add the other egg and the rest of the water and blend until it is a nice doughy consistency.*

    5. With a food scale or best guess, split the dough into 8 balls to make your 8 tortillas.

    6. On a cutting board or a flat surface lay down some parchment paper with a sheet below and above the ball of dough. Use a rolling pin to flatten the ball and shape the tortilla. Get it as round as you can, some people use a pan cover… I just make ugly tortillas. Woops

    7. On a medium heat put the flattened tortilla on a frying pan. It’s going to be oily enough that you do not need to grease the pan.

    8. Flip after about 5 minutes, if it feels like it’s burning it probably is… adjust your heat or take it off the pan. These can go from golden brown to burnt really quickly, so be careful!

    9. Once each side has browned load it up with some taco fillings and enjoy!

    10. Put tortilla on the pan and add cheese, meat, seasoning, veggies and whatever other quesadilla fixings float your boat. Top it with some more cheese and put another tortilla on top. Or fold over depending on how big or small you decide to make them. Let the cheese melt, flip, repeat, enjoy, take a nap.**

    *This can be done in any order. The point is to add the wet ingredients in batches. It helps make sure all the dry ingredients get an equal amount of moisture, which makes for a good consistent flavor.

    **Just kidding you'll prob want to go for a run because you won’t experience the energy crash that carbs give you**

    The Macros...

    Comment

    The Ultimate Fathead Pizza Crust

    Comment

    The Ultimate Fathead Pizza Crust

    In the battle of fathead vs cauliflower crust I have to give it to fathead. The cauliflower is without a doubt healthier but if you are going for pure taste. Fathead every time.  It was pretty simple to make. Here are how the slices breakdown by calorie:

    Calories Per Slice:

    Cauliflower Crust  64
    Fathead Crust       144
    I always treat myself to one meal on Sundays when I can have whatever I want. Usually it’s pizza
    — Beyonce

    Ditto Beyonce,,, so ditto. 

    Prep Time: 10 Minutes | Cook Time: 12-15

    Cooking instructions...

    1. Preheat oven at 425°
    2. In a microwave safe bowl mix mozzarella cheese and almond flower and microwave for a minute, add cream cheese and microwave for 30 more seconds

    3. Mix thoroughly. A hand mixer makes this task much easier. 

    4.  Add the egg and all spices. Mix thoroughly.... and again hand mixer is pretty clutch. 

    5. Place the ball of dough on a sheet of parchment paper with another sheet over it. Roll out the dough to preferred size. Note: this dough doesn't need to be super thin to work well.

    6. Once rolled out shape the dough and flip up the edges a bit to mold a crust.

    7. Slide parchment and dough onto baking sheet and let cook for 12-15 minutes.

    8. Once it's done let it cool and add your topping.

    Dressing the Pizza...

    1. Spread ⅓ cup of pizza sauce evenly leaving a little bit of room around the edges.

    2. Spread 2 cups mozzarella cheese over the pizza sauce

    3. fresh sliced basil and Parmesan garnished on top

    4. put back in oven for 7-10 depending on preference

    5. Cut into 8 even slices

    Ingredients...

    • 1½ cup mozzarella cheese
    • 1 tablespoon cream cheese
    • 1 egg
    • ⅔ cup of almond flower
    • ½ teaspoon oregano
    • ½ teaspoon garlic powder
    • ½ teaspoon salt

    Pizza Toppings..

    • ⅓ cup of pizza sauce
    • 2 cups Mozzarella Cheese
    • Garnish with Basil
    • Parmesan cheese

    Kitchen Supplies I use...

    • Rolling Pin (optional)
    • Parchment Paper
    • Baking Sheet
    • Spatula
    • Mixing Bowl
    • Hand Mixer


    The Macros...

    Comment

    One Pan Keto Meal Prep: Cheesy Chicken Bacon Bake

    Comment

    One Pan Keto Meal Prep: Cheesy Chicken Bacon Bake

    As some of you may know my cooking style is a bit mad scientist-ish. I like to pull all my produce, meats and cheeses out of the fridge and stare at them until something hits me square in the face. Let me tell you boys and girls I got hit hard in the face today… This came out perfect and so tasty, hell it was even the perfect amount for my meal prepping macros! 

    I took two portions with mozzarella and basil and baked for about 10 minutes. 

    I took two portions with mozzarella and basil and baked for about 10 minutes. 

    This recipe has a hefty mix of vegetables, protein and healthy animal fats perfect for a ketogenic diet. You can sub in and out the vegetables of your choice, for example on another occasion I used mushrooms and tomatoes, it was quite tasty! 

    Trader Joe's really has my back with this recipe too! The frozen organic riced cauliflower is delicious and convenient, they seem to sell out of the stuff a lot, so when I start getting low on supply I make sure to stock up with 7 or 8 bags and stack it up in my freezer. The asparagus comes courtesy of TJ's as well and is also from the frozen section. I generally stick to fresh vegetables, but the convenience and longevity of the frozen version is pretty hard to pass up. 

    The spinach I used was fresh, but TJ's has a pretty good frozen brand. I personally just think the frozen spinach is too soggy. Spinach is also extremely light so it's hard to tell what 5 oz. of spinach actually looks like. Here is a comparison next to my regular sized coffee mug... 

    5 oz of spinach

    5 oz of spinach

    If you don't have a Trader Joe's or a source of riced cauliflower you can easily make your own with a grater. Two bags of the frozen stuff is about the equivalent of one medium head of cauliflower. 

    The first step of this recipe is to microwave the cauliflower. If you don't have/use a microwave you can do this in a pan as well. The point of this step is to get rid of the moisture, which can ruin a lot of recipes if you are not careful. Like most vegetables cauliflower has a lot of water and will sweat out of it once it's heated. So be sure to do this before adding the cauliflower in with all the other ingredients. 

    I divided it into 6 servings. Each serving with about 640 calories and only 5 net carbs (without the topped mozzarella bake) But the best part is, is that it's a one pan dish so clean up is a breeze! 

    I divided it into 6 servings. Each serving with about 640 calories and only 5 net carbs (without the topped mozzarella bake) But the best part is, is that it's a one pan dish so clean up is a breeze! 

    Ingredients 

    • 2 pounds Chicken Breast
    • 12 ounces Bacon
    • 1 cup Parmesan Cheese
    • 3 tablespoons Butter
    • 6 cups Cauliflower
    • 12 ounces Asparagus
    • 5 ounces Spinach
    • 1 tablespoon Garlic
    • Salt/Pepper to taste
    • Fresh Basil for garnish 
    • Mozzarella Cheese

    Cooking instructions

    1. Rice your cauliflower. Microwave for 4 minutes, stir, and microwave for 4 more minutes. 

    2. Mix a tablespoon of butter into the cauliflower. 

    3. Using an extra-large pan (oven safe if you want this to truly be one pan) cook the bacon on a medium heat (6 out of 10). Remove and set to the side. 

    4. Season chicken with salt and pepper to taste and add to to pan, still cooking at a medium heat and using the bacon drippings as a cooking fat. Cook until no visible pink and then remove. Set the chicken aside with the bacon. 

    5. Add garlic, asparagus, spinach and the 2 remaining tablespoons of butter. Let the spinach cook down for about 2 minutes constantly stirring and mixing. You really want to evenly distribute the fats and juices!

    6. Reduce pan heat down to a medium-low (3 out of 10) 

    7. Dice chicken and bacon into desired size. This should be done roughly 10 minutes after cooking the chicken as you want to give the chicken time to rest (it's still cooking a bit in the middle).

    8. Add chicken, bacon, butter and garlic. Stir until evenly mixed. 

    9. Add the cauliflower rice and and parmesan cheese and continue stirring until evenly mixed. 

    10. Stir until evenly mixed and serve.

    Now here’s where you can go one of two ways:

     
    cheesy chicken bacon casserole4.jpg

    The Meal Prep route - This makes 6 perfect dinner portions, or 3 lunch and 3 dinner. It’s your world! 

    The Cheesy Bake route - In the picture above I took two servings and dumped them into an oven safe dish. Then, I broiled for about 10 minutes, until the cheese was lightly browned. I used about ¼ cup per serving. 

    *Remember that the broiler is HIGH heat from the top of the oven, so the higher up you put the dish the faster it will cook, and the broiler will cook the top of the bake fast. 10 minutes is all you need, maybe less depending on how strong your oven is, so watch closely! 

    The Macros...

    Comment